Heroes in Another Dimension - Dimension III: Difference between revisions
m (Text replacement - "{{Navbox-SA}}" to "{{Navbox-KSA}}") |
|||
| (23 intermediate revisions by 11 users not shown) | |||
| Line 1: | Line 1: | ||
{{Infobox-KSAStage | {{Infobox-KSAStage | ||
|title=Dimension III | |title=Dimension III | ||
|image=[[File:Dimension III 2.jpg|350px]] | |image=[[File:KSA Heroes Dimension III 2.jpg|350px]] | ||
|caption=Kirby carefully uses [[Geokinesis]] to guide his friend in '''Dimension III'''. | |caption=Kirby carefully uses [[Geokinesis]] to guide his friend in '''Dimension III'''. | ||
|level=[[Heroes in Another Dimension]] | |level=[[Heroes in Another Dimension]] | ||
| Line 10: | Line 9: | ||
|boss=[[Parallel Meta Knight]] | |boss=[[Parallel Meta Knight]] | ||
|midboss=[[Bonkers]] | |midboss=[[Bonkers]] | ||
|theme music=[[File:The Legend of Last World General Sample KSA.mp3]] | |||
|theme title="[[The Legend of Last World]]" | |||
|description=Clip of the music that plays in '''Dimension III''' | |||
|previousstage=[[Heroes in Another Dimension - Dimension II|Dimension II]] | |previousstage=[[Heroes in Another Dimension - Dimension II|Dimension II]] | ||
|nextstage=[[Heroes in Another Dimension - Dimension IV|Dimension IV]] | |nextstage=[[Heroes in Another Dimension - Dimension IV|Dimension IV]] | ||
| Line 32: | Line 34: | ||
*[[Wing]] | *[[Wing]] | ||
There are a total of 3 [[ | There are a total of 3 [[Dream Rod]]s that can be found in this dimension, with two during the [[Friend Circle]] section, and one in the boss prep room. | ||
==Friend Heart Guide== | ==Friend Heart Guide== | ||
| Line 50: | Line 52: | ||
===[[Dark Meta Knight]] Room=== | ===[[Dark Meta Knight]] Room=== | ||
*Two hanging bombs lay overhead, which need to be cut and detonated to reveal a [[Key]] and a path to its corresponding [[Gate]], yielding a heart. | *Two hanging bombs lay overhead, which need to be cut and detonated to reveal a [[Key]] and a path to its corresponding [[Gate]], yielding a heart. | ||
*Along a narrow path, a small chamber below can be accessed with a separate chamber containing a [[Burning Leo]] and a [[switch]]. Dark Meta Knight will need to use | *Along a narrow path, a small chamber below can be accessed with a separate chamber containing a [[Burning Leo]] and a [[switch]]. Dark Meta Knight will need to use Mirror Spin Slash on Burning Leo's fireball projectile to reflect it and hit the switch, opening a [[Door|doorway]] to a side area. In this area, Dark Meta Knight will need to hand a [[Key]] to a [[Key Dee]], and then retrieve it again to unlock a gate and get a heart. | ||
*Five more hanging bombs appear along a pathway. All but the middle one should be cut and detonated to make a path for the key to be taken to the [[door]] and obtain '''two''' hearts. | *Five more hanging bombs appear along a pathway. All but the middle one should be cut and detonated to make a path for the key to be taken to the [[door]] and obtain '''two''' hearts. It is still possible to bring the key to the other side if all bombs are cut but this is tricky to pull off. | ||
===[[Daroach]] Room 1=== | ===[[Daroach]] Room 1=== | ||
*A puzzle appears near the start involving the use of [[Curling]] and summoning [[Doc]] to aim for the correct [[ | *A puzzle appears near the start involving the use of [[Curling]] and summoning [[Doc]] to aim for the correct [[stake]]. Hitting the stake with the [[Gordo]] is not advisable until after the heart is collected. | ||
*A heart appears above a [[String Platform]] with a small passage leading there, which [[Spinni]] can fit inside. Daroach should be careful not to be standing directly under the platform when it is cut. | *A heart appears above a [[String Platform]] with a small passage leading there, which [[Spinni]] can fit inside. Daroach should be careful not to be standing directly under the platform when it is cut. | ||
*This complex puzzle involves a water pipe and two sets of bundled dynamite. Daroach will need to light the fuse on the far side and douse the lower one so the left-most dynamite is not detonated. This will yield '''three''' hearts. | *This complex puzzle involves a water pipe and two sets of bundled dynamite. Daroach will need to light the fuse on the far side and douse the lower one so the left-most dynamite is not detonated. This will yield '''three''' hearts. | ||
| Line 62: | Line 64: | ||
===[[Cleaning]] Rooms=== | ===[[Cleaning]] Rooms=== | ||
*The remaining hearts are all scattered throughout the two interconnected rooms which can be traversed using the [[Friend Circle]]. | *The remaining hearts are all scattered throughout the two interconnected rooms which can be traversed using the [[Friend Circle]], going back and forth between the two rooms on two separate trips. In the first room, Kirby and friends can collect all the hearts easily by just taking the upper paths going out, and then taking the lower ones coming back. Some tight jumping is needed to get all the hearts in the second room. | ||
==Enemies & Mid-Bosses== | ==Enemies & Mid-Bosses== | ||
| Line 72: | Line 74: | ||
{{col-begin}} | {{col-begin}} | ||
{{col-break|width=50%}} | {{col-break|width=50%}} | ||
*[[Big Kabu]] | |||
*[[Bio Spark]] | *[[Bio Spark]] | ||
*[[Bouncy]] | *[[Bouncy]] | ||
| Line 79: | Line 82: | ||
*[[Cappy]] | *[[Cappy]] | ||
*[[Como]] | *[[Como]] | ||
*[[Gim]] | *[[Gim]] | ||
*[[Gordo]] | *[[Gordo]] | ||
| Line 98: | Line 100: | ||
{{col-end}} | {{col-end}} | ||
|} | |} | ||
==Trivia== | |||
*The end of Daroach's second room contains the [[Strawberry Shortcake]] from ''[[Kirby: Squeak Squad]]'' as a [[food]] item. | |||
==Gallery== | ==Gallery== | ||
<gallery> | <gallery> | ||
Dimension III 1.jpg|Kirby traverses the first platforms. | KSA Heroes Dimension III 1.jpg|Kirby traverses the first platforms. | ||
Dimension III 3.jpg|Adeleine observes the whale. | KSA Heroes Dimension III 3.jpg|Adeleine observes the whale. | ||
Dimension III 4.jpg|Dark Meta Knight reflects. | KSA Heroes Dimension III 4.jpg|Dark Meta Knight reflects. | ||
Dimension III 5.jpg|Daroach handles a tricky defusing. | KSA Heroes Dimension III 5.jpg|Daroach handles a tricky defusing. | ||
Dimension III 6.jpg|Daroach's squad is ambushed. | KSA Heroes Dimension III 6.jpg|Daroach's squad is ambushed. | ||
Dimension III 7.jpg|Perilous [[Friend Circle]] action. | KSA Heroes Dimension III 7.jpg|Perilous [[Friend Circle]] action. | ||
Dimension III 8.jpg|Parallel Meta Knight is defeated. | KSA Heroes Dimension III 8.jpg|Parallel Meta Knight is defeated. | ||
KSA-map-8-AD3.jpg|Dimension III map | |||
</gallery> | </gallery> | ||
==Video walkthrough== | |||
{{Youtube|cnvbt9PgRiE|300|100% walkthrough of Dimension III.}} | |||
{{clear}} | |||
==Names in other languages== | ==Names in other languages== | ||
{{Names | {{Names | ||
|de=Dimension III | |ja=ディメンションIII | ||
|deM=Dimension III | |jaR=Dimenshon III | ||
|jaM=Dimension III | |||
|frE=Dimension III | |||
|frEM=- | |||
|de=Dimension III | |||
|deM=- | |||
|nl=Dimensie III | |||
|nlM=Dimension III | |||
|zhTrad=空間III | |||
|zhTradR=kōng jiān III | |||
|zhSimp=空间III | |||
|zhSimpR=kōng jiān III | |||
|zhM=Dimension III | |||
|es=Dimensión III | |||
|esM=Dimension III | |||
}} | }} | ||
| Line 120: | Line 145: | ||
{{Navbox-KSA}} | {{Navbox-KSA}} | ||
[[Category:Stages in Heroes in Another Dimension]] | [[Category:Stages in Heroes in Another Dimension]] | ||
Latest revision as of 18:03, 24 March 2024
| ||||||||||||||
| ||||||||||||||
| ||||||||||||||
|
| ||||||||||||||

Dimension III is the third of four primary stages in Heroes in Another Dimension. It is unlocked once Dimension I is completed, and completing this dimension is necessary to unlock the Final Dimension. As with the others, there are 30 Friend Hearts to collect in this stage. The boss of this dimension is Parallel Meta Knight.
Overview[edit]
The dimension takes place in 8 primary rooms, not counting the boss and boss prep chambers. The Hero Doors grant the following Copy Abilities/Dream Friends in the following order:
In the boss prep room, the following Copy Essences can be found:
There are a total of 3 Dream Rods that can be found in this dimension, with two during the Friend Circle section, and one in the boss prep room.
Friend Heart Guide[edit]
The following are in order of appearance:
Starting Room[edit]
- The first heart is out in the open, and must be obtained in order to progress.
ESP Room[edit]
- A heart can be found behind a small puzzle which requires the use of Geokinesis to solve.
- A second Geokinesis puzzle appears up ahead, which presents a crushing hazard to be avoided during it. This yields two hearts.
Adeleine & Ribbon Rooms[edit]
- A diamond shape is formed of blocks in the first area. In the next room, Adeleine will need to match the shape by shaving off a few blocks in order for the way to this heart to be clear.
- A heart shape is found in the next area. From there, Adeleine needs to recreate that shape in the following room by chipping away the right blocks, including putting out some fire blocks with her paintbrush. This yields two hearts if done correctly.
- A block formation in the shape of a whale can be found up ahead. To recreate this shape in the following room, Adeleine will need to be careful not to chip too much off the 'tail'. From there, a Wire needs to be electrified to make the spout appear, which can be done using the Kracko form of Ado's Painter. This yields three hearts if done right.
Dark Meta Knight Room[edit]
- Two hanging bombs lay overhead, which need to be cut and detonated to reveal a Key and a path to its corresponding Gate, yielding a heart.
- Along a narrow path, a small chamber below can be accessed with a separate chamber containing a Burning Leo and a switch. Dark Meta Knight will need to use Mirror Spin Slash on Burning Leo's fireball projectile to reflect it and hit the switch, opening a doorway to a side area. In this area, Dark Meta Knight will need to hand a Key to a Key Dee, and then retrieve it again to unlock a gate and get a heart.
- Five more hanging bombs appear along a pathway. All but the middle one should be cut and detonated to make a path for the key to be taken to the door and obtain two hearts. It is still possible to bring the key to the other side if all bombs are cut but this is tricky to pull off.
Daroach Room 1[edit]
- A puzzle appears near the start involving the use of Curling and summoning Doc to aim for the correct stake. Hitting the stake with the Gordo is not advisable until after the heart is collected.
- A heart appears above a String Platform with a small passage leading there, which Spinni can fit inside. Daroach should be careful not to be standing directly under the platform when it is cut.
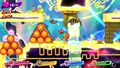
- This complex puzzle involves a water pipe and two sets of bundled dynamite. Daroach will need to light the fuse on the far side and douse the lower one so the left-most dynamite is not detonated. This will yield three hearts.
Daroach Room 2[edit]
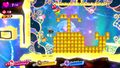
- During the ambush, two Key Dees appear with keys who will need to be intercepted. Once the battle with Bonkers is over, these keys can be used to unlock two gates holding two hearts.
Cleaning Rooms[edit]
- The remaining hearts are all scattered throughout the two interconnected rooms which can be traversed using the Friend Circle, going back and forth between the two rooms on two separate trips. In the first room, Kirby and friends can collect all the hearts easily by just taking the upper paths going out, and then taking the lower ones coming back. Some tight jumping is needed to get all the hearts in the second room.
Enemies & Mid-Bosses[edit]
| Regular Enemies | Mid-Bosses | |||
|---|---|---|---|---|
|
|
|
Trivia[edit]
- The end of Daroach's second room contains the Strawberry Shortcake from Kirby: Squeak Squad as a food item.
Gallery[edit]
Kirby traverses the first platforms.
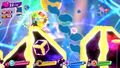
Adeleine observes the whale.
Dark Meta Knight reflects.
Daroach handles a tricky defusing.
Daroach's squad is ambushed.
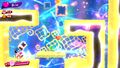
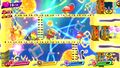
Perilous Friend Circle action.
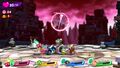
Parallel Meta Knight is defeated.
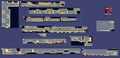
Dimension III map


Video walkthrough[edit]
100% walkthrough of Dimension III.
|
Names in other languages[edit]
| Language | Name | Meaning |
|---|---|---|
| Japanese | ディメンションIII Dimenshon III |
Dimension III |
| Traditional Chinese | 空間III kōng jiān III |
Dimension III |
| Simplified Chinese | 空间III kōng jiān III | |
| Dutch | Dimensie III | Dimension III |
| European French | Dimension III | - |
| German | Dimension III | - |
| Spanish | Dimensión III | Dimension III |