Old Tower: Difference between revisions
m (→Gallery) |
m (→Names in other languages: Minor fix.) |
||
| (45 intermediate revisions by 12 users not shown) | |||
| Line 1: | Line 1: | ||
{{Infobox-Super Star Stage | {{Infobox-Super Star Stage | ||
| image = [[File:Old Tower. | | image = [[File:Old Tower.png|250px]] | ||
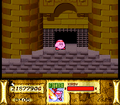
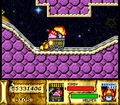
| caption = Kirby entering the base of the '''Old Tower''' in | | caption = Kirby entering the base of the '''Old Tower''' in ''[[Kirby Super Star Ultra]]''. | ||
| main_game = [[The Great Cave Offensive]] | | main_game = [[The Great Cave Offensive]] | ||
| boss = [[Chameleo Arm]] | | boss = [[Chameleo Arm]] | ||
| Line 10: | Line 9: | ||
| next = [[Garden]] | | next = [[Garden]] | ||
|theme music=[[File:KSS Sub-Tree Area.mp3]] | |theme music=[[File:KSS Sub-Tree Area.mp3]] | ||
|theme title=[[Sub-Tree Area]] | |theme title="[[Sub-Tree Area]]" | ||
|description=Clip of the theme that plays in '''Old Tower''', from '' | |description=Clip of the theme that plays in '''Old Tower''', from ''Kirby Super Star'' | ||
}} | }} | ||
'''Old Tower''' is the third area in [[The Great Cave Offensive]] which [[Kirby]] explores. The entire stage takes place within the eponymous 'old tower', and can actually be skipped if Kirby sees no reason to go in there, though he would be forfeiting the 16 [[Treasure]]s that lay within. The [[Boss]] of the area is [[Chameleo Arm]]. | '''Old Tower''' is the third area in [[The Great Cave Offensive]] which [[Kirby]] explores. The entire stage takes place within the eponymous 'old tower', and can actually be skipped if Kirby sees no reason to go in there, though he would be forfeiting the 16 [[Treasure]]s that lay within. The [[Boss]] of the area is [[Chameleo Arm]]. | ||
| Line 62: | Line 61: | ||
|- | |- | ||
| {{center|[[File:KSS Old Tower treasure 1.png|100px]]<br>'''Star Tiara'''}} | | {{center|[[File:KSS Old Tower treasure 1.png|100px]]<br>'''Star Tiara'''}} | ||
|[[File: | |[[File:KSS Star Tiara Treasure Sprite.png]] [[File:KSSU Star Tiara Treasure Sprite.png]] | ||
| 408,200 G | | 408,200 G | ||
| This treasure can be found in a side chamber from the first room up above accessible by a [[Spring]]. The chest is guarded by two [[Gordo]]s inside a case of [[Star Block]]s. | | This treasure can be found in a side chamber from the first room up above accessible by a [[Spring]]. The chest is guarded by two [[Gordo]]s inside a case of [[Star Block]]s. | ||
|- | |- | ||
| {{center|[[File:KSS Old Tower treasure 2.png|100px]]<br>'''Turtle Shell ('' | | {{center|[[File:KSS Old Tower treasure 2.png|100px]]<br>'''Turtle Shell (''Kirby Super Star'')'''}} | ||
| rowspan=2|[[File: | | rowspan=2|[[File:KSS Turtle Shell Treasure Sprite.png]] [[File:KSSU Koopa Shell Treasure Sprite.png]] | ||
| rowspan=2|800 G | | rowspan=2|800 G | ||
| rowspan=2|This treasure is dropped to the floor after Jukid is defeated in the lower area of the tower. | | rowspan=2|This treasure is dropped to the floor after Jukid is defeated in the lower area of the tower. | ||
| Line 73: | Line 72: | ||
| '''Koopa Shell (''Kirby Super Star Ultra'')''' | | '''Koopa Shell (''Kirby Super Star Ultra'')''' | ||
|- | |- | ||
| {{center|[[File:KSS Old Tower treasure 3.png|100px]]<br>'''Sword ('' | | {{center|[[File:KSS Old Tower treasure 3.png|100px]]<br>'''Sword (''Kirby Super Star'')'''}} | ||
| rowspan=2|[[File: | | rowspan=2|[[File:KSS Sword Treasure Sprite.png]] [[File:KSSU Falchion Treasure Sprite.png]] | ||
| rowspan=2|325,000 G | | rowspan=2|325,000 G | ||
| rowspan=2|This treasure can be found in a room adjacent to the pool with the [[Fuse Cannon]] in the lower area of the tower. Using the cannon allows Kirby to get inside. | | rowspan=2|This treasure can be found in a room adjacent to the pool with the [[Fuse Cannon]] in the lower area of the tower. Using the cannon allows Kirby to get inside. | ||
| Line 81: | Line 80: | ||
|- | |- | ||
| {{center|[[File:KSS Old Tower treasure 4.png|100px]]<br>'''Warrior Shield'''}} | | {{center|[[File:KSS Old Tower treasure 4.png|100px]]<br>'''Warrior Shield'''}} | ||
|[[File: | |[[File:KSS Warrior Shield Treasure Sprite.png]] [[File:KSSU Warrior Shield Treasure Sprite.png]] | ||
| 50,000 G | | 50,000 G | ||
| This treasure can be found under the water in the middle of the path in the lower area of the tower. | | This treasure can be found under the water in the middle of the path in the lower area of the tower. | ||
|- | |- | ||
| {{center|[[File:KSS Old Tower treasure 5.png|100px]]<br>'''Unicorn's Horn'''}} | | {{center|[[File:KSS Old Tower treasure 5.png|100px]]<br>'''Unicorn's Horn'''}} | ||
|[[File: | |[[File:KSS Unicorn Horn Treasure Sprite.png]] [[File:KSSU Unicorn Horn Treasure Sprite.png]] | ||
| 80,300 G | | 80,300 G | ||
| This treasure can be found in a passage under the floor in the third room, guarded by a series of [[Shotzo]]s. | | This treasure can be found in a passage under the floor in the third room, guarded by a series of [[Shotzo]]s. | ||
|- | |- | ||
| {{center|[[File:KSS Old Tower treasure 6.png|100px]]<br>'''Autumntime ('' | | {{center|[[File:KSS Old Tower treasure 6.png|100px]]<br>'''Autumntime (''Kirby Super Star'')'''}} | ||
| rowspan=2|[[File:Autumntime.png]] [[File: | | rowspan=2|[[File:KSS Autumntime Treasure Sprite.png]] [[File:KSSU Three-Star Cane Treasure Sprite.png]] | ||
| 250,000 G | | 250,000 G | ||
| rowspan=2|This treasure can be accessed after defeating [[Bonkers]] in the fourth room. | | rowspan=2|This treasure can be accessed after defeating [[Bonkers]] in the fourth room. | ||
| Line 98: | Line 97: | ||
| 222,000 G | | 222,000 G | ||
|- | |- | ||
| {{center|[[File:KSS Old Tower treasure 7.png|100px]]<br>'''Rice Bowl ('' | | {{center|[[File:KSS Old Tower treasure 7.png|100px]]<br>'''Rice Bowl (''Kirby Super Star'')'''}} | ||
| rowspan=2|[[File: | | rowspan=2|[[File:KSS Rice Bowl Treasure Sprite.png]] [[File:KSSU Broken Bowl Treasure Sprite.png]] | ||
| rowspan=2|50 G | | rowspan=2|50 G | ||
| rowspan=2|This treasure can be found on the floor on the left end of the hall past the room with the Meta-Knights. Kirby will need an ability that can reach through the floor to open up the way on the right end, then pass the [[Spike]]s using a [[Launcher]]. | | rowspan=2|This treasure can be found on the floor on the left end of the hall past the room with the Meta-Knights. Kirby will need an ability that can reach through the floor to open up the way on the right end, then pass the [[Spike]]s using a [[Launcher]]. | ||
| Line 106: | Line 105: | ||
|- | |- | ||
| {{center|[[File:KSS Old Tower treasure 8.png|100px]]<br>'''Tut's Mask'''}} | | {{center|[[File:KSS Old Tower treasure 8.png|100px]]<br>'''Tut's Mask'''}} | ||
|[[File: | |[[File:KSS Tut Mask Treasure Sprite.png]] [[File:KSSU Tut Mask Treasure Sprite.png]] | ||
| 160,000 G | | 160,000 G | ||
| This treasure can be found in the upper chamber accessible from outside the tower, under the floor by breaking the [[Bomb Block]]. The room is filled with danger, so Kirby should watch his step. | | This treasure can be found in the upper chamber accessible from outside the tower, under the floor by breaking the [[Bomb Block]]. The room is filled with danger, so Kirby should watch his step. | ||
|- | |- | ||
| {{center|[[File:KSS Old Tower treasure 9.png|100px]]<br>'''Mr. Saturn'''}} | | {{center|[[File:KSS Old Tower treasure 9.png|100px]]<br>'''Mr. Saturn'''}} | ||
|[[File: | |[[File:KSS Mr Saturn Treasure Sprite.png]] [[File:KSSU Mr Saturn Treasure Sprite.png]] | ||
| 120,000 G | | 120,000 G | ||
| This treasure can be found in a side chamber on the right near the bottom of the rising platform area. It is at the end of a long hallway filled with [[Sleep]] [[Copy Essence]]s and a strong wind current pushing Kirby back toward the entrance. | | This treasure can be found in a side chamber on the right near the bottom of the rising platform area. It is at the end of a long hallway filled with [[Sleep]] [[Copy Essence]]s and a strong wind current pushing Kirby back toward the entrance. | ||
|- | |- | ||
| {{center|[[File:KSS Old Tower treasure 10.png|100px]]<br>''' | | {{center|[[File:KSS Old Tower treasure 10.png|100px]]<br>'''Armor'''}} | ||
|[[File: | |[[File:KSS Armor Treasure Sprite.png]] [[File:KSSU Armor Treasure Sprite.png]] | ||
| 212,000 G | | 212,000 G | ||
| This treasure can be found up the main rising platform area pathway, in a small alcove to the left. | | This treasure can be found up the main rising platform area pathway, in a small alcove to the left. | ||
|- | |- | ||
| {{center|[[File:KSS Old Tower treasure 11.png|100px]]<br>'''Treasure Box'''}} | | {{center|[[File:KSS Old Tower treasure 11.png|100px]]<br>'''Treasure Box'''}} | ||
|[[File: | |[[File:KSS Treasure Box Treasure Sprite.png]] [[File:KSSU Treasure Box Treasure Sprite.png]] | ||
| 100,000 G | | 100,000 G | ||
| This treasure can be found in a side chamber accessible from the middle of the rising platform area chute. It can be found at the top of a starry path which Kirby can reach using springs, but he should be mindful of the electric mines that also occupy the area. | | This treasure can be found in a side chamber accessible from the middle of the rising platform area chute. It can be found at the top of a starry path which Kirby can reach using springs, but he should be mindful of the electric mines that also occupy the area. | ||
|- | |- | ||
| {{center|[[File:KSS Old Tower treasure 12.png|100px]]<br>'''Mannequin'''}} | | {{center|[[File:KSS Old Tower treasure 12.png|100px]]<br>'''Mannequin'''}} | ||
|[[File: | |[[File:KSS Mannequin Treasure Sprite.png]] [[File:KSSU Mannequin Treasure Sprite.png]] | ||
| 3,000 G | | 3,000 G | ||
| This treasure can be found in a side chamber to the top left. Kirby will have to be quick to get it, as the screen is scrolling quickly to the right away from the chest itself, and Kirby will have to leave the room and come back, or be [[Crusher|crushed]] if he misses it. | | This treasure can be found in a side chamber to the top left. Kirby will have to be quick to get it, as the screen is scrolling quickly to the right away from the chest itself, and Kirby will have to leave the room and come back, or be [[Crusher|crushed]] if he misses it. | ||
|- | |- | ||
| {{center|[[File:KSS Old Tower treasure 13.png|100px]]<br>'''Gold Crown'''}} | | {{center|[[File:KSS Old Tower treasure 13.png|100px]]<br>'''Gold Crown'''}} | ||
|[[File: | |[[File:KSS Gold Crown Treasure Sprite.png]] [[File:KSSU Gold Crown Treasure Sprite.png]] | ||
| 528,000 G | | 528,000 G | ||
| This treasure can be found in a pool with a current pushing upward in the upper portion of the tower. To reach it, the [[Stone]] ability is needed. | | This treasure can be found in a pool with a current pushing upward in the upper portion of the tower. To reach it, the [[Stone]] ability is needed. | ||
|- | |- | ||
| {{center|[[File:KSS Old Tower treasure 14.png|100px]]<br>'''King's Cape'''}} | | {{center|[[File:KSS Old Tower treasure 14.png|100px]]<br>'''King's Cape'''}} | ||
|[[File: | |[[File:KSS King Cape Treasure Sprite.png]] [[File:KSSU King Cape Treasure Sprite.png]] | ||
| 508,000 G | | 508,000 G | ||
| This treasure can be obtained by using the door to the upper left or upper right, reaching the top chamber, and then entering the door under the [[String Platform]] and [[ | | This treasure can be obtained by using the door to the upper left or upper right, reaching the top chamber, and then entering the door under the [[String Platform]] and [[Stake]]. Two different abilities are needed to get in here, so a division of labor may help. The chest can be found in the room within, though there are a lot of enemies guarding it. | ||
|- | |- | ||
| {{center|[[File:KSS Old Tower treasure 15.png|100px]]<br>'''Model Ship'''}} | | {{center|[[File:KSS Old Tower treasure 15.png|100px]]<br>'''Model Ship'''}} | ||
|[[File: | |[[File:KSS Model Ship Treasure Sprite.png]] [[File:KSSU Model Ship Treasure Sprite.png]] | ||
| 800,000 G | | 800,000 G | ||
| This treasure can be found in the upper-left chamber in the uppermost room. To reach it, Kirby has to go through a door behind a gate, which opens temporarily when a switch is pressed at the bottom of the chamber. | | This treasure can be found in the upper-left chamber in the uppermost room. To reach it, Kirby has to go through a door behind a gate, which opens temporarily when a switch is pressed at the bottom of the chamber. | ||
|- | |- | ||
| {{center|[[File:KSS Old Tower treasure 16.png|100px]]<br>'''Sun Ring'''}} | | {{center|[[File:KSS Old Tower treasure 16.png|100px]]<br>'''Sun Ring'''}} | ||
|[[File: | |[[File:KSS Sun Ring Treasure Sprite.png]] [[File:KSSU Sun Ring Treasure Sprite.png]] | ||
| 800,000 G | | 800,000 G | ||
| This treasure can be found in the upper-right chamber in the uppermost area. The door to the chest is hidden in the dark, but it can be found if the candles are illuminated. | | This treasure can be found in the upper-right chamber in the uppermost area. The door to the chest is hidden in the dark, but it can be found if the candles are illuminated. | ||
| Line 166: | Line 165: | ||
!Copy Ability | !Copy Ability | ||
|- | |- | ||
|align=center|[[File:KSS Bio Spark.png]] [[File: | |align=center|[[File:KSS Bio Spark.png]] [[File:KSSU Bio Spark Sprite.png]] | ||
|[[Bio Spark]] | |[[Bio Spark]] | ||
|style="border-style: solid; border-width: 1px 3px 1px 1px"|[[Ninja]] | |style="border-style: solid; border-width: 1px 3px 1px 1px"|[[Ninja]] | ||
|align=center|[[File:KSS Gim.png]] [[File: | |align=center|[[File:KSS Gim.png]] [[File:KSSU Gim Sprite.png]] | ||
|[[Gim]] | |[[Gim]] | ||
|style="border-style: solid; border-width: 1px 3px 1px 1px"|[[Yo-Yo]] | |style="border-style: solid; border-width: 1px 3px 1px 1px"|[[Yo-Yo]] | ||
|align=center|[[File:KSS Scarfy sprite.png]] [[File: | |align=center|[[File:KSS Scarfy sprite.png]] [[File:KSSU Scarfy Sprite.png]] | ||
|[[Scarfy]] | |[[Scarfy]] | ||
|[[Crash]] (when scanned with [[Copy]]) | |[[Crash]] (when scanned with [[Copy]]) | ||
|- | |- | ||
|align=center|[[File:KSS Bounder.png]] [[File: | |align=center|[[File:KSS Bounder.png]] [[File:KSSU Gip Sprite.png]] | ||
|[[Bounder]]/[[Gip]] | |[[Bounder]]/[[Gip]] | ||
|style="border-style: solid; border-width: 1px 3px 1px 1px"|None | |style="border-style: solid; border-width: 1px 3px 1px 1px"|None | ||
|align=center|[[File:KSS Gordo.png]] [[File: | |align=center|[[File:KSS Gordo.png]] [[File:KSSU Gordo Sprite.png]] | ||
|[[Gordo]] | |[[Gordo]] | ||
|style="border-style: solid; border-width: 1px 3px 1px 1px"|N/A | |style="border-style: solid; border-width: 1px 3px 1px 1px"|N/A | ||
|align=center|[[File:KSS Shotzo.png]] [[File: | |align=center|[[File:KSS Shotzo.png]] [[File:KSSU Shotzo Sprite.png]] | ||
|[[Shotzo]] | |[[Shotzo]] | ||
|N/A | |N/A | ||
|- | |- | ||
|align=center|[[File:KSS Broom Hatter.png]] [[File: | |align=center|[[File:KSS Broom Hatter.png]] [[File:KSSU Broom Hatter Sprite.png]] | ||
|[[Broom Hatter]] | |[[Broom Hatter]] | ||
|style="border-style: solid; border-width: 1px 3px 1px 1px"|None | |style="border-style: solid; border-width: 1px 3px 1px 1px"|None | ||
|align=center|[[File:KSS Grizzo.png]] [[File: | |align=center|[[File:KSS Grizzo.png]] [[File:KSSU Grizzo Sprite.png]] | ||
|[[Grizzo]] | |[[Grizzo]] | ||
|style="border-style: solid; border-width: 1px 3px 1px 1px"|None | |style="border-style: solid; border-width: 1px 3px 1px 1px"|None | ||
|align=center|[[File:KSS Simirror.png]] [[File: | |align=center|[[File:KSS Simirror.png]] [[File:KSSU Simirror Sprite.png]] | ||
|[[Simirror]] | |[[Simirror]] | ||
|[[Mirror]] | |[[Mirror]] | ||
|- | |- | ||
|align=center|[[File:KSS Bronto Burt.png]] [[File: | |align=center|[[File:KSS Bronto Burt.png]] [[File:KSSU Bronto Burt Sprite.png]] | ||
|[[Bronto Burt]] | |[[Bronto Burt]] | ||
|style="border-style: solid; border-width: 1px 3px 1px 1px"|None | |style="border-style: solid; border-width: 1px 3px 1px 1px"|None | ||
|align=center|[[File:KSS Jungle Bomb.png]] [[File: | |align=center|[[File:KSS Jungle Bomb.png]] [[File:KSSU Jungle Bomb Sprite.png]] | ||
|[[Jungle Bomb]] | |[[Jungle Bomb]] | ||
|style="border-style: solid; border-width: 1px 3px 1px 1px"|[[Bomb]] | |style="border-style: solid; border-width: 1px 3px 1px 1px"|[[Bomb]] | ||
|align=center|[[File:KSS Sir Kibble.png]] [[File: | |align=center|[[File:KSS Sir Kibble.png]] [[File:KSSU Sir Kibble Sprite.png]] | ||
|[[Sir Kibble]] | |[[Sir Kibble]] | ||
|[[Cutter]] | |[[Cutter]] | ||
|- | |- | ||
|align=center|[[File:KSS Burnin Leo.png]] [[File: | |align=center|[[File:KSS Burnin Leo.png]] [[File:KSSU Burning Leo Sprite.png]] | ||
|[[Burning Leo|Burnin' Leo]] | |[[Burning Leo|Burnin' Leo]] | ||
|style="border-style: solid; border-width: 1px 3px 1px 1px"|[[Fire]] | |style="border-style: solid; border-width: 1px 3px 1px 1px"|[[Fire]] | ||
|align=center|[[File:KSS Kabu.png]] [[File: | |align=center|[[File:KSS Kabu.png]] [[File:KSSU Kabu Sprite.png]] | ||
|[[Kabu]] | |[[Kabu]] | ||
|style="border-style: solid; border-width: 1px 3px 1px 1px"|None | |style="border-style: solid; border-width: 1px 3px 1px 1px"|None | ||
|align=center|[[File:KSS Twizzy.png]] [[File: | |align=center|[[File:KSS Twizzy.png]] [[File:KSSU Twizzy Sprite.png]] | ||
|[[Twizzy]] | |[[Twizzy]] | ||
|None | |None | ||
|- | |- | ||
|align=center|[[File:KSS Cappy Cover.png]] [[File: | |align=center|[[File:KSS Cappy Cover.png]] [[File:KSSU Cappy Sprite.png]] | ||
|[[Cappy]] | |[[Cappy]] | ||
|style="border-style: solid; border-width: 1px 3px 1px 1px"|None | |style="border-style: solid; border-width: 1px 3px 1px 1px"|None | ||
|align=center|[[File:KSS Laser Ball.png]] [[File: | |align=center|[[File:KSS Laser Ball.png]] [[File:KSSU Laser Ball Sprite.png]] | ||
|[[Laser Ball]] | |[[Laser Ball]] | ||
|style="border-style: solid; border-width: 1px 3px 1px 1px"|[[Beam]] | |style="border-style: solid; border-width: 1px 3px 1px 1px"|[[Beam]] | ||
|align=center|[[File:KSS Waddle Dee.png]] [[File: | |align=center|[[File:KSS Waddle Dee.png]] [[File:KSSU Waddle Dee Sprite.png]] | ||
|[[Waddle Dee]] | |[[Waddle Dee]] | ||
|None | |None | ||
|- | |- | ||
|align=center|[[File:KSS Capsule J.png]] [[File: | |align=center|[[File:KSS Capsule J.png]] [[File:KSSU Capsule J2 Sprite.png]] | ||
|[[Capsule J]]/[[Capsule J2]] | |[[Capsule J]]/[[Capsule J2]] | ||
|style="border-style: solid; border-width: 1px 3px 1px 1px"|[[Jet]] | |style="border-style: solid; border-width: 1px 3px 1px 1px"|[[Jet]] | ||
|align=center|[[File:KSS Lovely.png]] [[File: | |align=center|[[File:KSS Lovely.png]] [[File:KSSU Lovely Sprite.png]] | ||
|[[Lovely]] | |[[Lovely]] | ||
|style="border-style: solid; border-width: 1px 3px 1px 1px"|N/A | |style="border-style: solid; border-width: 1px 3px 1px 1px"|N/A | ||
|align=center|[[File:KSS Waddle Doo.png]] [[File: | |align=center|[[File:KSS Waddle Doo.png]] [[File:KSSU Waddle Doo Sprite.png]] | ||
|[[Waddle Doo]] | |[[Waddle Doo]] | ||
|[[Beam]] | |[[Beam]] | ||
|- | |- | ||
|align=center|[[File:KSS Coconut.png]] [[File: | |align=center|[[File:KSS Coconut.png]] [[File:KSSU Coconut Sprite.png]] | ||
|[[Coconut]] | |[[Coconut]] | ||
|style="border-style: solid; border-width: 1px 3px 1px 1px"|None | |style="border-style: solid; border-width: 1px 3px 1px 1px"|None | ||
| Line 242: | Line 241: | ||
|[[Parasol (enemy)|Parasol]] | |[[Parasol (enemy)|Parasol]] | ||
|style="border-style: solid; border-width: 1px 3px 1px 1px"|[[Parasol]] | |style="border-style: solid; border-width: 1px 3px 1px 1px"|[[Parasol]] | ||
|align=center|[[File:KSS Walky.png]] [[File: | |align=center|[[File:KSS Walky.png]] [[File:KSSU Walky Sprite.png]] | ||
|[[Walky]] | |[[Walky]] | ||
|[[Mike]] | |[[Mike]] | ||
|- | |- | ||
|align=center|[[File:KSS Gator.png]] [[File: | |align=center|[[File:KSS Gator.png]] [[File:KSSU Gator Sprite.png]] | ||
|[[Gator (Kirby Super Star)|Gator]] | |[[Gator (Kirby Super Star)|Gator]] | ||
|style="border-style: solid; border-width: 1px 3px 1px 1px"|None | |style="border-style: solid; border-width: 1px 3px 1px 1px"|None | ||
|align=center|[[File:KSS Rocky.png]] [[File: | |align=center|[[File:KSS Rocky.png]] [[File:KSSU Rocky Sprite.png]] | ||
|[[Rocky]] | |[[Rocky]] | ||
|style="border-style: solid; border-width: 1px 3px 1px 1px"|[[Stone]] | |style="border-style: solid; border-width: 1px 3px 1px 1px"|[[Stone]] | ||
| Line 261: | Line 260: | ||
!Copy Ability | !Copy Ability | ||
|- | |- | ||
|align=center|[[File:KSS Bonkers.png]] [[File: | |align=center|[[File:KSS Bonkers.png]] [[File:KSSU Bonkers Sprite.png]] | ||
|[[Bonkers]] | |[[Bonkers]] | ||
|[[Hammer]] | |[[Hammer]] | ||
|- | |- | ||
|align=center|[[File:KSS Jukid.png]] [[File: | |align=center|[[File:KSS Jukid.png]] [[File:KSSU Jukid Sprite.png]] | ||
|[[Jukid]] | |[[Jukid]] | ||
|[[Suplex]] | |[[Suplex]] | ||
|- | |- | ||
|align=center|[[File:KSS Axe Knight sprite.png]][[File:KSSU Axe Knight sprite.png]]<br>[[File:KSS Mace Knight.png]][[File: | |align=center|[[File:KSS Axe Knight sprite.png]][[File:KSSU Axe Knight sprite.png]]<br>[[File:KSS Mace Knight.png]][[File:KSSU Mace Knight Sprite.png]]<br>[[File:KSS Trident Knight.png]][[File:KSSU Trident Knight Sprite.png]] | ||
|[[Meta-Knights]] ([[Axe Knight]], [[Mace Knight]], and [[Trident Knight]]) | |[[Meta-Knights]] ([[Axe Knight]], [[Mace Knight]], and [[Trident Knight]]) | ||
|None | |None | ||
| Line 276: | Line 275: | ||
<tab name="Boss"> | <tab name="Boss"> | ||
{| class="wikitable" width=25% | {| class="wikitable" width=25% | ||
!Image (''KSS'') | !Image (''KSS''/''Ultra'') | ||
!Name | !Name | ||
!Copy Ability | !Copy Ability | ||
|- | |- | ||
|align=center|[[File:KSS Chameleo Arm Sprite.png]] | |align=center|[[File:KSS Chameleo Arm Sprite.png]] [[File:KSSU Chameleo Arm.png]] | ||
|[[Chameleo Arm]] | |[[Chameleo Arm]] | ||
|[[Paint]] (from projectiles) | |[[Paint]] (from projectiles) | ||
| Line 289: | Line 288: | ||
=== Boss: Chameleo Arm === | === Boss: Chameleo Arm === | ||
[[File:Chameleo Arm Fight. | [[File:Chameleo Arm Fight.png|thumb|right|250px|Kirby throws knives at a red Chameleo Arm that is trying to eat him.]] | ||
{{main|Chameleo Arm}} | {{main|Chameleo Arm}} | ||
This area is accessed from one of the upper rooms in the tower. Before facing the boss, Kirby has access to the [[Ninja]], [[Wing]] and [[Plasma]] abilities from [[Copy Essence]]s. The boss chamber itself is an open area made of stone with a fresco in the background. Chameleo Arm attacks by tossing rainbow bombs, stretching its clawed feet, and trying to catch Kirby with its tongue. It is also sometimes camouflaged with the background. Defeating it opens the way forward into the highest sections of the tower. | This area is accessed from one of the upper rooms in the tower. Before facing the boss, Kirby has access to the [[Ninja]], [[Wing]] and [[Plasma]] abilities from [[Copy Essence]]s. The boss chamber itself is an open area made of stone with a fresco in the background. Chameleo Arm attacks by tossing rainbow bombs, stretching its clawed feet, and trying to catch Kirby with its tongue. It is also sometimes camouflaged with the background. Defeating it opens the way forward into the highest sections of the tower. | ||
| Line 313: | Line 312: | ||
KSS Old Tower screenshot 17.png|Riding the Cart on to the Garden area | KSS Old Tower screenshot 17.png|Riding the Cart on to the Garden area | ||
Old Tower KSS 3D render.jpg|Scan of a page from the official Japanese guidebook showing the 3D rendered background of one of the area of the Old Tower | Old Tower KSS 3D render.jpg|Scan of a page from the official Japanese guidebook showing the 3D rendered background of one of the area of the Old Tower | ||
KSSU-map-GC-3.png|Section map | |||
</gallery> | </gallery> | ||
{{clear}} | {{clear}} | ||
==Names in other languages== | |||
{{names | |||
|ja={{furi|古代|こだい}}のとう | |||
|jaR=Kodai no tō | |||
|jaM=Ancient Tower | |||
|de=Turm | |||
|deM=Tower | |||
|it=Torre | |||
|itM=Tower | |||
|ko=고대의 탑 | |||
|koR=Godae-ui Tap | |||
|koM=Ancient Tower | |||
|es=Torre | |||
|esM=Tower | |||
}} | |||
{{Navbox-KSS/KSSU}} | {{Navbox-KSS/KSSU}} | ||
Latest revision as of 17:29, 20 March 2024
| ||||||||||||||
| ||||||||||||||
| ||||||||||||||
|
| ||||||||||||||

Old Tower is the third area in The Great Cave Offensive which Kirby explores. The entire stage takes place within the eponymous 'old tower', and can actually be skipped if Kirby sees no reason to go in there, though he would be forfeiting the 16 Treasures that lay within. The Boss of the area is Chameleo Arm.
Synopsis[edit]
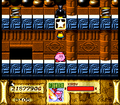
The entire stage takes place inside the tower, which can be accessed from the outside in a number of different ways. A save room can be found to the right of the tower, and the way to the Garden stage can be found to the left. Given the non-linear nature of this stage, the treasure listing will be based on a particular route. The player may not necessarily take the same route when playing this area.
The first room can be found inside the bottom-most entrance to the tower. Inside are a number of enemies on various floors, and a few doors leading to different parts of the tower. There is one treasure here.
The second room is accessible from the first, through a door to the right. It leads up a vertical laddered hall filled with Waddle Dees and Sir Kibbles. There are no treasures in this room.
The third room is a red hallway lined with Coconuts and other hazards. There is one treasure here.
The fourth room is an open space in the tower, where Kirby will have to contend with the Mid-Boss Bonkers. Like in Sub-Tree the floor can be opened up here to defeat him more easily, but that will also risk losing the treasure up above. There is one treasure here.
Using the Hammer ability, Kirby can access an area to the left from this first room by smashing the Stake. It leads down using a series of Elevators to a basement portion of the tower.
In the first basement room, Kirby can find two Burning Leos patrolling the area. Two doors lead to further rooms.
The upper door leads to a hall where Jukid is faced. Defeating it yields many goodies, and allows access to the next room. There is one treasure here.
The room after that is an area with a large pool and a fuse at the bottom of it. Kirby cannot light this fuse himself, meaning that he will need help to do so. There is one treasure here.
The lower door leads to a room with a water floor, patrolled by Gordos and suspended over a bottomless pit. A wind current also dominates this area. There is one treasure here.
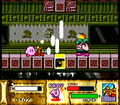
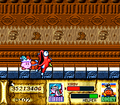
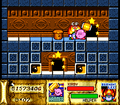
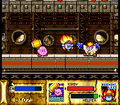
The next room on the itinerary can be accessed after the room where Bonkers is faced. It is an open area of the tower, with inexplicable sky viewable in the background. Kirby has to fight the Meta-Knights in this area.
The second room from there is a red hallway patrolled by Waddle Dees and other foes. There is one treasure here.
The third room is a hall filled with Fire Blocks and crumbling floors. This room can be accessed from the outside by taking the gateway above the one on the floor. There is one treasure here.
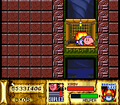
The fourth room is a series of decks and chambers with blue sky visible in the background. The path leads up using moving platforms that act as elevators. There are four treasures here.
The fifth room is an interior series of halls with a similar look to Mallow Castle. There is a large pool in the middle of this room. The door at the top-left leads to the boss chamber, where Chameleo Arm is fought (details below). Kirby can break through the floor at the bottom of the pool to reach another area of the tower.
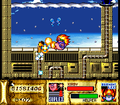
The sixth room is a crumbling exterior bridge patrolled by Bronto Burts (some of which are walking).
The seventh room is a somewhat small chamber divided into smaller rooms. There are two treasures here.
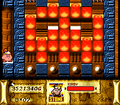
The last room is accessed after the fight with Chameleo Arm. It is an ascent filled with Rotating Cannons. At the top are three distinct doorways, each leading to a different area. The middle doorway leads out into open space, then back down to the bottom. The two on the sides are chambers which lead to two treasures.
Treasures[edit]
| Old Tower Area Treasures | |||
|---|---|---|---|
| Treasure | Image | Value | How to reach |
 Star Tiara |
408,200 G | This treasure can be found in a side chamber from the first room up above accessible by a Spring. The chest is guarded by two Gordos inside a case of Star Blocks. | |
 Turtle Shell (Kirby Super Star) |
800 G | This treasure is dropped to the floor after Jukid is defeated in the lower area of the tower. | |
| Koopa Shell (Kirby Super Star Ultra) | |||
 Sword (Kirby Super Star) |
325,000 G | This treasure can be found in a room adjacent to the pool with the Fuse Cannon in the lower area of the tower. Using the cannon allows Kirby to get inside. | |
| Falchion (Kirby Super Star Ultra) | |||
 Warrior Shield |
50,000 G | This treasure can be found under the water in the middle of the path in the lower area of the tower. | |
 Unicorn's Horn |
80,300 G | This treasure can be found in a passage under the floor in the third room, guarded by a series of Shotzos. | |
 Autumntime (Kirby Super Star) |
250,000 G | This treasure can be accessed after defeating Bonkers in the fourth room. | |
| Three-Star Cane (Kirby Super Star Ultra) | 222,000 G | ||
 Rice Bowl (Kirby Super Star) |
50 G | This treasure can be found on the floor on the left end of the hall past the room with the Meta-Knights. Kirby will need an ability that can reach through the floor to open up the way on the right end, then pass the Spikes using a Launcher. | |
| Broken Bowl (Kirby Super Star Ultra) | |||
 Tut's Mask |
160,000 G | This treasure can be found in the upper chamber accessible from outside the tower, under the floor by breaking the Bomb Block. The room is filled with danger, so Kirby should watch his step. | |
 Mr. Saturn |
120,000 G | This treasure can be found in a side chamber on the right near the bottom of the rising platform area. It is at the end of a long hallway filled with Sleep Copy Essences and a strong wind current pushing Kirby back toward the entrance. | |
 Armor |
212,000 G | This treasure can be found up the main rising platform area pathway, in a small alcove to the left. | |
 Treasure Box |
100,000 G | This treasure can be found in a side chamber accessible from the middle of the rising platform area chute. It can be found at the top of a starry path which Kirby can reach using springs, but he should be mindful of the electric mines that also occupy the area. | |
 Mannequin |
3,000 G | This treasure can be found in a side chamber to the top left. Kirby will have to be quick to get it, as the screen is scrolling quickly to the right away from the chest itself, and Kirby will have to leave the room and come back, or be crushed if he misses it. | |
 Gold Crown |
528,000 G | This treasure can be found in a pool with a current pushing upward in the upper portion of the tower. To reach it, the Stone ability is needed. | |
 King's Cape |
508,000 G | This treasure can be obtained by using the door to the upper left or upper right, reaching the top chamber, and then entering the door under the String Platform and Stake. Two different abilities are needed to get in here, so a division of labor may help. The chest can be found in the room within, though there are a lot of enemies guarding it. | |
 Model Ship |
800,000 G | This treasure can be found in the upper-left chamber in the uppermost room. To reach it, Kirby has to go through a door behind a gate, which opens temporarily when a switch is pressed at the bottom of the chamber. | |
 Sun Ring |
800,000 G | This treasure can be found in the upper-right chamber in the uppermost area. The door to the chest is hidden in the dark, but it can be found if the candles are illuminated. | |
Enemies and Copy Abilities[edit]
| ||||||||||||||||||||||||||||||||||||||||||||||||||||||||||||||||||||||||||||||||||||||||||||||||||||||||||||
Boss: Chameleo Arm[edit]

- Main article: Chameleo Arm
This area is accessed from one of the upper rooms in the tower. Before facing the boss, Kirby has access to the Ninja, Wing and Plasma abilities from Copy Essences. The boss chamber itself is an open area made of stone with a fresco in the background. Chameleo Arm attacks by tossing rainbow bombs, stretching its clawed feet, and trying to catch Kirby with its tongue. It is also sometimes camouflaged with the background. Defeating it opens the way forward into the highest sections of the tower.
Gallery[edit]
Entering the Old Tower--an entirely optional exercise.
Kirby should try not to headbutt the block when he grabs the food.
Simirror may defeat Bonkers more easily this way, but it will mean losing the treasure chest afterwards.

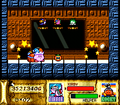
Ambushed by the Meta-Knights

Copy Essences are used as an obstacle in this windy tunnel. Kirby needs to be more careful not to fall asleep again if he wants to get anywhere.
This is what happens if Kirby fails to escape the scrolling room in time.
Crossing the crumbling bridge
A pit-stop before the boss
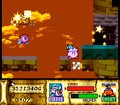
Chameleo Arm is not faced at the end of this area, but instead, is just another trial in the middle of it.

Using a series of cannons to ascend to the top of the tower

Lighting these candles will make things in the room easier to see for a moment.
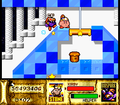
Some cooperation is necessary to get in here.
This part of the tower is blocked off by a stake.
Battle with Jukid in the tower basement
Burning Leo can light fuses underwater.
Riding the elevator back out of the basement
Riding the Cart on to the Garden area
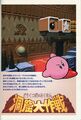
Scan of a page from the official Japanese guidebook showing the 3D rendered background of one of the area of the Old Tower
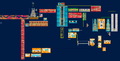
Section map


Names in other languages[edit]
| Language | Name | Meaning |
|---|---|---|
| Japanese | 古代のとう Kodai no tō |
Ancient Tower |
| German | Turm | Tower |
| Italian | Torre | Tower |
| Korean | 고대의 탑 Godae-ui Tap |
Ancient Tower |
| Spanish | Torre | Tower |