|
|
| (65 intermediate revisions by 20 users not shown) |
| Line 1: |
Line 1: |
| {{construction}}
| |
| {{image}}
| |
| {{Infobox-KRtDLLevel | | {{Infobox-KRtDLLevel |
| |image=[[File:Egg Engines.png|260px]] | | |image=[[File:KRtDLD Egg Engines select screenshot.png|350px]] |
| |caption=Screenshot from ''Kirby's Return to Dream Land''. | | |caption=Screenshot of '''Egg Engines''' on the [[World Map]] from ''[[Kirby's Return to Dream Land Deluxe]]''. |
| |level=6 | | |level=6 |
| |world=[[Halcandra]] | | |world=[[Halcandra]] |
| |stages=6 | | |stages=6 |
| |part=None | | |part={{N}} |
| |spheres=21 | | |spheres=21 |
| |mid-boss= | | |mid-boss= [[Sphere Doomer]] (6-1 , 6-3), [[Dubior]] (6-2), [[King Doo]] (6-3), [[Moundo]] (6-3), [[Kibble Blade]] (6-4) |
| |superability= | | |superability= [[Monster Flame]] (6-1), [[Flare Beam]] (6-3) |
| |boss= [[Metal General]], [[HR-D3]] (Extra Mode only) | | |boss= [[Metal General]], [[HR-D3]] (Extra Mode only) |
| |previous=[[Nutty Noon]] | | |previous=[[Nutty Noon]] |
| |next=[[Dangerous Dinner]] | | |next=[[Dangerous Dinner]] |
| | |theme music=[[File:Egg Engines sample KRtDL.oga]] |
| | |theme title="[[Egg Engines (theme)|Egg Engines]]" |
| | |description=The stage select theme for Egg Engines. |
| }} | | }} |
| Level 6: '''Egg Engines''' is the sixth level in ''[[Kirby's Return to Dream Land]]'' and the first level in [[Halcandra]]. Egg Engines is an industrial level with a lot of machinery. The boss of this level is [[Metal General]]. In Extra Mode, [[HR-D3]] is fought after Metal General. There are twenty one [[Energy Sphere]]s in this level, three in stage 1, four each in stage 2 and 3, and five each in stage 4 and 5. | | Level 6: '''Egg Engines''' is the sixth level in ''[[Kirby's Return to Dream Land]]'' and its remake ''[[Kirby's Return to Dream Land Deluxe]]'', and the first level in [[Halcandra]]. Egg Engines is an industrial level with a lot of machinery. The boss of this level is [[Metal General]]. In Extra Mode, [[HR-D3]] is fought after Metal General. There are twenty one [[Energy Sphere]]s in this level, three in stage 1, four each in stage 2 and 3, and five each in stage 4 and 5. |
| | | {{clear|left}} |
| ==Stages== | | ==Stages== |
| ===Stage 1===
| | For details on each stage individually, click the name of the stage. |
| Section 1: The stage begins with a metal walkway, segmented by a few raised platforms. A large moon looms in the background over a dim wasteland, backed by looming metallic structures. To the right, Kirby catches his first look at [[Halcandra]]'s variants of [[Waddle Dee]]s which boast a gray color scheme and look just a little like [[Magolor]]. Further to the right is a Bomb Block wall, which opens up a path past a large teetering hammer with an X painted on the head. It will attempt to fall over and smash anyone who gets too close. Past another Bomb Block formation, some [[Volttzo]]s are firing from the background. The path continues with more hammers and Volttzos in the way until Kirby reaches a spike pit with some platforms holding a [[Flamer]] and an [[Elec]], two similar enemies that roll along the walls and can provide the [[Fire]] and [[Spark]] abilities, respectively. Past more Hammers, a fuse can be found which can be lit with Fire. From there, Kirby will need to rush past more Volttzos and Hammers to get to the Cannon before it fires. The cannon will shoot Kirby to an optional area where a [[1Up]] and the [[Mike]] ability can be picked up. From there, past a number of [[Bowby]], the door to the next section can be reached.
| | {| class="sortable wikitable" border=1 cellpadding=2 |
| | | !class=sortable|Stage |
| Section 2: The door leads to another walkway. To the right, a long bridge made of X Blocks must be crossed. [[Sheld]] as well as Volttzos must be avoided along the way. Further in, active waves of [[Gordo]]s move in from the right, forcing Kirby to jump to avoid them. There are also numerous [[Sleep]] Copy Pedestals that should be avoided, lest Kirby fall asleep on an X Block and fall through to his doom. Later in, a [[Pluid]] can be swallowed to get the [[Water]] ability, which can aid Kirby's passage through this area past even more Sleep Pedestals and enemies to reach the door to the next section.
| | !class=sortable|Energy Spheres / Ship Parts |
| | | !class=sortable|Super Ability |
| Section 3: The door leads to the walkway's edge, and a Cannon is hovering in the air just off the edge. In this section, Kirby will need to shoot from cannon to cannon, and avoid getting crushed by obstacles in the process. At one particular cannon, an optional doorway sits below. Kirby will actually need to hit the trap once it closes to access that door and get an [[Energy Sphere]]. Otherwise, he will get shot forward, past more traps, and eventually hit a closed metal gate area to reach the door to the next section. Guarding the door is a [[Sparky]].
| | !class=sortable|Boss/Mid-Boss |
| | | !class=unsortable|Notes |
| Section 4: The door leads to a high walkway leading to a bridge, under which a bunch of Volttzos shoot up. If Kirby got Spark from the Sparky in the previous section, he can access a hidden compartment with some stars. Further in, some [[Tick]]s spike upward, and the bridge ends, leading to a labyrinthine hall with more firing Volttzos. At the end is the door to the next section.
| |
| | |
| Section 5: The door leads to a new walkway, and a switch on the ground will release some [[Invincibility Candy]] from a ceiling compartment. Kirby can use this to charge unhindered through the next series of obstacles. Further ahead, in the path of a Volttzo is an optional door that leads to an Energy Sphere. Kirby will need to swallow a local [[Blade Knight]] to access it though. The door to the next section lies between two Hammers, and a [[Maxim Tomato]] can be found just beyond the platform's edge.
| |
| | |
| Section 6: The door leads to the interior of a factory, where a large bomb on a roller (known as a [[Bomb Machine]]) patrols and occasionally fires missiles, which can be swallowed for the [[Bomb]] ability. These cannot be destroyed with normal abilities, but up ahead is a [[Super Hot Head]] which provides the [[Monster Flame]] [[Super Ability]]. Kirby can use this ability to light the Bomb Machines' fuses to destroy them. Ahead are some boxes that shoot out rotary spikes, but these can also be destroyed with Monster Flame. Up a ladder lies a spike pit room that extends to the left with more Bomb Machines to be lit. Another ladder takes Kirby up to a hallway leading to the right, with even more Bomb Machines and rotary blocks. At the top, a giant Bomb Machine remains. Destroying it reveals the rift to the alternate dimension.
| |
| | |
| Alternate Dimension: The rift wall approaches from the right, and Kirby will need to immediately swallow some blocks and fire it at the rift wall to push it back in order to progress. To the left, some [[Wapod]] are wafting out of a pot and [[Mopoo]] from the ceiling past a conveyor belt. Kirby will need to swallow them to blast away Bomb Block walls and move forward. More conveyor belts must be passed further in, where Kirby will need to make good use of Super Inhale to proceed. In the next room, another conveyor belt carries Kirby past [[Ninja]] and [[Bomb]] Copy Pedestals. An Ice [[Sphere Doomer]] is fought in a room with a shifting conveyor belt in the middle. Defeating it yields the last two Energy Spheres of the stage. After returning from the rift, the stage exit is located just to the left.
| |
| | |
| ====Enemies, Mid-bosses, and Abilities====
| |
| {| style="border: 3px solid #E47575; {{round}};background: #F69D99" cellspacing="2" | |
| ! width="420px" | '''Regular Enemies''' | |
| ! width="180px" | '''Mid-Boss''' | |
| |- bgcolor="E47575"
| |
| |
| |
| {{col-begin}}
| |
| {{col-break|width=33%}}
| |
| *[[Waddle Dee]]
| |
| *[[Elec]]
| |
| *[[Sheld]]
| |
| *[[Sparky]]
| |
| *[[Juckle]]
| |
| *[[Bronto Burt]]
| |
| *[[Super Hot Head]]
| |
| {{col-break|width=33%}}
| |
| *[[Volttzo]]
| |
| *[[Walky]]
| |
| *[[Gordo]]
| |
| *[[Tick]]
| |
| *[[Blade Knight]]
| |
| *[[Wapod]]
| |
| {{col-break|width=34%}}
| |
| *[[Flamer]]
| |
| *[[Bowby]]
| |
| *[[Pluid]]
| |
| *[[ArmorDee]]
| |
| *[[Bomb Machine]]
| |
| *[[Mopoo]]
| |
| {{col-end}}
| |
| |
| |
| {{col-begin|width=50%}}
| |
| *[[Sphere Doomer]] (Ice)
| |
| {{col-end}}
| |
| |- | |
| |- | | |- |
| ! width="420px"| '''Abilities'''
| | |{{center|[[File:KRtDLD Egg Engines Stage 1 select screenshot.png|200px]]<br>'''[[Egg Engines - Stage 1|Stage 1]]'''}} |
| ! width="180px" | '''Super Ability'''
| | |3 |
| |- bgcolor="#E47575"
| | |[[Monster Flame]] |
| |
| | |[[Sphere Doomer]] (Ice) |
| {{col-begin}}
| |
| {{col-break|width=50%}} | |
| *[[Fire]]
| |
| *[[Mike]]
| |
| *[[Water]]
| |
| *[[Cutter]]
| |
| *[[Bomb]]
| |
| *[[Ice]]
| |
| {{col-break|width=50%}}
| |
| *[[Spark]]
| |
| *[[Sleep]]
| |
| *[[Needle]]
| |
| *[[Sword]]
| |
| *[[Ninja]]
| |
| {{col-end}}
| |
| |
| |
| {{col-begin}}
| |
| *[[Monster Flame]]
| |
| {{col-end}}
| |
| |}
| |
| | |
| ===Stage 2===
| |
| Prelude: The stage begins in a small room inside the factory. The door to the next section is immediately to the right.
| |
| | |
| Section 1: The door leads to a hallway interspersed with chambers patrolled by [[Waddle Dee]]s inside large spiked boxes. Swallowing the Waddle Dee does not stop the box from moving about the chamber. Past these is the door to the next section.
| |
| | |
| Section 2: The door leads to a curved hallway full of [[Elec]]s and [[Flamer]]s blocked off by Star Block walls. The door to the next section is to the top-left.
| |
| | |
| Section 3: The door leads to a very narrow hallway that angles down into a larger one to the left. Here Kirby gets his first look at the durable [[Degout]] guarding the room. It can't be inhaled, but a few good hits from [[Spark]] or [[Fire]] can take it out. Some spike bars rotate further to the left, and more Degouts attempt to get in Kirby's way. The door to the next section is located past a hallway going right with more spiked bars in it.
| |
| | |
| Section 4: The door leads to a hall with falling drill bits and spiked platforms going to and fro. The drill bits cannot be inhaled either, so they should be avoided. A [[Chilly]] guards the next hall, which can grant the [[Ice]] ability. Past another drill bit room is a [[Parasol Waddle Dee]], the [[Parasol]] of which can be used to block the drill bits. [[Pluid]]s will also fall from the ceiling in some rooms, including the one with the door to the next section.
| |
| | |
| Section 5: The door leads to a room with pistons pounding into the floor and ceiling. If Kirby still has [[Ice]], [[Water]] or [[Parasol]], he can use it to break away some Fire Blocks in the floor to make safe passageways and uncover some items. One particular Fire Blockade is in the ceiling, which guards an Energy Sphere. Past that is the door to the next section.
| |
| | |
| Section 6: The door leads to a vertical shaft with [[Gigatzo]]s firing up it. A [[Rocky]] can be found in the next room, which can provide the [[Stone]] ability. In an upper chamber, Gigatzos and Volttzos can be seen firing in tandem. Stone can be used to protect Kirby from their shots. The door to the next section is located at the top of this room.
| |
| | |
| Section 7: The door leads to a small room with a pool of water extending to a passageway beneath. Patrolling the waterway are large rolling spike wheels, as well as some [[Gordo]]s and [[Blipper]]s. In one particular room, an Energy Sphere can be accessed if Kirby still has the Stone ability from the previous section. Otherwise, he will need to enlist the help of [[King Dedede]]'s hammer. The door to the next section is located at the end of the waterway in an air pocket.
| |
| | |
| Section 8: The door leads to a series of small connected chambers extending to the left. A [[Search]] is guarding the room ahead, and can be inhaled for the [[Crash]] ability. Up ahead are a few more rooms, then a ladder to the left going up. At the top is a long hallway full of [[Search]]es, as well as a [[Walky]]. Getting the [[Mike]] ability may be a better use of Kirby's talent as he goes through the door to the next section than Crash would be.
| |
| | |
| Section 9: The door leads to another series of chambers to the right, with Degouts hovering over a spiked pit. Kirby can use Mike if he has it to easily clear them out. Additionally, Gordos and [[Scarfy|Scarfies]] can be seen in subsequent chambers. A ladder leads down to a long hallway with no floor extending to the left. Kirby will need to be careful not to get hit while hovering, as it may end up causing him to fall to his doom. The door to the next section is located at the end of this hall.
| |
| | |
| Section 10: The door leads to a room that holds a [[Whippy]] and a [[Leafan]]. Just to the right, Kirby will encounter [[Dubior]], and must defeat it, gaining access to Spark in the process. The door to the next section is just beyond.
| |
| | |
| Section 11: The door leads to an elevator with a switch that starts it up. Above Kirby's head are a series of switches just beyond reach. [[Spark]] can be used to easily hit them as the elevator moves, but care must still be taken to hit them all in time. If Kirby can hit the second one, an Energy Sphere will be uncovered at the end of the lift. (the other two revealing a 1Up and a Maxim Tomato) Just to the right is the door to the next section.
| |
| | |
| Section 12: The door leads to a hallway leading to the right. A [[Sodory]] guards the entrance, and a ceiling switch brings up a platform from the bottomless pit yielding a [[Key]]. Kirby must then take this Key past a series of pistons, avoiding getting squished in the process. A number of [[Hunter Degout]]s will notice Kirby's shiny key and begin chasing him in the next hallway segment, which Kirby must either avoid or appropriately deal with. At the end of the hallway is a door that can be unlocked to reveal the last Energy Sphere of the stage, with the stage exit just above that.
| |
| | |
| ====Enemies, Mid-bosses, and Abilities====
| |
| {| style="border: 3px solid #E47575; {{round}};background: #F69D99" cellspacing="2"
| |
| ! width="420px" | '''Regular Enemies'''
| |
| ! width="180px" | '''Mid-Boss'''
| |
| |- bgcolor="E47575"
| |
| |
| |
| {{col-begin}}
| |
| {{col-break|width=33%}}
| |
| *[[Waddle Dee]]
| |
| *[[Degout]]
| |
| *[[ArmorDee]]
| |
| *[[Rocky]]
| |
| *[[Blipper]]
| |
| *[[Scarfy]]
| |
| *[[Sodory]]
| |
| {{col-break|width=33%}}
| |
| *[[Elec]]
| |
| *[[Chilly]]
| |
| *[[Pluid]]
| |
| *[[Volttzo]]
| |
| *[[Search]]
| |
| *[[Whippy]]
| |
| *[[Hunter Degout]]
| |
| {{col-break|width=34%}}
| |
| *[[Flamer]]
| |
| *[[Parasol Waddle Dee]]
| |
| *[[Gigatzo]]
| |
| *[[Gordo]]
| |
| *[[Walky]]
| |
| *[[Leafan]]
| |
| {{col-end}}
| |
| | | | | |
| {{col-begin|width=50%}}
| |
| *[[Dubior]]
| |
| {{col-end}}
| |
| |-
| |
| |- | | |- |
| ! width="420px"| '''Abilities'''
| | |{{center|[[File:KRtDLD Egg Engines Stage 2 select screenshot.png|200px]]<br>'''[[Egg Engines - Stage 2|Stage 2]]'''}} |
| ! width="180px" | '''Super Ability'''
| | |4 |
| |- bgcolor="#E47575"
| | |{{N}} |
| |
| | |[[Dubior]] |
| {{col-begin}} | |
| {{col-break|width=50%}}
| |
| *[[Fire]]
| |
| *[[Ice]]
| |
| *[[Water]]
| |
| *[[Crash]]
| |
| *[[Whip]]
| |
| *[[Sword]]
| |
| {{col-break|width=50%}}
| |
| *[[Spark]]
| |
| *[[Parasol]]
| |
| *[[Stone]]
| |
| *[[Mike]]
| |
| *[[Leaf]]
| |
| {{col-end}}
| |
| |
| |
| {{col-begin}}
| |
| *N/A
| |
| {{col-end}}
| |
| |} | |
| | |
| ===Stage 3===
| |
| Section 1: The stage begins in an elevator out in the wastes, which begins to move automatically upward. This leads to a gatehouse, opening which leads to a long conveyor belt that extends to the right. Once the conveyor belt reaches its peak, a wind kicks in that carries Kirby to the right, making it tough to avoid the enemies up ahead. Kirby must jump past a number of Degouts and [[Foley]]s along the belt, all the while avoiding spiked ceilings in various places. The belt eventually leads to a cannon, which fires Kirby and his friends upward, then to the right, leading directly to the next section.
| |
| | |
| Section 2: The conveyor belt continues to the right as a couple of [[Waddle Dee]]s and a [[Waddle Doo]] can be seen running along below, inaccessible. The path continues to the right past a gnarly spiked ceiling and another rightward current. Searches occupy parts of the belt, and need to be dealt with, lest Kirby gets blown up. At one particular point, Kirby can Super Inhale a block to uncover some stars. Just beyond that, another section leads to a low roof with a ceiling switch that can be grabbed. Successfully grabbing it will open up a compartment with an Energy Sphere in it. Just beyond that is the door to the next section at the end of the belt.
| |
| | |
| Section 3: The door leads back to the factory interior, but with another conveyor belt leading past some teetering hammers. A [[Lanzer]] patrols up ahead, as well as a [[Parasol Waddle Doo]] and a [[Poppy Bros. Jr.]]. Past the conveyor belt is a chamber where [[King Doo]] and [[Moundo]] must be fought at the same time. Up ahead is a conveyor leading to a compartment that can be accessed with either Stone or Beam. Inside lies some food and some stars. Just to the right is the door to the next section.
| |
| | |
| Section 4: The door leads to a large hallway with no floor. A switch in the alcove Kirby starts in will cause a long floor to rise up from the abyss, containing many enemies and items. If Kirby is fast enough, he can grab an [[Energy Sphere]] off this floor before it sinks back down. Past this sinking floor chamber is the door to the next section.
| |
| | |
| Section 5: The door leads back out into the wastes, with a ladder going up a shaft. At the top is a room full of rotary blocks, which must be avoided as Kirby continues his ascent. At the top of the next ladder, a [[Super Waddle Doo]] appears, which grants Kirby the [[Flare Beam]] Super Ability. Above are lamps, as seen the last time Kirby got this ability, which must be activated to open up a force door with some items behind it. Up ahead are more rotary blocks, which can be destroyed with Flare Beam. As Kirby continues his ascent, more lamps must be dealt with, moving in patterns to make it more difficult to hit them all in one charge. Kirby will proceed with Flare Beam through the door at the top to the next section.
| |
| | |
| Section 6: The door leads to another vertical shaft, with more lamps. Lighting these causes the floor below to lower, revealing a new path which opens up to the rift to the alternate dimension.
| |
| | |
| Alternate Dimension: The rift wall pursues from the left as Kirby must make his way through more suspended bodies of water over a bottomless pit. Among the things that need to be maneuvered around include spikes surfaces and [[Shotzo]]s, as well as Blippers and Gordos swimming in the currents. In the next room, the [[Spear]] and [[Hammer]] abilities are available on [[Copy Pedestal]]s, and an Ice Sphere Doomer is fought in an arena with a pool of suspended water in the middle. Defeating it yields the last two Energy Spheres of the stage. Once Kirby leaves the rift, a cannon to the right will blast him up to the room where the stage exit is located.
| |
| | |
| ====Enemies, Mid-bosses, and Abilities====
| |
| {| style="border: 3px solid #E47575; {{round}};background: #F69D99" cellspacing="2"
| |
| ! width="420px" | '''Regular Enemies'''
| |
| ! width="180px" | '''Mid-Bosses'''
| |
| |- bgcolor="E47575"
| |
| |
| |
| {{col-begin}}
| |
| {{col-break|width=33%}}
| |
| *[[Degout]]
| |
| *[[Waddle Dee]]
| |
| *[[Search]]
| |
| *[[Parasol Waddle Doo]]
| |
| *[[Noddy]]
| |
| *[[Blipper]]
| |
| {{col-break|width=33%}} | |
| *[[Foley]]
| |
| *[[Waddle Doo]]
| |
| *[[Bronto Burt]]
| |
| *[[Poppy Bros. Jr.]]
| |
| *[[Sheld]]
| |
| *[[Gordo]]
| |
| {{col-break|width=34%}}
| |
| *[[ArmorDee]]
| |
| *[[Tick]]
| |
| *[[Lanzer]]
| |
| *[[Water Galbo]]
| |
| *[[Shotzo]]
| |
| {{col-end}}
| |
| | | | | |
| {{col-begin|width=50%}}
| |
| *[[King Doo]]
| |
| *[[Moundo]]
| |
| *[[Sphere Doomer]] (Ice)
| |
| {{col-end}}
| |
| |- | | |- |
| |- | | |{{center|[[File:KRtDLD Egg Engines Stage 3 select screenshot.png|200px]]<br>'''[[Egg Engines - Stage 3|Stage 3]]'''}} |
| ! width="420px"| '''Abilities'''
| | |4 |
| ! width="180px" | '''Super Ability'''
| | |[[Flare Beam]] |
| |- bgcolor="#E47575"
| | |[[King Doo]]<br>[[Moundo]]<br>[[Sphere Doomer]] (Ice) |
| |
| |
| {{col-begin}} | |
| {{col-break|width=50%}}
| |
| *[[Bomb]]
| |
| *[[Crash]]
| |
| *[[Beam]]
| |
| *[[Stone]]
| |
| *[[Sleep]]
| |
| *[[Ice]]
| |
| {{col-break|width=50%}}
| |
| *[[Needle]]
| |
| *[[Spear]]
| |
| *[[Parasol]]
| |
| *[[Water]]
| |
| *[[Hammer]]
| |
| {{col-end}}
| |
| | | |
| {{col-begin}}
| |
| *[[Flare Beam]]
| |
| {{col-end}}
| |
| |} | |
| | |
| ===Stage 4===
| |
| Section 1: The stage begins as Kirby and his friends fall down a brickwork chute into what appears to be the factory pipeline. At the bottom is a water current that carries Kirby to the right, then downward past some [[Glunk]]s and Gordos. The current continues in a spiral pattern until the air pocket containing the door to the next sections is reached, guarded by a [[Clayn]].
| |
| | |
| Section 2: The door leads to a dark area of the pipeline. After navigating a tricky hallway, Kirby happens upon a [[Hot Head]], whose Fire ability can help light things up. A [[Candle]] can later be found which can help in the absence of Fire. With it, Kirby can see what he is dropping down into and avoid getting hit. To the right, a [[Sodory]] guards a [[Hammer]] Copy Pedestal. With Hammer, Kirby can drop below and uncover some Metal Block encased areas to access an Energy Sphere. To the left lies the door to the next section, guarded by another Clayn. However, should Kirby see it, there is another exit in the area.
| |
| | |
| Section 3: The door leads to a hallway that goes off to the right. Another path, full of water, can be seen below, accessible only if Kirby went through the other door. Each hallway is blocked off regularly by breakable blocks and various enemies, but only the bottom path contains an Energy Sphere. Also on the bottom path are a couple Pedestals containing the [[Parasol]] and [[Fighter]] abilities. Each path ends in a separate door that leads to the next section.
| |
| | |
| Section 4: Both doors lead to a narrow hallway mostly filled with water as a current continues to push toward the right. This leads to a hallway with both an upper and lower portion. Choosing either leads to different enemies to fight, but eventually, a chamber is reached where Kirby must battle [[Kibble Blade]]. Defeating him yields the [[Cutter]] ability, which is needed to access a switch past a current of water to unlock another Energy Sphere. Swimming in the water leads to the door to the next section.
| |
| | |
| Section 5: The door leads to an underwater maze. Kirby must navigate carefully through each room in order to find the next Energy Sphere before he goes too far. To the right is the door to the next section.
| |
| | |
| Section 6: The door leads to another underwater tunnel, whose current immediately takes Kirby into a room with a hungry [[Barbar]] in it. As Kirby progresses to the right, he must avoid more Barbar as he activates Bomb Blocks with his water gun. One Barbar in particular is guarding an optional doorway that leads to the stage's last Energy Sphere. The last current carries Kirby through a great deal of Barbar before finally ending up in a room with the stage exit.
| |
| | |
| ====Enemies, Mid-bosses, and Abilities====
| |
| {| style="border: 3px solid #E47575; {{round}};background: #F69D99" cellspacing="2"
| |
| ! width="420px" | '''Regular Enemies'''
| |
| ! width="180px" | '''Mid-Boss'''
| |
| |- bgcolor="E47575"
| |
| | | | | |
| {{col-begin}}
| |
| {{col-break|width=33%}}
| |
| *[[Glunk]]
| |
| *[[Hot Head]]
| |
| *[[Noddy]]
| |
| *[[Blipper]]
| |
| *[[Chilly]]
| |
| *[[Shotzo]]
| |
| {{col-break|width=33%}}
| |
| *[[Gordo]]
| |
| *[[Babut]]
| |
| *[[Sodory]]
| |
| *[[Squishy]]
| |
| *[[Barbar]]
| |
| {{col-break|width=34%}}
| |
| *[[Clayn]]
| |
| *[[Waddle Dee]]
| |
| *[[Lanzer]]
| |
| *[[Barracu]]
| |
| *[[Sparky]]
| |
| {{col-end}}
| |
| |
| |
| {{col-begin|width=50%}}
| |
| *[[Kibble Blade]]
| |
| {{col-end}}
| |
| |- | | |- |
| |- | | |{{center|[[File:KRtDLD Egg Engines Stage 4 select screenshot.png|200px]]<br>'''[[Egg Engines - Stage 4|Stage 4]]'''}} |
| ! width="420px"| '''Abilities'''
| | |5 |
| ! width="180px" | '''Super Ability'''
| | |{{N}} |
| |- bgcolor="#E47575" | | |[[Kibble Blade]] |
| | | | | |
| {{col-begin}}
| |
| {{col-break|width=50%}}
| |
| *[[Fire]]
| |
| *[[Sword]]
| |
| *[[Spear]]
| |
| *[[Parasol]]
| |
| *[[Cutter]]
| |
| {{col-break|width=50%}}
| |
| *[[Sleep]]
| |
| *[[Hammer]]
| |
| *[[Ice]]
| |
| *[[Fighter]]
| |
| *[[Spark]]
| |
| {{col-end}}
| |
| |
| |
| {{col-begin}}
| |
| *N/A
| |
| {{col-end}}
| |
| |}
| |
|
| |
| ===Stage 5===
| |
| Section 1: The stage begins in the factory interior, where Waddle Dees can be seen running on some small conveyor belts. Further down the hall, a [[Waddle Doo]] can be swallowed for the [[Beam]] ability. Past that is a room where a large piston slowly presses the floor. More enemies and pistons are encountered as the hall continues to the right. At the end, a ceiling switch can be used to cause a piston to fall and crush a mass of Waddle Dees guarding the door to the next section.
| |
|
| |
| Section 2: The door leads to a room with nothing in it at first. A ceiling then appears from above and starts sinking, with the intent of crushing whatever is below. There is a small inlet that Kirby and his friends can use to avoid getting crushed. Once it hits the ground, it flies back up. Another ceiling then comes down with an inlet in a different location. This is followed by more, with different shapes and speeds. The fifth ceiling contains an Energy Sphere to the left, which Kirby can grab is he is quick enough. After that ceiling recedes, a door appears leading to the next section.
| |
|
| |
| Section 3: The door leads to another factory hallway leading to the right. A conveyor belt conveys several Waddle Dees to get in Kirby's way. Further to the right are individual conveyors suspended over a bottomless pit, and a [[Sir Kibble]], a [[Leafan]] and a [[Rocky]] guarding the path. Past a few more standard enemies, an [[Owgulf]] can be seen fluttering about. The last conveyor belt moves exceptionally fast, carrying anything on it to the left edge. Along the way, an optional door can be found which leads to a room with an [[Energy Sphere]]. The door to the next section is located not far beyond.
| |
|
| |
| Section 4: The door leads to a room that works much like the one in Section 2. This time, the Energy Sphere is found in the third ceiling, rather high up in the inlet. After five attempts to squish, the door to the next section appears.
| |
|
| |
| Section 5: The door leads to a chamber with a Bomb Block plug at the right, concealing a ladder that leads down. Kirby will need to open walls that release Gordos, then hide from said Gordos as he progresses downward. A [[Whippy]] can be found along this path, providing the [[Whip]] ability. Along the way, Kirby will encounter an [[Invisibility Stone]], to help avoid more Gordos and blasts from [[Gigatzo]]s. Past an Invisibility Stone Gate, another Energy Sphere can be accessed, guarded by some [[Degout]]s. The door to the next section is located at the bottom of the chute.
| |
|
| |
| Section 6: The door leads to another squishing room. This time, however, the platforms come down in pieces and multiples, and Kirby is in just as much danger if he rides one back up as he is if under one. The fourth and final wave has several ceilings come down from the right to the left. The last Energy Sphere appears near the right, if Kirby can get it fast enough, and just before the last ceilings come down, the stage exit appears for Kirby to escape through.
| |
|
| |
| ====Enemies, Mid-bosses, and Abilities====
| |
| {| style="border: 3px solid #E47575; {{round}};background: #F69D99" cellspacing="2"
| |
| ! width="420px" | '''Regular Enemies'''
| |
| ! width="180px" | '''Mid-Boss'''
| |
| |- bgcolor="E47575"
| |
| |
| |
| {{col-begin}}
| |
| {{col-break|width=33%}}
| |
| *[[Waddle Dee]]
| |
| *[[Galbo]]
| |
| *[[Sir Kibble]]
| |
| *[[Bowby]]
| |
| *[[ArmorDee]]
| |
| *[[Degout]]
| |
| *[[Bouncy]]
| |
| *[[Noddy]]
| |
| {{col-break|width=33%}}
| |
| *[[Waddle Doo]]
| |
| *[[Bowby]]
| |
| *[[Leafan]]
| |
| *[[Broom Hatter]]
| |
| *[[Bronto Burt]]
| |
| *[[Gordo]]
| |
| *[[Whippy]]
| |
| {{col-break|width=34%}}
| |
| *[[Sheld]]
| |
| *[[Walky]]
| |
| *[[Rocky]]
| |
| *[[Owgulf]]
| |
| *[[Tick]]
| |
| *[[Knuckle Joe]]
| |
| *[[Gigatzo]]
| |
| {{col-end}}
| |
| |
| |
| {{col-begin|width=50%}}
| |
| *N/A
| |
| {{col-end}}
| |
| |- | | |- |
| | |{{center|[[File:KRtDLD Egg Engines Stage 5 select screenshot.png|200px]]<br>'''[[Egg Engines - Stage 5|Stage 5]]'''}} |
| | |5 |
| | |{{N}} |
| | |{{N}} |
| | |There is a secret [[HAL Room]] in this stage. |
| |- | | |- |
| ! width="420px"| '''Abilities'''
| | |{{center|[[File:KRtDLD Egg Engines Stage 6 select screenshot.png|200px]]<br>'''[[Egg Engines - Stage 6|Stage 6]]'''}} |
| ! width="180px" | '''Super Ability'''
| | |{{N}} |
| |- bgcolor="#E47575" | | |{{N}} |
| |
| | |[[Metal General]]<br>[[HR-D3]] (Extra Mode only) |
| {{col-begin}} | |
| {{col-break|width=50%}} | |
| *[[Beam]]
| |
| *[[Mike]]
| |
| *[[Leaf]]
| |
| *[[Wing]]
| |
| *[[Fighter]]
| |
| *[[Sleep]]
| |
| {{col-break|width=50%}}
| |
| *[[Fire]]
| |
| *[[Cutter]]
| |
| *[[Stone]]
| |
| *[[Needle]]
| |
| *[[Whip]]
| |
| {{col-end}}
| |
| | | | | |
| {{col-begin}}
| |
| *N/A
| |
| {{col-end}}
| |
| |} | | |} |
|
| |
|
| ===Stage 6 (Boss: [[Metal General]], [[HR-D3]])=== | | == Gallery == |
| The stage begins in an elevator in the factory. It automatically takes Kirby and his friends up to a room with a conveyor belt floor. In this room are Pedestals with the following abilities: [[Hi-Jump]], [[Beam]], [[Ninja]] and [[Sword]]. The conveyor then leads to another elevator that goes up to the door to the boss room.
| | <gallery> |
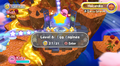
| | | KRtDL Egg Engines map screenshot.png|Egg Engines on the World Map in ''Kirby's Return to Dream Land'' |
| The boss room itself is merely a platform located in the wasteland, with walls on both sides but no ceiling. The [[Metal General]] is already present in the room, though deactivated. Approaching causes a strange glow to emanate into the Genera's body, activating him and beginning the fight.
| | KRtDL Egg Engines lobby screenshot.png|A portion of the Egg Engines level hub in ''Kirby's Return to Dream Land'' |
| | KRTDL-map-B-6-0.jpg|Full view of the level hub in ''Kirby's Return to Dream Land'' |
| | </gallery> |
|
| |
|
| ==Names in Other Languages== | | ==Names in other languages== |
| {{Names | | {{Names |
| |ja=エッガーエンジンズ | | |ja=エッガーエンジンズ |
| |jaR=Eggā Enjinzu | | |jaR=Eggā Enjinzu |
| |jaM=Egger Engines | | |jaM=Egger Engines<br><small>The Japanese version writes the level name in English as such.</small> |
| |es=Artefactos Almendra | | |esA=Artefactos Almendra |
| |esM=Almond Artifacts | | |esAM=Almond Artifacts |
| |fr=Imbroglio Industriel | | |esE=Maquinaria Menta |
| |frM=Industrial Entanglement | | |esEM=Mint Machinery |
| | |frA=Imbroglio industriel |
| | |frAM=Industrial entanglement |
| | |frE=Imbroglio Industriel |
| | |frEM=Industrial Entanglement |
| | |de=Eier-Elektrik |
| | |deM=Eggs Electrics |
| | |it=Industrie Involtino |
| | |itM=Roulade Industries |
| | |ko=달걀 엔진 |
| | |koR=Dalgyal Enjin |
| | |koM=Egg Engine<br><small>In the Korean version of ''Kirby's Return to Dream Land'' and its remake, the name is written in English as "Egger Engines".</small> |
| | |pt=Engrenagens Espetinho |
| | |ptM=Kebab Gears<br><small>Specifically, "espetinho" in Brazil refers to any kind of cooked food in a skewer, usually meat but not always.</small> |
| | |zhTrad=惡戰爾後 |
| | |zhTradR=è zhàn ěr hòu |
| | |zhSimp=恶战尔后 |
| | |zhSimpR=è zhàn ěr hòu |
| | |zhM=Aftermath of a fierce war<br><small>In the Chinese versions of ''Kirby's Return to Dream Land Deluxe'', the name is written in English as "Egger Engines".</small> |
| | |nl=Aardbeiautomaten |
| | |nlM=Strawberry machines |
| }} | | }} |
| <br clear=all>
| |
|
| |
|
| {{KirbyRtDL}} | | {{clear}} |
|
| |
|
| | {{Navbox-KRtDL/KRtDLD}} |
| [[Category:Halcandra locations]] | | [[Category:Halcandra locations]] |
| [[Category:Levels in Kirby's Return to Dream Land]]
| |