Item Challenge
| ||||||||||||||||||
| ||||||||||||||||||
|
| ||||||||||||||||||

| “ | The final stage is the Item Challenge! The time limit is 3:30 for this true test! | ” | — Item Challenge Caption |
Item Challenge is the last Challenge Stage unlocked in Kirby's Return to Dream Land and Kirby's Return to Dream Land Deluxe. It tests Kirby's proficiency with many of the various items in the game in a series of chambers, where the goal is to defeat all the enemies and collect all the coins as quickly as possible. The window of time to earn a Platinum Medal is 0:41 or higher.
Layout[edit]
The stage consists of three main chambers and three side chambers.
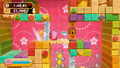
Kirby necessarily begins this challenge without any Copy Ability, as any he tries to bring into the challenge will be shed prior to entering the door from the Lor Starcutter. Instead, he begins in the first chamber with a Key in his hands. He can use this on a gate just up ahead past some crumbling blocks over spikes. From there, he hops into a Stomper Boot and can use it to crash through some metal blocks into a wider area where he will need to leap through more blocks and on enemies' heads over a precarious bottomless pit. From here, Kirby will need to ditch the boot in favor of a Crackler, which he can carry along to shoot Bomb Blocks and create a bridge over another abyss. It then needs to be taken along a series of elevators followed by drops, all the while blasting the enemies encountered along the way. If he is quick enough, Kirby can then blast some metal blocks away at the end of this section to reveal a door leading to a side area before the Crackler fizzles out. In this side area, Kirby will need to guide two Key Dees toward gates to give him access to a coin cache.
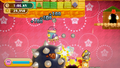
The second area begins with Kirby picking up a Prism Shield and carrying it along a straight path, defeating enemies above him as he does so. He'll need to make big leaps with the shield further down the path, with one wrong move leading directly to the abyss below. The Prism Shield can then be used to clear away barriers and defeat more foes on a path that alternates up and down. After riding a wind current up to the door forward, Kirby can drop the Prism Shield and use his Super Inhale to uncover another side door. In this side area, Kirby will need to alternate between an Invisibility Stone and a key to gain access to a coin cache.
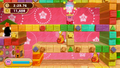
The third area gives Kirby another Stomper Boot with which to bounce atop Gordos, lava pillars, and other hazards. The main crux of this area revolves around riding a giant spiky boulder that rolls down a path by continually bouncing on top of it using the boot. Kirby will need to be careful not to jump too high in places, as the ceiling is searing hot in places. The spiky boulder will clear away all of the enemies guarding the stage exit, but one more side door can be accessed if Kirby jumps at the right moment. He will need to bring the Stomper Boot through this door in order to access the Balloon Bomb in the side area. Kirby will then need to carry this bomb up past a series of shifting platforms and toss it at an otherwise inaccessible Bomb Block to get at the last set of coins before returning to the main area and finishing the stage.
In Extra Mode, there are a great many more coins to collect. In addition, a lot of stage elements move faster, including the Key Dees in the first side-chamber. This can actually save time compared to Story Mode, since Kirby will not have to wait for them to catch up.
Enemies[edit]
| Enemies | |||
|---|---|---|---|
|
|
Tips[edit]
There are a few things to keep in mind when aiming for Platinum on this stage, though it should be noted that the strategies listed here are by no means the only ones that will do the job:
- Pressing the jump button right after stomping an enemy with the Stomper Boot will give Kirby an extra high bounce, which is handy for reaching higher platforms.
- Kirby has the ability to grab items from behind walls using his inhale. This is a necessary technique to solve the second side area.
- The Balloon Bomb becomes volatile after expanding four times from its initial state (to its fifth size). Kirby will need to keep his distance when throwing it, or he will hurt himself.
- Once Kirby has finished using an item, it is quicker to drop it rather than throw it. Dropping items in midair is the fastest way; it is almost instant and allows Kirby to float straight away without losing any height.
Guide[edit]
- "Your reward for collecting all of the Energy Spheres is the Item Challenge!"
- "This challenge is all about items! The time limit is 3:30."
- "The Item Challenge is a true test of Kirby skill. Go for the goal!"
Pro Tips[edit]
- "Items can be inhaled toward you, even when behind a wall."
- "The Stomper Boot lets you bounce off foes when you step on them."
- "There's a medal even better than gold. Have you ever earned one?"
Gallery[edit]
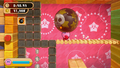
Kirby charges forth with a Stomper Boot in Kirby's Return to Dream Land.
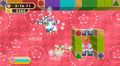
Kirby jumps to the gate with the key.
Kirby bounces off his foes using the Stomper Boot.
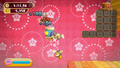
Kirby clears the way up using the Crackler.
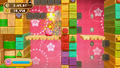
Kirby uses the Pull Switch to let the Key Dees through.
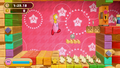
Kirby runs forward fearlessly with the Prism Shield.
Kirby inhales the key through a barrier so he can proceed with the Invisibility Stone.
Kirby rides atop a spiky boulder with another Stomper Boot.
Kirby prepares to throw the Balloon Bomb.
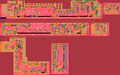
Full map of the Challenge Stage in Kirby's Return to Dream Land


Video walkthroughs[edit]
Platinum Rank run of the Item Challenge in Kirby's Return to Dream Land.
|
Platinum Rank run of the Item Challenge in Kirby's Return to Dream Land Deluxe.
|
Platinum Rank run of the Item Challenge in Extra Mode in Kirby's Return to Dream Land Deluxe.
|
Names in other languages[edit]
| Language | Name | Meaning |
|---|---|---|
| Japanese | キャリーチャレンジ kyarī charenji |
Carry Challenge |
| Italian | Sfida - Oggetti | Objects - Challenge |
| Korean | 아이템 챌린지 aitem chaellinji |
Item Challenge |
| Brazilian Portuguese | Desafio dos itens | Items challenge |
| Latin American Spanish | Reto de los objetos | Objects challenge |