Nutty Noon - Stage 2: Difference between revisions
m (Text replacement - "Armor Dee" to "Armor Waddle Dee") |
No edit summary |
||
| Line 1: | Line 1: | ||
{{construction|This page is being refurbished to account for KRtDLD info. Hang tight. --[[User:Samwell|Samwell]] ([[User talk:Samwell|talk]]) 04:31, 1 March 2023 (UTC)}} | |||
{{Infobox-KRtDLStage | {{Infobox-KRtDLStage | ||
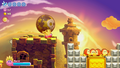
|image=[[File: | |image=[[File:KRtDLD Nutty Noon Stage 2 select screenshot.png|350px]] | ||
|caption= | |caption='''Nutty Noon - Stage 2''' in the [[level hub]]. | ||
|level=[[Nutty Noon]] | |level=[[Nutty Noon]] | ||
|super=[[Flare Beam]] | |super=[[Flare Beam]] | ||
| Line 9: | Line 10: | ||
|nextstage=[[Nutty Noon - Stage 3]] | |nextstage=[[Nutty Noon - Stage 3]] | ||
}} | }} | ||
'''Nutty Noon - Stage 2''' is the second stage of [[Nutty Noon]] in ''Kirby's Return to Dream Land''. There are four [[Energy Sphere]]s in this stage. | '''Nutty Noon - Stage 2''' (simply called '''Stage 2''' or '''5-2''' in-game) is the second stage of [[Nutty Noon]] in ''Kirby's Return to Dream Land'' and its remake—''[[Kirby's Return to Dream Land Deluxe]]''. There are four [[Energy Sphere]]s in this stage. | ||
==Overview== | ==Overview== | ||
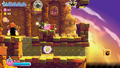
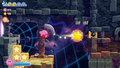
[[File:KRtDLD Nutty Noon Stage 2 screenshot 01.png|thumb|250px|Kirby attacks his foes on the bridge along the castle high in the evening sky.]] | |||
The stage begins at the foot of a long stone bridge in the clouds, bathed in evening light. As Kirby progresses, he will need to deal with the guards, then pass through the gatehouse. | The stage begins at the foot of a long stone bridge in the clouds, bathed in evening light. As Kirby progresses, he will need to deal with the guards, then pass through the gatehouse. | ||
| Line 20: | Line 22: | ||
From there, Kirby traverses another long bridge. Along the way, he will have to battle [[Moundo]] for rite of passage. | From there, Kirby traverses another long bridge. Along the way, he will have to battle [[Moundo]] for rite of passage. | ||
In the last area, Kirby will find himself in tight hallways where he can use the [[Flare Beam]] ability to light the way forward. If he lights all of the | In the last area, Kirby will find himself in tight hallways where he can use the [[Flare Beam]] ability to light the way forward. If he lights all of the [[Beam lamp]]s in his path, he can open the way to a rift to [[Another Dimension]]. | ||
=== | ===Another Dimension rift=== | ||
In this challenge, Kirby is tasked with shooting [[Star Bullet]]s at [[Bomb Block]]s to proceed. Each separate part has him aiming carefully at the block, which is often guarded by moving barriers. At the end, he will have to do battle with an electric [[Sphere Doomer]] to clear this ordeal. From there, Kirby can ride a series of cannons to reach the stage exit. | In this challenge, Kirby is tasked with shooting [[Star Bullet]]s at [[Bomb Block]]s to proceed. Each separate part has him aiming carefully at the block, which is often guarded by moving barriers. At the end, he will have to do battle with an electric [[Sphere Doomer]] to clear this ordeal. From there, Kirby can ride a series of cannons to reach the stage exit. | ||
===Energy Sphere | ===Energy Sphere guide=== | ||
*In the second area, Kirby will need to carry a [[Balloon Bomb]] across a series of shifting platforms and toss it onto a large metal block barricade. Behind this barricade is a side door which leads to a [[Bomb]] challenge. Completing this task yields the sphere. | *In the second area, Kirby will need to carry a [[Balloon Bomb]] across a series of shifting platforms and toss it onto a large metal block barricade. Behind this barricade is a side door which leads to a [[Bomb]] challenge. Completing this task yields the first sphere. | ||
*After defeating [[Moundo]], Kirby can use the [[Stone]] ability to pound a series of [[Stake]]s in the following hallway. Kirby should mind the last post, as it should not be pounded. This done, the sphere should be accessible. | *After defeating [[Moundo]], Kirby can use the [[Stone]] ability to pound a series of [[Stake]]s in the following hallway. Kirby should mind the last post, as it should not be pounded. This done, the second sphere should be accessible. | ||
*The last two spheres can be obtained by defeating the [[Sphere Doomer]] at the end of the rift. | *The last two spheres can be obtained by defeating the [[Sphere Doomer]] at the end of the rift. | ||
==Enemies, Mid-Bosses and | ==Enemies, Mid-Bosses and abilities== | ||
{| style="border: 3px solid #E47575; {{round}};background: #F69D99" cellspacing="2" | {| style="border: 3px solid #E47575; {{round}};background: #F69D99" cellspacing="2" | ||
! width="420px" | '''Regular Enemies''' | ! width="420px" | '''Regular Enemies''' | ||
| Line 42: | Line 44: | ||
*[[Gordo]] | *[[Gordo]] | ||
*[[Moonja]] | *[[Moonja]] | ||
*[[Mumbies]] | |||
{{col-break|width=33%}} | {{col-break|width=33%}} | ||
*[[Poppy Bros. Jr.]] | *[[Poppy Bros. Jr.]] | ||
*[[Sandran]] <small>(KRtDLD only)</small> | |||
*[[Scarfy]] | *[[Scarfy]] | ||
{{col-break|width=34%}} | |||
*[[Shelt]] | *[[Shelt]] | ||
*[[Super Waddle Doo]] | *[[Super Waddle Doo]] | ||
*[[Waddle Dee]] | *[[Waddle Dee]] | ||
| Line 68: | Line 71: | ||
*[[Ninja]] | *[[Ninja]] | ||
*[[Parasol]] | *[[Parasol]] | ||
*[[Sand]] <small>(KRtDLD only)</small> | |||
{{col-break|width=50%}} | |||
*[[Spark]] | *[[Spark]] | ||
*[[Stone]] | *[[Stone]] | ||
*[[Sword]] | *[[Sword]] | ||
| Line 81: | Line 85: | ||
==Gallery== | ==Gallery== | ||
=== ''Kirby's Return to Dream Land'' === | |||
<gallery> | <gallery> | ||
KRtDL Nutty Noon Stage 2 screenshot.png|Kirby finds a castle in the clouds. | |||
KRtDL Nutty Noon Stage 2-1.jpg|Kirby takes the suggestion offered to him by Poppy Bros. Jr. | KRtDL Nutty Noon Stage 2-1.jpg|Kirby takes the suggestion offered to him by Poppy Bros. Jr. | ||
KRtDL Nutty Noon Stage 2-2.jpg|Flare Beam Kirby solves a beam lamp puzzle. | KRtDL Nutty Noon Stage 2-2.jpg|Flare Beam Kirby solves a beam lamp puzzle. | ||
KRtDL Nutty Noon Stage 2-3.jpg|Kirby spits through a shifting spiky nook to hit the Bomb Block. | KRtDL Nutty Noon Stage 2-3.jpg|Kirby spits through a shifting spiky nook to hit the Bomb Block. | ||
</gallery> | |||
===''Kirby's Return to Dream Land Deluxe''=== | |||
<gallery> | |||
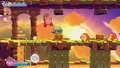
KRtDLD Nutty Noon Stage 2 screenshot 02.png|Kirby prepares to toss a Balloon Bomb at a fortification. | |||
KRtDLD Nutty Noon Stage 2 screenshot 03.png|Bomb Kirby aims carefully to hit a Bomb Block on the other side of this gap. | |||
KRtDLD Nutty Noon Stage 2 screenshot 04.png|Kirby contends with many possible switches. | |||
KRtDLD Nutty Noon Stage 2 screenshot 05.png|Kirby comes across a familiar stake puzzle. | |||
KRtDLD Nutty Noon Stage 2 screenshot 06.png|Flare Beam Kirby lights up the beam lamps. | |||
KRtDLD Nutty Noon Stage 2 screenshot 07.png|Kirby spits carefully to make progress in the rift. | |||
</gallery> | </gallery> | ||
Revision as of 04:31, 1 March 2023
| ||||||||||||||
| ||||||||||||||
|
| ||||||||||||||

Nutty Noon - Stage 2 (simply called Stage 2 or 5-2 in-game) is the second stage of Nutty Noon in Kirby's Return to Dream Land and its remake—Kirby's Return to Dream Land Deluxe. There are four Energy Spheres in this stage.
Overview

The stage begins at the foot of a long stone bridge in the clouds, bathed in evening light. As Kirby progresses, he will need to deal with the guards, then pass through the gatehouse.
The next area has Kirby bounding between columns that shift continuously up and down. Many enemies fill the air here, but Kirby can toss Bombs at them, so he should be fine.
The next area has Kirby ascending a tower, made of chambers with Pull Switches. In each room, only one switch opens the way forward, while the others open compartments containing foes and/or valuables.
From there, Kirby traverses another long bridge. Along the way, he will have to battle Moundo for rite of passage.
In the last area, Kirby will find himself in tight hallways where he can use the Flare Beam ability to light the way forward. If he lights all of the Beam lamps in his path, he can open the way to a rift to Another Dimension.
Another Dimension rift
In this challenge, Kirby is tasked with shooting Star Bullets at Bomb Blocks to proceed. Each separate part has him aiming carefully at the block, which is often guarded by moving barriers. At the end, he will have to do battle with an electric Sphere Doomer to clear this ordeal. From there, Kirby can ride a series of cannons to reach the stage exit.
Energy Sphere guide
- In the second area, Kirby will need to carry a Balloon Bomb across a series of shifting platforms and toss it onto a large metal block barricade. Behind this barricade is a side door which leads to a Bomb challenge. Completing this task yields the first sphere.
- After defeating Moundo, Kirby can use the Stone ability to pound a series of Stakes in the following hallway. Kirby should mind the last post, as it should not be pounded. This done, the second sphere should be accessible.
- The last two spheres can be obtained by defeating the Sphere Doomer at the end of the rift.
Enemies, Mid-Bosses and abilities
| Regular Enemies | Mid-Bosses | ||||
|---|---|---|---|---|---|
|
| ||||
| Abilities | Super Ability | ||||
|
|
|
Gallery
Kirby's Return to Dream Land
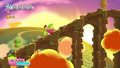
Kirby finds a castle in the clouds.
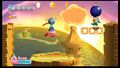
Kirby takes the suggestion offered to him by Poppy Bros. Jr.
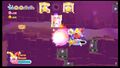
Flare Beam Kirby solves a beam lamp puzzle.
Kirby spits through a shifting spiky nook to hit the Bomb Block.


Kirby's Return to Dream Land Deluxe
Kirby prepares to toss a Balloon Bomb at a fortification.
Bomb Kirby aims carefully to hit a Bomb Block on the other side of this gap.

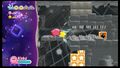
Kirby contends with many possible switches.
Kirby comes across a familiar stake puzzle.
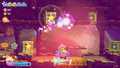
Flare Beam Kirby lights up the beam lamps.
Kirby spits carefully to make progress in the rift.


Video Walkthrough
100% walkthrough of Nutty Noon - Stage 2.
|