White Wafers - Stage 3: Difference between revisions
m (→Gallery) |
m (Minor fix) |
||
| (13 intermediate revisions by 6 users not shown) | |||
| Line 1: | Line 1: | ||
{{Infobox-KRtDLStage | {{Infobox-KRtDLStage | ||
|image=[[File: | |image=[[File:KRtDLD White Wafers Stage 3 select screenshot.png|350px]] | ||
|caption= | |caption='''White Wafers - Stage 3''' in the [[level hub]]. | ||
|level=[[White Wafers]] | |level=[[White Wafers]] | ||
|super= | |super={{N}} | ||
|sphere=4 | |sphere=4 | ||
|midboss=[[Water Galboros]] | |midboss=[[Water Galboros]] | ||
|theme music=[[File:Tumbling Ice sample KRtDL.oga]] | |||
|theme title="[[Tumbling Ice]]" | |||
|description=Clip of the theme that primarily plays in White Wafers - Stage 3. | |||
|previousstage=[[White Wafers - Stage 2]] | |previousstage=[[White Wafers - Stage 2]] | ||
|nextstage=[[White Wafers - Stage 4]] | |nextstage=[[White Wafers - Stage 4]] | ||
}} | }} | ||
'''White Wafers - Stage 3''' (simply called '''Stage 3''' or '''4-3''' in-game) is the third stage of [[White Wafers]] in ''[[Kirby's Return to Dream Land]]'' and its remake—''[[Kirby's Return to Dream Land Deluxe]]''. There are four [[Energy Sphere]]s in this stage. | |||
'''White Wafers - Stage 3''' is the third stage of [[White Wafers]] in '' | |||
==Overview== | ==Overview== | ||
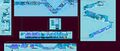
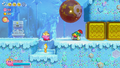
The stage begins at the top of an icy passage. Kirby will need a Pull [[Switch]] to open the way downward. Along the way, Kirby will need to dodge some [[Coldtzo]] fire, then pass a [[Lanzer]] to | [[File:KRtDLD White Wafers Stage 3 screenshot 03.png|thumb|left|250px|Kirby uses an Invisibility Stone to slip by some icy boulders in the caves.]] | ||
The stage begins at the top of an icy passage. Kirby will need a Pull [[Switch]] to open the way downward. Along the way, Kirby will need to dodge some [[Coldtzo]] fire, then pass a [[Lanzer]] to reach the door in the pool. | |||
The next area is an underwater passage. Kirby will need to traverse past bounding spiked ammonites and enemies on blocks. | The next area is an underwater passage. Kirby will need to traverse past bounding spiked ammonites and enemies on blocks. | ||
Kirby returns to dry land in the next series of tunnels. Here, Kirby will need to dodge some ice | Kirby returns to dry land in the next series of tunnels. Here, Kirby will need to dodge some ice [[boulder]]s rolling his way on various decks. The door to the next area can be found after crossing several of these decks. | ||
In the next area are a multitude of waterfalls (and | In the next area are a multitude of waterfalls (and "water-rises") hanging over a lengthy [[bottomless pit]]. Kirby will need to swim across these as he makes his way across the chasm. Near the end, a number of [[Barbar]] can be found in the last few columns of water. | ||
The final stretch takes place in a wide cavern with [[Coldtzo]]s firing from the background. Along the way, Kirby can carry a series of [[Balloon Bomb]]s to make a path. This done successfully, Kirby will have a quick fix for the [[Water Galboros]] problem up ahead. From there, one more stretch leads to the | The final stretch takes place in a wide cavern with [[Coldtzo]]s firing from the background. Along the way, Kirby can carry a series of [[Balloon Bomb]]s to make a path. This done successfully, Kirby will have a quick fix for the [[Water Galboros]] problem up ahead. From there, one more stretch leads to the Goal Door further right. | ||
===Energy Sphere | ===Energy Sphere guide=== | ||
*In the underwater area, Kirby will need to carry the [[Spear]] ability across the hazards, then use it to hit a [[ | *In the underwater area, Kirby will need to carry the [[Spear]] ability across the hazards, then use it to hit a [[switch]] in the floor to cause a pit to deepen, revealing the first sphere. | ||
*In the rolling ice section, Kirby can find an [[Invisibility Stone]] on the path. He will need to carry it up the path, destroying some ice blocks along the way. Passing through the crystal gate will lead to a path where Kirby can break a [[Bomb Block]] and obtain the sphere. | *In the rolling ice section, Kirby can find an [[Invisibility Stone]] on the path. He will need to carry it up the path, destroying some ice blocks along the way. Passing through the crystal gate will lead to a path where Kirby can break a [[Bomb Block]] and obtain the second sphere. | ||
*In the waterfall area, Kirby will need to use the [[Cutter]] ability to let loose a heavy [[ | *In the waterfall area, Kirby will need to use the [[Cutter]] ability to let loose a heavy [[Rope|rope platform]] holding a round-trip door. Through the door is a room where Kirby can let loose an ice boulder to gain access to the third sphere. | ||
*In the last area, past the [[Water Galboros]], a [[ | *In the last area, past the [[Water Galboros]], a [[key]] can be collected and taken to a door up ahead. Inside is a [[Bomb Block]] barrier holding the last sphere. | ||
==Enemies, Mid-Bosses and | ==Enemies, Mid-Bosses and abilities== | ||
{| style="border: 3px solid #E47575; {{round}};background: #F69D99" cellspacing="2" | {| style="border: 3px solid #E47575; {{round}};background: #F69D99" cellspacing="2" | ||
! width="420px" | '''Regular Enemies''' | ! width="420px" | '''Regular Enemies''' | ||
| Line 44: | Line 46: | ||
*[[Chilly]] | *[[Chilly]] | ||
*[[Coldtzo]] | *[[Coldtzo]] | ||
*[[Craby]] | |||
{{col-break|width=33%}} | {{col-break|width=33%}} | ||
*[[Galbo]] | *[[Galbo]] | ||
*[[Glunk]] | *[[Glunk]] | ||
*[[Hunter Scarfy]]* | |||
*[[Lanzer]] | *[[Lanzer]] | ||
*[[Leafan]] | *[[Leafan]] | ||
*[[Needlous]] | *[[Needlous]] | ||
*[[Rocky]] | |||
{{col-break|width=34%}} | {{col-break|width=34%}} | ||
*[[ | *[[Sandran]] <small>(KRtDLD only)</small> | ||
*[[Shelt]] | *[[Shelt]] | ||
*[[Sir Kibble]] | *[[Sir Kibble]] | ||
| Line 77: | Line 81: | ||
*[[Needle]] | *[[Needle]] | ||
{{col-break|width=50%}} | {{col-break|width=50%}} | ||
*[[Sand]] <small>(KRtDLD only)</small> | |||
*[[Spear]] | *[[Spear]] | ||
*[[Stone]] | *[[Stone]] | ||
| Line 87: | Line 92: | ||
{{col-end}} | {{col-end}} | ||
|} | |} | ||
<small>*Only appears in Extra Mode in ''Kirby's Return to Dream Land Deluxe''</small> | |||
==Gallery== | ==Gallery== | ||
===''Kirby's Return to Dream Land''=== | |||
<gallery> | |||
KRtDL White Wafers Stage 3-1.jpg|Kirby skillfully uses a ladder to avoid a rolling ice boulder. | |||
KRtDL White Wafers Stage 3-2.jpg|Kirby prepares to drop a surprise on [[Chilly]]. | |||
KRtDL White Wafers Stage 3-3.jpg|[[Water Galboros]] gets taken out by a Balloon Bomb. | |||
KRtDL White Wafers Stage 3-4.png|Kirby swims close to a spiky shell. | |||
KRtDL White Wafers Stage 3 screenshot.png|Kirby does not seem to mind the freezing water or the giant Barbars inside the falls. | |||
KRTDL-map-A-4-3.jpg|Stage map | |||
</gallery> | |||
===''Kirby's Return to Dream Land Deluxe''=== | |||
<gallery> | <gallery> | ||
KRtDLD White Wafers Stage 3 screenshot 01.png|Kirby slips past the firing Coldtzos. | |||
KRtDLD White Wafers Stage 3 screenshot 02.png|Kirby swims past the spiky shells in the freezing water channel. | |||
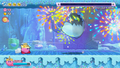
KRtDLD White Wafers Stage 3 screenshot 04.png|Kirby carefully avoids a Barbar trying to eat him in a suspended water bar. | |||
KRtDLD White Wafers Stage 3 screenshot 05.png|Kirby tosses the first Balloon Bomb to clear an obstruction. | |||
KRtDLD White Wafers Stage 3 screenshot 06.png|Kirby defeats Water Galboros using the second Balloon Bomb. | |||
</gallery> | </gallery> | ||
==Video | ==Video walkthroughs== | ||
{{Youtube|EkPrrrKIraQ|300|100% walkthrough of White Wafers - Stage 3.}} | {{Youtube|EkPrrrKIraQ|300|100% walkthrough of White Wafers - Stage 3 in ''Kirby's Return to Dream Land''.}} | ||
{{Youtube|jmU9FLFzrD4|300|100% walkthrough of White Wafers - Stage 3 in Extra Mode in ''Kirby's Return to Dream Land Deluxe''.}} | |||
{{clear}} | {{clear}} | ||
{{Navbox-KRtDL}} | {{Navbox-KRtDL/KRtDLD}} | ||
Latest revision as of 14:04, 23 June 2023
| ||||||||||||||
| ||||||||||||||
| ||||||||||||||
|
| ||||||||||||||

White Wafers - Stage 3 (simply called Stage 3 or 4-3 in-game) is the third stage of White Wafers in Kirby's Return to Dream Land and its remake—Kirby's Return to Dream Land Deluxe. There are four Energy Spheres in this stage.
Overview[edit]

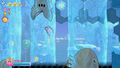
The stage begins at the top of an icy passage. Kirby will need a Pull Switch to open the way downward. Along the way, Kirby will need to dodge some Coldtzo fire, then pass a Lanzer to reach the door in the pool.
The next area is an underwater passage. Kirby will need to traverse past bounding spiked ammonites and enemies on blocks.
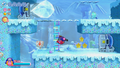
Kirby returns to dry land in the next series of tunnels. Here, Kirby will need to dodge some ice boulders rolling his way on various decks. The door to the next area can be found after crossing several of these decks.
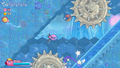
In the next area are a multitude of waterfalls (and "water-rises") hanging over a lengthy bottomless pit. Kirby will need to swim across these as he makes his way across the chasm. Near the end, a number of Barbar can be found in the last few columns of water.
The final stretch takes place in a wide cavern with Coldtzos firing from the background. Along the way, Kirby can carry a series of Balloon Bombs to make a path. This done successfully, Kirby will have a quick fix for the Water Galboros problem up ahead. From there, one more stretch leads to the Goal Door further right.
Energy Sphere guide[edit]
- In the underwater area, Kirby will need to carry the Spear ability across the hazards, then use it to hit a switch in the floor to cause a pit to deepen, revealing the first sphere.
- In the rolling ice section, Kirby can find an Invisibility Stone on the path. He will need to carry it up the path, destroying some ice blocks along the way. Passing through the crystal gate will lead to a path where Kirby can break a Bomb Block and obtain the second sphere.
- In the waterfall area, Kirby will need to use the Cutter ability to let loose a heavy rope platform holding a round-trip door. Through the door is a room where Kirby can let loose an ice boulder to gain access to the third sphere.
- In the last area, past the Water Galboros, a key can be collected and taken to a door up ahead. Inside is a Bomb Block barrier holding the last sphere.
Enemies, Mid-Bosses and abilities[edit]
| Regular Enemies | Mid-Boss | ||||
|---|---|---|---|---|---|
|
| ||||
| Abilities | Super Ability | ||||
|
|
|
*Only appears in Extra Mode in Kirby's Return to Dream Land Deluxe
Gallery[edit]
Kirby's Return to Dream Land[edit]
Kirby skillfully uses a ladder to avoid a rolling ice boulder.

Kirby prepares to drop a surprise on Chilly.
Water Galboros gets taken out by a Balloon Bomb.
Kirby swims close to a spiky shell.
Kirby does not seem to mind the freezing water or the giant Barbars inside the falls.
Stage map


Kirby's Return to Dream Land Deluxe[edit]
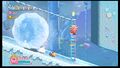
Kirby slips past the firing Coldtzos.
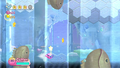
Kirby swims past the spiky shells in the freezing water channel.
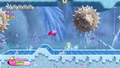
Kirby carefully avoids a Barbar trying to eat him in a suspended water bar.
Kirby tosses the first Balloon Bomb to clear an obstruction.
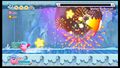
Kirby defeats Water Galboros using the second Balloon Bomb.


Video walkthroughs[edit]
100% walkthrough of White Wafers - Stage 3 in Kirby's Return to Dream Land.
|
100% walkthrough of White Wafers - Stage 3 in Extra Mode in Kirby's Return to Dream Land Deluxe.
|