Raisin Ruins - Stage 1: Difference between revisions
m (Text replacement - "{{Good}}↵" to "") |
m (Minor fix) |
||
| (7 intermediate revisions by 5 users not shown) | |||
| Line 1: | Line 1: | ||
{{Infobox-KRtDLStage | {{Infobox-KRtDLStage | ||
|image=[[File: | |image=[[File:KRtDLD Raisin Ruins Stage 1 select screenshot.png|350px]] | ||
|caption= | |caption='''Raisin Ruins - Stage 1''' in the [[level hub]]. | ||
|level=[[Raisin Ruins]] | |level=[[Raisin Ruins]] | ||
|super= | |super={{N}} | ||
|sphere=3 | |sphere=3 | ||
|midboss=[[Bonkers]] | |midboss=[[Bonkers]] | ||
|theme music=[[File:Sandy Wilds sample KRtDL.oga]] | |||
|theme title="[[Sandy Wilds]]" | |||
|description=Clip of the theme that primarily plays in Raisin Ruins - Stage 1. | |||
|previousstage=[[Cookie Country - Stage 5]] | |previousstage=[[Cookie Country - Stage 5]] | ||
|nextstage=[[Raisin Ruins - Stage 2]] | |nextstage=[[Raisin Ruins - Stage 2]] | ||
}} | }} | ||
'''Raisin Ruins - Stage 1''' (simply called '''Stage 1''' or '''2-1''' in-game) is the first stage of [[Raisin Ruins]] in ''[[Kirby's Return to Dream Land]]'' and its remake—''[[Kirby's Return to Dream Land Deluxe]]''. There are three [[Energy Sphere]]s in this stage. The [[Whip]] [[Copy Ability]] debuts in this stage. In ''Kirby's Return to Dream Land Deluxe'', the [[Sand]] Copy Ability also debuts here. | |||
'''Raisin Ruins - Stage 1''' is the first stage of [[Raisin Ruins]] in ''Kirby's Return to Dream Land''. There are three [[Energy Sphere]]s in this stage. The [[Whip]] [[Copy Ability]] debuts in this stage. | |||
==Overview== | ==Overview== | ||
The stage begins out on a series of dry dunes. Up ahead, a [[Whippy]] can be found which will yield the [[Whip]] ability if swallowed. Using this new toy, [[Kirby]] can tackle the enemies up ahead in proper western fashion. Along the way, several small ruins can be found, which contain goodies that can be grabbed using the whip's long reach. | [[File:KRtDLD Raisin Ruins Stage 1 screenshot 07.png|thumb|left|250px|[[Parasol]] Kirby floats out in the dry wastes, his head protected from the sunlight by his trusty parasol.]] | ||
The stage begins out on a series of dry dunes. Up ahead, a [[Whippy]] can be found which will yield the [[Whip]] ability if swallowed. Using this new toy, [[Kirby]] can tackle the enemies up ahead in proper western fashion. Along the way, several small ruins can be found, which contain goodies that can be grabbed using the whip's long reach. In ''Kirby's Return to Dream Land Deluxe'', the [[Sand]] ability can be obtained here as well, and it can also grab items through walls. There is a side door that leads to a [[1-Up]] guarded by a wall of [[Gordo]]s, but the main path is through the door to the right. | |||
In the next area, Kirby can find patrolling [[Flamer]]s. Using their fire, Kirby can | In the next area, Kirby can find patrolling [[Flamer]]s. Using their fire, Kirby can light a [[fuse]] up ahead in order to make use of a [[Cannon]] while proceeding past the [[Nruff]]-riding [[Waddle Dee]]s. A hidden [[Copy Essence]] can be found near the end of the path which yields the [[Needle]] ability. | ||
Through the door, the path leads into a tunnel, lined with foes and [[boulder]]s primed to roll down it. Kirby will have to keep pace with the boulders as they are dropped to pass through safely. Alternatively, he may be able to slip by them if he is fast enough or has the right ability. | |||
Through the next door is another tunnel which leads uphill, where Kirby will now have to avoid boulders rolling in his direction. This eventually leads out of the cave. | |||
Out in the open, Kirby can grab an [[Invincible Candy]] and charge effortlessly through all the foes up ahead. | Out in the open, Kirby can grab an [[Invincible Candy]] and charge effortlessly through all the foes up ahead. There are a few [[bottomless pit]]s to consider on the path, however. | ||
In the last area, Kirby can grab a [[Parasol]] if he so wishes and carry it into an encounter with the mallet-wielding simian [[Bonkers]]. Defeating him yields the [[Hammer]] ability, and the way through a short [[Kabu]] tunnel to reach the stage exit on the other side. | In the last area, Kirby can grab a [[Parasol]] if he so wishes and carry it into an encounter with the mallet-wielding simian [[Bonkers]]. Defeating him yields the [[Hammer]] ability, and the way through a short [[Kabu]]-infested tunnel to reach the stage exit on the other side. | ||
===Energy Sphere Guide=== | ===Energy Sphere Guide=== | ||
*A | *A cannon can be found along the path in the second area. Kirby will need to light the fuse, then get in and be fired to a separate area where he can get the first sphere. | ||
*In the downward tunnel, Kirby will have to follow the dual boulders while trying to avoid getting hit by them. They will clear the way to the sphere by breaking through a barrier at the end of the tunnel. | *In the downward-sloping tunnel, Kirby will have to follow the dual boulders while trying to avoid getting hit by them. They will clear the way to the second sphere by breaking through a barrier at the end of the tunnel. | ||
*After defeating [[Bonkers]], Kirby will need to use the [[Hammer]] ability to bust through some metal blocks to get this | *After defeating [[Bonkers]], Kirby will need to use the [[Hammer]] ability to bust through some metal blocks to get the last sphere. Sand can also be used for this. | ||
==Enemies, Mid-Bosses and Abilities== | ==Enemies, Mid-Bosses and Abilities== | ||
| Line 38: | Line 41: | ||
{{col-begin}} | {{col-begin}} | ||
{{col-break|width=33%}} | {{col-break|width=33%}} | ||
*[[Blade Knight]] <small>(KRtDLD only)</small> | |||
*[[Bouncy]]* | |||
*[[Bronto Burt]] | *[[Bronto Burt]] | ||
*[[Broom Hatter]] | *[[Broom Hatter]] | ||
*[[Cappy]] | *[[Cappy]] | ||
*[[Flamer]] | *[[Flamer]] | ||
{{col-break|width=33%}} | |||
*[[Gordo]] | *[[Gordo]] | ||
*[[Hot Head]] | *[[Hot Head]] | ||
*[[Kabu]] | *[[Kabu]] | ||
*[[Nruff]] | *[[Nruff]] | ||
*[[Pacto]] | *[[Pacto]] | ||
*[[Parasol Waddle Dee]] | *[[Parasol Waddle Dee]] | ||
*[[ | *[[Parasol Waddle Doo]] | ||
{{col-break|width=34%}} | {{col-break|width=34%}} | ||
*[[Sandran]] <small>(KRtDLD only)</small> | |||
*[[Scarfy]] | *[[Scarfy]] | ||
*[[Sparky]] | *[[Sparky]] | ||
| Line 71: | Line 77: | ||
*[[Hammer]] | *[[Hammer]] | ||
*[[Needle]] | *[[Needle]] | ||
*[[Parasol]] | |||
{{col-break|width=50%}} | {{col-break|width=50%}} | ||
*[[ | *[[Sand]] <small>(KRtDLD only)</small> | ||
*[[Spark]] | *[[Spark]] | ||
*[[Sword]] | *[[Sword]] | ||
| Line 78: | Line 85: | ||
{{col-end}} | {{col-end}} | ||
|} | |} | ||
<small>*Only appears in Extra Mode in ''Kirby's Return to Dream Land Deluxe''</small> | |||
==Gallery== | ==Gallery== | ||
===''Kirby's Return to Dream Land''=== | |||
<gallery> | <gallery> | ||
KRtDL Raisin Ruins Stage 1 screenshot.png|Kirby traverses the difficult, dry landscape. | |||
KRtDL Raisin Ruins Stage 1-1.jpg|Kirby bypasses the [[Gordo]]s. | KRtDL Raisin Ruins Stage 1-1.jpg|Kirby bypasses the [[Gordo]]s. | ||
KRtDL Raisin Ruins Stage 1-2.jpg|Kirby rolls with the rocks. | KRtDL Raisin Ruins Stage 1-2.jpg|Kirby rolls with the rocks. | ||
KRtDL Raisin Ruins Stage 1-3.jpg|The duel with Bonkers. | KRtDL Raisin Ruins Stage 1-3.jpg|The duel with Bonkers. | ||
KRTDL-map-A-2-1.jpg|Stage map | |||
</gallery> | |||
===''Kirby's Return to Dream Land Deluxe''=== | |||
<gallery> | |||
KRtDLD Raisin Ruins Stage 1 screenshot 01.png|Whip Kirby gives the local fauna a serious lashing. | |||
KRtDLD Raisin Ruins Stage 1 screenshot 02.png|Whip Kirby dives into an underground cache to get some supplies through the walls. | |||
KRtDLD Raisin Ruins Stage 1 screenshot 03.png|Fire Kirby blasts through the obstacles between him and the cannon. | |||
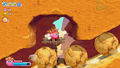
KRtDLD Raisin Ruins Stage 1 screenshot 04.png|Needle Kirby rolls fast through the boulder-laden tunnel. | |||
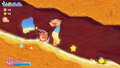
KRtDLD Raisin Ruins Stage 1 screenshot 05.png|Kirby takes cover in a nook in the ceiling to dodge three boulders. | |||
KRtDLD Raisin Ruins Stage 1 screenshot 06.png|Kirby kicks a Waddle Doo out of the way while dashing using Invincible Candy along the dunes. | |||
KRtDLD Raisin Ruins Stage 1 screenshot 08.png|Sand Kirby uses the powerful Golem Smasher on Bonkers. | |||
</gallery> | </gallery> | ||
==Video | ==Video walkthroughs== | ||
{{Youtube|IqgUjdozK6Y|300|100% walkthrough of Raisin Ruins - Stage 1.}} | {{Youtube|IqgUjdozK6Y|300|100% walkthrough of Raisin Ruins - Stage 1 in ''Kirby's Return to Dream Land''.}} | ||
{{Youtube|9zrWpdgDsH8|300|100% walkthrough of Raisin Ruins - Stage 1 in Extra Mode in ''Kirby's Return to Dream Land Deluxe''.}} | |||
{{clear}} | {{clear}} | ||
{{Navbox-KRtDL/KRtDLD}} | {{Navbox-KRtDL/KRtDLD}} | ||
Latest revision as of 14:04, 23 June 2023
| ||||||||||||||
| ||||||||||||||
| ||||||||||||||
|
| ||||||||||||||

Raisin Ruins - Stage 1 (simply called Stage 1 or 2-1 in-game) is the first stage of Raisin Ruins in Kirby's Return to Dream Land and its remake—Kirby's Return to Dream Land Deluxe. There are three Energy Spheres in this stage. The Whip Copy Ability debuts in this stage. In Kirby's Return to Dream Land Deluxe, the Sand Copy Ability also debuts here.
Overview[edit]

The stage begins out on a series of dry dunes. Up ahead, a Whippy can be found which will yield the Whip ability if swallowed. Using this new toy, Kirby can tackle the enemies up ahead in proper western fashion. Along the way, several small ruins can be found, which contain goodies that can be grabbed using the whip's long reach. In Kirby's Return to Dream Land Deluxe, the Sand ability can be obtained here as well, and it can also grab items through walls. There is a side door that leads to a 1-Up guarded by a wall of Gordos, but the main path is through the door to the right.
In the next area, Kirby can find patrolling Flamers. Using their fire, Kirby can light a fuse up ahead in order to make use of a Cannon while proceeding past the Nruff-riding Waddle Dees. A hidden Copy Essence can be found near the end of the path which yields the Needle ability.
Through the door, the path leads into a tunnel, lined with foes and boulders primed to roll down it. Kirby will have to keep pace with the boulders as they are dropped to pass through safely. Alternatively, he may be able to slip by them if he is fast enough or has the right ability.
Through the next door is another tunnel which leads uphill, where Kirby will now have to avoid boulders rolling in his direction. This eventually leads out of the cave.
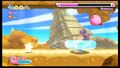
Out in the open, Kirby can grab an Invincible Candy and charge effortlessly through all the foes up ahead. There are a few bottomless pits to consider on the path, however.
In the last area, Kirby can grab a Parasol if he so wishes and carry it into an encounter with the mallet-wielding simian Bonkers. Defeating him yields the Hammer ability, and the way through a short Kabu-infested tunnel to reach the stage exit on the other side.
Energy Sphere Guide[edit]
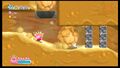
- A cannon can be found along the path in the second area. Kirby will need to light the fuse, then get in and be fired to a separate area where he can get the first sphere.
- In the downward-sloping tunnel, Kirby will have to follow the dual boulders while trying to avoid getting hit by them. They will clear the way to the second sphere by breaking through a barrier at the end of the tunnel.
- After defeating Bonkers, Kirby will need to use the Hammer ability to bust through some metal blocks to get the last sphere. Sand can also be used for this.
Enemies, Mid-Bosses and Abilities[edit]
| Regular Enemies | Mid-Boss | ||||
|---|---|---|---|---|---|
|
| ||||
| Abilities | |||||
|
| |||||
*Only appears in Extra Mode in Kirby's Return to Dream Land Deluxe
Gallery[edit]
Kirby's Return to Dream Land[edit]
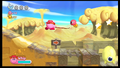
Kirby traverses the difficult, dry landscape.
Kirby bypasses the Gordos.
Kirby rolls with the rocks.
The duel with Bonkers.
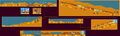
Stage map


Kirby's Return to Dream Land Deluxe[edit]
Whip Kirby gives the local fauna a serious lashing.
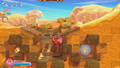
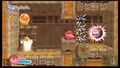
Whip Kirby dives into an underground cache to get some supplies through the walls.
Fire Kirby blasts through the obstacles between him and the cannon.
Needle Kirby rolls fast through the boulder-laden tunnel.
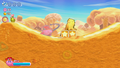
Kirby takes cover in a nook in the ceiling to dodge three boulders.
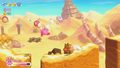
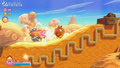
Kirby kicks a Waddle Doo out of the way while dashing using Invincible Candy along the dunes.

Sand Kirby uses the powerful Golem Smasher on Bonkers.


Video walkthroughs[edit]
100% walkthrough of Raisin Ruins - Stage 1 in Kirby's Return to Dream Land.
|
100% walkthrough of Raisin Ruins - Stage 1 in Extra Mode in Kirby's Return to Dream Land Deluxe.
|