Nutty Noon - Stage 4: Difference between revisions
mNo edit summary |
ShadowKirby (talk | contribs) m (Grapes) |
||
| (17 intermediate revisions by 8 users not shown) | |||
| Line 1: | Line 1: | ||
{{Infobox-KRtDLStage | {{Infobox-KRtDLStage | ||
|image=[[File: | |image=[[File:KRtDLD Nutty Noon Stage 4 select screenshot.png|350px]] | ||
|caption= | |caption='''Nutty Noon - Stage 4''' in the [[level hub]]. | ||
|level=[[Nutty Noon]] | |level=[[Nutty Noon]] | ||
|super=[[Grand Hammer]] | |super=[[Grand Hammer]] | ||
|sphere=4 | |sphere=4 | ||
|midboss=[[Super Bonkers]], [[Sphere Doomer]] ( | |midboss=[[Super Bonkers]], [[Sphere Doomer]] (Spark) | ||
|theme music=[[File:Grape Garden KRtDL.mp3]] | |||
|theme title="[[Grape Garden (theme)|Dreaming of Clouds]]" | |||
|description=Clip of the theme that primarily plays in Nutty Noon - Stage 4. | |||
|previousstage=[[Nutty Noon - Stage 3]] | |previousstage=[[Nutty Noon - Stage 3]] | ||
|nextstage=[[Nutty Noon - Stage 5]] | |nextstage=[[Nutty Noon - Stage 5]] | ||
}} | }} | ||
'''Nutty Noon - Stage 4''' (simply called '''Stage 4''' or '''5-4''' in-game) is the fourth stage of [[Nutty Noon]] in ''[[Kirby's Return to Dream Land]]'' and its remake—''[[Kirby's Return to Dream Land Deluxe]]''. There are four [[Energy Sphere]]s in this stage. | |||
'''Nutty Noon - Stage 4''' is the fourth stage of [[Nutty Noon]] in '' | |||
==Overview== | ==Overview== | ||
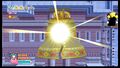
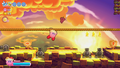
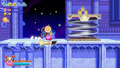
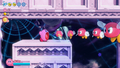
The stage begins out on the open clouds, as Kirby is presented with a [[Stomper Boot]] to traverse the place with. As Kirby progresses, he will need to be extra careful, as one wrong step with the boot means falling into the | [[File:KRtDLD Nutty Noon Stage 4 screenshot 06.png|thumb|left|250px|Kirby makes the bell toll a little too hard after slamming into it at the end of the Grand Hammer section.]] | ||
The stage begins out on the open clouds, as Kirby is presented with a [[Stomper Boot]] to traverse the place with. As Kirby progresses, he will need to be extra careful, as one wrong step with the boot means falling into the [[bottomless pit]] below. | |||
The next area has Kirby scaling the steps of another cloud castle. He will need to make use of ropes to bypass the guards and [[Gigatzo]]s along the walls. | The next area has Kirby scaling the steps of another cloud castle. He will need to make use of ropes to bypass the guards and [[Gigatzo]]s along the walls. | ||
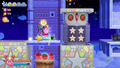
Once inside the tower, Kirby finds himself bathed in the nighttime light and blue hues of the interior. Here, he must battle [[Super Bonkers]] | Once inside the tower, Kirby finds himself bathed in the nighttime light and blue hues of the interior. Here, he must battle [[Super Bonkers]] and can then choose to grab the [[Grand Hammer]] super ability to progress. Assuming Kirby takes the path revealed by hitting the [[Stake]]s, he can eventually find himself launched up to toll (and break) a giant bell, revealing a rift to [[Another Dimension]]. | ||
=== | ===Another Dimension rift=== | ||
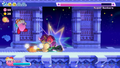
This particular challenge has Kirby riding several platforms which interlock with each-other, often while carrying a full mouth. At the end of this path, he will need to battle an electric [[Sphere Doomer]] to complete this challenge. | This particular challenge has Kirby riding several platforms which interlock with each-other, often while carrying a full mouth. At the end of this path, he will need to battle an electric [[Sphere Doomer]] to complete this challenge. | ||
Once back outside, Kirby can finish ascending the tower to find himself out on the open night-time cloudscape to reach the stage exit. | Once back outside, Kirby can finish ascending the tower to find himself out on the open night-time cloudscape to reach the stage exit. | ||
===Energy Sphere | ===Energy Sphere guide=== | ||
*Near the end of the [[Stomper Boot]] section, Kirby can find a floor below the main path made of [[Gordo]]s. Using the boot, he can cross safely, and get the sphere on the other side. | *Near the end of the [[Stomper Boot]] section, Kirby can find a floor below the main path made of [[Gordo]]s. Using the boot, he can cross safely, and get the first sphere on the other side. | ||
*While swinging from one of the ropes in the second area, Kirby can find | *While swinging from one of the ropes in the second area, Kirby can find the second sphere between two [[Gigatzo]]s firing at each-other. He will need to grab it and hopefully avoid getting hit by a blast in the process. | ||
*The last two spheres can be obtained from the [[Sphere Doomer]] at the end of the rift. | *The last two spheres can be obtained from the [[Sphere Doomer]] at the end of the rift. | ||
==Enemies, Mid-Bosses and | ==Enemies, Mid-Bosses and abilities== | ||
{| style="border: 3px solid #E47575; {{round}};background: #F69D99" cellspacing="2" | {| style="border: 3px solid #E47575; {{round}};background: #F69D99" cellspacing="2" | ||
! width="420px" | '''Regular Enemies''' | ! width="420px" | '''Regular Enemies''' | ||
| Line 38: | Line 40: | ||
{{col-begin}} | {{col-begin}} | ||
{{col-break|width=33%}} | {{col-break|width=33%}} | ||
*[[Armoroid]] <small>(KRtDLD only)</small> | |||
*[[Bowby]] | *[[Bowby]] | ||
*[[Bronto Burt]] | *[[Bronto Burt]] | ||
*[[Cerulean]] | *[[Cerulean]] | ||
*[[Gemra]] | *[[Gemra]] | ||
{{col-break|width=33%}} | |||
*[[Gigatzo]] | *[[Gigatzo]] | ||
*[[Gordo]] | *[[Gordo]] | ||
*[[Kabu]] | *[[Kabu]] | ||
| Line 58: | Line 61: | ||
| | | | ||
{{col-begin|width=50%}} | {{col-begin|width=50%}} | ||
*[[Sphere Doomer]] ( | *[[Sphere Doomer]] (Spark) | ||
*[[Super Bonkers]] | *[[Super Bonkers]] | ||
{{col-end}} | {{col-end}} | ||
| Line 74: | Line 77: | ||
*[[Ice]] | *[[Ice]] | ||
{{col-break|width=50%}} | {{col-break|width=50%}} | ||
*[[Mecha]] <small>(KRtDLD only)</small> | |||
*[[Spark]] | *[[Spark]] | ||
*[[Spear]] | *[[Spear]] | ||
| Line 83: | Line 87: | ||
{{col-end}} | {{col-end}} | ||
|} | |} | ||
==Trivia== | |||
*In the second room of this stage, all [[food]] items with a fixed location are grapes. This is likely a reference to [[Grape Garden]], a similar cloudy location, the music of which is also featured here. | |||
==Gallery== | ==Gallery== | ||
===''Kirby's Return to Dream Land''=== | |||
<gallery> | <gallery> | ||
KRtDL Nutty Noon Stage 4 screenshot.png|Kirby makes use of [[Gordo]]s for a change. | |||
KRtDL Nutty Noon Stage 4-1.jpg|Kirby waits for a chance to hit the switch above. | KRtDL Nutty Noon Stage 4-1.jpg|Kirby waits for a chance to hit the switch above. | ||
KRtDL Nutty Noon Stage 4-2.jpg|Kirby may have tolled the bell too hard. | KRtDL Nutty Noon Stage 4-2.jpg|Kirby may have tolled the bell too hard. | ||
KRtDL Nutty Noon Stage 4-3.jpg|Kirby rides the oddly-shaped interlocking platforms. | KRtDL Nutty Noon Stage 4-3.jpg|Kirby rides the oddly-shaped interlocking platforms. | ||
KRTDL-map-A-5-4.jpg|Stage map | |||
</gallery> | |||
===''Kirby's Return to Dream Land Deluxe''=== | |||
<gallery> | |||
KRtDLD Nutty Noon Stage 4 screenshot 01.png|Kirby makes his way along a dangerous path using a Stomper Boot. | |||
KRtDLD Nutty Noon Stage 4 screenshot 02.png|Kirby uses a long rope to slide past several Shotzos. | |||
KRtDLD Nutty Noon Stage 4 screenshot 03.png|Kirby jumps to avoid Super Bonkers' hammer. | |||
KRtDLD Nutty Noon Stage 4 screenshot 04.png|Kirby prepares to attack a Strike Box with his Grand Hammer. | |||
KRtDLD Nutty Noon Stage 4 screenshot 05.png|Kirby approaches a giant spring which his hammer should compress. | |||
KRtDLD Nutty Noon Stage 4 screenshot 07.png|Kirby inhales a long line of Bronto Burts of increasing size. | |||
</gallery> | </gallery> | ||
==Video | ==Video walkthroughs== | ||
{{Youtube|9QS_PvZydBA|300|100% walkthrough of Nutty Noon - Stage 4.}} | {{Youtube|9QS_PvZydBA|300|100% walkthrough of Nutty Noon - Stage 4 in ''Kirby's Return to Dream Land''.}} | ||
{{Youtube|viFnL0gfc_0|300|100% walkthrough of Nutty Noon - Stage 4 in Extra Mode in ''Kirby's Return to Dream Land Deluxe''.}} | |||
{{clear}} | {{clear}} | ||
{{Navbox-KRtDL/KRtDLD}} | |||
{{Navbox-KRtDL}} | |||
Revision as of 16:41, 20 September 2023
| ||||||||||||||
| ||||||||||||||
| ||||||||||||||
|
| ||||||||||||||

Nutty Noon - Stage 4 (simply called Stage 4 or 5-4 in-game) is the fourth stage of Nutty Noon in Kirby's Return to Dream Land and its remake—Kirby's Return to Dream Land Deluxe. There are four Energy Spheres in this stage.
Overview

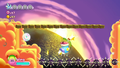
The stage begins out on the open clouds, as Kirby is presented with a Stomper Boot to traverse the place with. As Kirby progresses, he will need to be extra careful, as one wrong step with the boot means falling into the bottomless pit below.
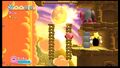
The next area has Kirby scaling the steps of another cloud castle. He will need to make use of ropes to bypass the guards and Gigatzos along the walls.
Once inside the tower, Kirby finds himself bathed in the nighttime light and blue hues of the interior. Here, he must battle Super Bonkers and can then choose to grab the Grand Hammer super ability to progress. Assuming Kirby takes the path revealed by hitting the Stakes, he can eventually find himself launched up to toll (and break) a giant bell, revealing a rift to Another Dimension.
Another Dimension rift
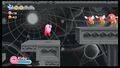
This particular challenge has Kirby riding several platforms which interlock with each-other, often while carrying a full mouth. At the end of this path, he will need to battle an electric Sphere Doomer to complete this challenge.
Once back outside, Kirby can finish ascending the tower to find himself out on the open night-time cloudscape to reach the stage exit.
Energy Sphere guide
- Near the end of the Stomper Boot section, Kirby can find a floor below the main path made of Gordos. Using the boot, he can cross safely, and get the first sphere on the other side.
- While swinging from one of the ropes in the second area, Kirby can find the second sphere between two Gigatzos firing at each-other. He will need to grab it and hopefully avoid getting hit by a blast in the process.
- The last two spheres can be obtained from the Sphere Doomer at the end of the rift.
Enemies, Mid-Bosses and abilities
| Regular Enemies | Mid-Bosses | ||||
|---|---|---|---|---|---|
|
| ||||
| Abilities | Super Ability | ||||
|
|
|
Trivia
- In the second room of this stage, all food items with a fixed location are grapes. This is likely a reference to Grape Garden, a similar cloudy location, the music of which is also featured here.
Gallery
Kirby's Return to Dream Land
Kirby makes use of Gordos for a change.
Kirby waits for a chance to hit the switch above.
Kirby may have tolled the bell too hard.
Kirby rides the oddly-shaped interlocking platforms.

Stage map


Kirby's Return to Dream Land Deluxe

Kirby makes his way along a dangerous path using a Stomper Boot.
Kirby uses a long rope to slide past several Shotzos.
Kirby jumps to avoid Super Bonkers' hammer.
Kirby prepares to attack a Strike Box with his Grand Hammer.
Kirby approaches a giant spring which his hammer should compress.
Kirby inhales a long line of Bronto Burts of increasing size.


Video walkthroughs
100% walkthrough of Nutty Noon - Stage 4 in Kirby's Return to Dream Land.
|
100% walkthrough of Nutty Noon - Stage 4 in Extra Mode in Kirby's Return to Dream Land Deluxe.
|