Nutty Noon - Stage 3: Difference between revisions
m (Text replacement - "{{KRDL KAW}}" to "{{KRtDL KAW}}") |
m (Minor fix) |
||
| (16 intermediate revisions by 6 users not shown) | |||
| Line 1: | Line 1: | ||
{{Infobox-KRtDLStage | {{Infobox-KRtDLStage | ||
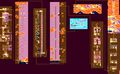
|image=[[File: | |image=[[File:KRtDLD Nutty Noon Stage 3 select screenshot.png|350px]] | ||
|caption= | |caption='''Nutty Noon - Stage 3''' in the [[level hub]]. | ||
|level=[[Nutty Noon]] | |level=[[Nutty Noon]] | ||
|super= | |super={{N}} | ||
|sphere=4 | |sphere=4 | ||
|midboss= | |midboss={{N}} | ||
|theme music=[[File:Grape Garden KRtDL.mp3]] | |||
|theme title="[[Grape Garden (theme)|Dreaming of Clouds]]" | |||
|description=Clip of the theme that primarily plays in Nutty Noon - Stage 3. | |||
|previousstage=[[Nutty Noon - Stage 2]] | |previousstage=[[Nutty Noon - Stage 2]] | ||
|nextstage=[[Nutty Noon - Stage 4]] | |nextstage=[[Nutty Noon - Stage 4]] | ||
}} | }} | ||
'''Nutty Noon - Stage 3''' (simply called '''Stage 3''' or '''5-3''' in-game) is the third stage of [[Nutty Noon]] in ''[[Kirby's Return to Dream Land]]'' and its remake—''[[Kirby's Return to Dream Land Deluxe]]''. There are four [[Energy Sphere]]s in this stage. | |||
'''Nutty Noon - Stage 3''' is the third stage of [[Nutty Noon]] in '' | |||
==Overview== | ==Overview== | ||
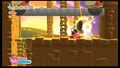
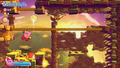
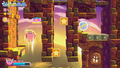
[[File:KRtDLD Nutty Noon Stage 3 screenshot 04.png|thumb|left|250px|As Kirby climbs higher and higher up the sky tower, he will need to mind the many floating foes that want to make a snack out of him.]] | |||
The stage begins at the base of a stone passageway. Kirby will need to use the many ropes set within as he climbs the tower, battling the wind in places. Up ahead, a [[1-Up]] cache can be opened with the help of the [[Beam]] ability. A number of more ropes and spike pits must be traversed above before finding the door to the exterior. | The stage begins at the base of a stone passageway. Kirby will need to use the many ropes set within as he climbs the tower, battling the wind in places. Up ahead, a [[1-Up]] cache can be opened with the help of the [[Beam]] ability. A number of more ropes and spike pits must be traversed above before finding the door to the exterior. | ||
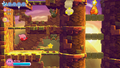
On the outer wall, Kirby will need to jump against a continuous breeze up the tower side while avoiding [[Shotzo]] fire from the nooks. Along the way, a [[ | On the outer wall, Kirby will need to jump against a continuous breeze up the tower side while avoiding [[Shotzo]] fire from the nooks. Along the way, a [[Crackler]] can be used to aid Kirby on his ascent. | ||
Back inside the tower, Kirby can race a [[Key | Back inside the tower, Kirby can race a [[Key Dee]] down the tower interior to reach the door at the bottom leading back outside. | ||
Kirby finds himself on the other side of the tower, as he must climb several ladders past [[Volttzo]] fire and hungry [[Pacloud]]s. | Kirby next finds himself on the other side of the tower, as he must climb several ladders past [[Volttzo]] fire and hungry [[Pacloud]]s. | ||
Back inside the tower, Kirby finds the [[Hi-Jump]] ability, which he can use to ascend. Past a number of gates and enemies, the door can be found at the top. | Back inside the tower, Kirby finds the [[Hi-Jump]] ability, which he can use to ascend. Past a number of gates and enemies, the door can be found at the top. | ||
| Line 26: | Line 28: | ||
From here, Kirby will need to pass through a number of chambers while continuing to ascend the tower. Many of these rooms involve pulling Pull [[Switch]]es to break barriers and drop enemies on Kirby's head. At the top, Kirby can find his way out of the tower, and must continue along the clouds to find a cannon up top. This cannon will fire him to the last area. | From here, Kirby will need to pass through a number of chambers while continuing to ascend the tower. Many of these rooms involve pulling Pull [[Switch]]es to break barriers and drop enemies on Kirby's head. At the top, Kirby can find his way out of the tower, and must continue along the clouds to find a cannon up top. This cannon will fire him to the last area. | ||
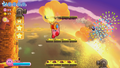
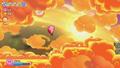
Kirby finds himself in the bright orange clouds. Past an [[Owgulf]] on guard, the stage exit can be found just to the right. | Kirby then finds himself in the bright orange clouds. Past an [[Owgulf]] on guard, the stage exit can be found just to the right. | ||
===Energy Sphere | ===Energy Sphere guide=== | ||
* | *The first sphere can be obtained by beating the [[Key Dee]] to the bottom of the long tower descent. | ||
*On the second outer wall section, Kirby can break open a [[Bomb Block]] barrier in the wall to reveal a round-trip door. Through the door is a cloudy room with a path past many [[Pacloud]]s to reach | *On the second outer wall section, Kirby can break open a [[Bomb Block]] barrier in the wall to reveal a round-trip door. Through the door is a cloudy room with a path past many [[Pacloud]]s to reach the second sphere. | ||
*In the [[Hi-Jump]] area, Kirby can find a switch and gate challenge. Kirby will need to be quick to unlock the way to the sphere and get there in time. | *In the [[Hi-Jump]] area, Kirby can find a switch and gate challenge. Kirby will need to be quick to unlock the way to the third sphere and get there in time. | ||
*In the last area, | *In the last area, the last sphere can be found up above, partially obscured by a cloud. | ||
==Enemies, Mid-Bosses and | ==Enemies, Mid-Bosses and abilities== | ||
{| style="border: 3px solid #E47575; {{round}};background: #F69D99" cellspacing="2" | {| style="border: 3px solid #E47575; {{round}};background: #F69D99" cellspacing="2" | ||
! width="420px" | '''Regular Enemies''' | ! width="420px" | '''Regular Enemies''' | ||
| Line 42: | Line 44: | ||
{{col-begin}} | {{col-begin}} | ||
{{col-break|width=33%}} | {{col-break|width=33%}} | ||
*[[Armor Dee]] | *[[Armor Waddle Dee]] | ||
*[[Babut]] | *[[Babut]] | ||
*[[Blade Knight]] | *[[Blade Knight]] | ||
| Line 48: | Line 50: | ||
*[[Bronto Burt]] | *[[Bronto Burt]] | ||
*[[Broom Hatter]] | *[[Broom Hatter]] | ||
*[[Gemra]] | *[[Gemra]] | ||
*[[Gordo]] | *[[Gordo]] | ||
*[[Kabu]] | |||
{{col-break|width=33%}} | {{col-break|width=33%}} | ||
*[[ | *[[Key Dee]] | ||
*[[Needlous]] | *[[Needlous]] | ||
*[[Noddy]] | *[[Noddy]] | ||
| Line 58: | Line 60: | ||
*[[Pacloud]] | *[[Pacloud]] | ||
*[[Parasol Waddle Dee]] | *[[Parasol Waddle Dee]] | ||
*[[ | *[[Parasol Waddle Doo]] | ||
*[[Poppy Bros. Jr.]] | *[[Poppy Bros. Jr.]] | ||
*[[Rocky]] | |||
{{col-break|width=34%}} | {{col-break|width=34%}} | ||
*[[ | *[[Sandran]] <small>(KRtDLD only)</small> | ||
*[[Scarfy]] | *[[Scarfy]] | ||
*[[Shotzo]] | *[[Shotzo]] | ||
| Line 86: | Line 89: | ||
*[[Hi-Jump]] | *[[Hi-Jump]] | ||
*[[Needle]] | *[[Needle]] | ||
*[[Parasol]] | |||
{{col-break|width=50%}} | {{col-break|width=50%}} | ||
*[[ | *[[Sand]] <small>(KRtDLD only)</small> | ||
*[[Sleep]] | *[[Sleep]] | ||
*[[Stone]] | *[[Stone]] | ||
| Line 100: | Line 104: | ||
==Gallery== | ==Gallery== | ||
=== ''Kirby's Return to Dream Land'' === | |||
<gallery> | |||
KRtDL Nutty Noon Stage 3-1.jpg|Kirby takes to the ropes to climb the tower. | |||
KRtDL Nutty Noon Stage 3-2.jpg|Kirby cleverly disguises himself as he falls while racing Key Dee. | |||
KRtDL Nutty Noon Stage 3 screenshot.png|Kirby climbs the battlements. | |||
KRtDL Nutty Noon Stage 3-3.jpg|Kirby rocks his foe using Stone Uppercut. | |||
KRTDL-map-A-5-3.jpg|Stage map | |||
</gallery> | |||
===''Kirby's Return to Dream Land Deluxe''=== | |||
<gallery> | <gallery> | ||
KRtDLD Nutty Noon Stage 3 screenshot 01.png|Kirby shimmies along the ropes carefully. | |||
KRtDLD Nutty Noon Stage 3 screenshot 02.png|Kirby uses the Crackler to take out the foes on his way up the right side of the tower. | |||
KRtDLD Nutty Noon Stage 3 screenshot 03.png|Kirby heads back down the tower interior to catch the falling Key Dee. | |||
KRtDLD Nutty Noon Stage 3 screenshot 05.png|Kirby Hi-Jumps to solve a switch and gate puzzle. | |||
KRtDLD Nutty Noon Stage 3 screenshot 06.png|Kirby prepares to have some Armor Waddle Dees fall on him. | |||
KRtDLD Nutty Noon Stage 3 screenshot 07.png|Kirby escapes the tower and reaches a creamy orange cloudscape. | |||
</gallery> | </gallery> | ||
==Video | ==Video walkthroughs== | ||
{{Youtube|Q5OweVjMjwA|300|100% walkthrough of Nutty Noon - Stage 3.}} | {{Youtube|Q5OweVjMjwA|300|100% walkthrough of Nutty Noon - Stage 3 in ''Kirby's Return to Dream Land''.}} | ||
{{Youtube|VmM9WJhkmrQ|300|100% walkthrough of Nutty Noon - Stage 3 in Extra Mode in ''Kirby's Return to Dream Land Deluxe''.}} | |||
{{clear}} | {{clear}} | ||
{{Navbox- | {{Navbox-KRtDL/KRtDLD}} | ||
Latest revision as of 14:04, 23 June 2023
| ||||||||||||||
| ||||||||||||||
| ||||||||||||||
|
| ||||||||||||||

Nutty Noon - Stage 3 (simply called Stage 3 or 5-3 in-game) is the third stage of Nutty Noon in Kirby's Return to Dream Land and its remake—Kirby's Return to Dream Land Deluxe. There are four Energy Spheres in this stage.
Overview[edit]

The stage begins at the base of a stone passageway. Kirby will need to use the many ropes set within as he climbs the tower, battling the wind in places. Up ahead, a 1-Up cache can be opened with the help of the Beam ability. A number of more ropes and spike pits must be traversed above before finding the door to the exterior.
On the outer wall, Kirby will need to jump against a continuous breeze up the tower side while avoiding Shotzo fire from the nooks. Along the way, a Crackler can be used to aid Kirby on his ascent.
Back inside the tower, Kirby can race a Key Dee down the tower interior to reach the door at the bottom leading back outside.
Kirby next finds himself on the other side of the tower, as he must climb several ladders past Volttzo fire and hungry Paclouds.
Back inside the tower, Kirby finds the Hi-Jump ability, which he can use to ascend. Past a number of gates and enemies, the door can be found at the top.
From here, Kirby will need to pass through a number of chambers while continuing to ascend the tower. Many of these rooms involve pulling Pull Switches to break barriers and drop enemies on Kirby's head. At the top, Kirby can find his way out of the tower, and must continue along the clouds to find a cannon up top. This cannon will fire him to the last area.
Kirby then finds himself in the bright orange clouds. Past an Owgulf on guard, the stage exit can be found just to the right.
Energy Sphere guide[edit]
- The first sphere can be obtained by beating the Key Dee to the bottom of the long tower descent.
- On the second outer wall section, Kirby can break open a Bomb Block barrier in the wall to reveal a round-trip door. Through the door is a cloudy room with a path past many Paclouds to reach the second sphere.
- In the Hi-Jump area, Kirby can find a switch and gate challenge. Kirby will need to be quick to unlock the way to the third sphere and get there in time.
- In the last area, the last sphere can be found up above, partially obscured by a cloud.
Enemies, Mid-Bosses and abilities[edit]
| Regular Enemies | Mid-Boss | ||||
|---|---|---|---|---|---|
|
| ||||
| Abilities | Super Ability | ||||
|
|
|
Gallery[edit]
Kirby's Return to Dream Land[edit]
Kirby takes to the ropes to climb the tower.
Kirby cleverly disguises himself as he falls while racing Key Dee.
Kirby climbs the battlements.
Kirby rocks his foe using Stone Uppercut.
Stage map


Kirby's Return to Dream Land Deluxe[edit]
Kirby shimmies along the ropes carefully.
Kirby uses the Crackler to take out the foes on his way up the right side of the tower.
Kirby heads back down the tower interior to catch the falling Key Dee.
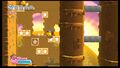
Kirby Hi-Jumps to solve a switch and gate puzzle.

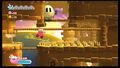
Kirby prepares to have some Armor Waddle Dees fall on him.
Kirby escapes the tower and reaches a creamy orange cloudscape.


Video walkthroughs[edit]
100% walkthrough of Nutty Noon - Stage 3 in Kirby's Return to Dream Land.
|
100% walkthrough of Nutty Noon - Stage 3 in Extra Mode in Kirby's Return to Dream Land Deluxe.
|