Nutty Noon - Stage 1: Difference between revisions
m (Text replacement - "{{KRtDL KAW}}" to "Kirby's Return to Dream Land") |
m (Minor fix) |
||
| (8 intermediate revisions by 4 users not shown) | |||
| Line 1: | Line 1: | ||
{{Infobox-KRtDLStage | |||
|image=[[File: | |image=[[File:KRtDLD Nutty Noon Stage 1 select screenshot.png|350px]] | ||
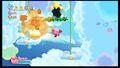
|caption= | |caption='''Nutty Noon - Stage 1''' in the [[level hub]]. | ||
|level=[[Nutty Noon]] | |level=[[Nutty Noon]] | ||
|super= | |super={{N}} | ||
|sphere=4 | |sphere=4 | ||
|midboss= | |midboss={{N}} | ||
|theme music=[[File:KRtDL Sky Waltz.mp3]] | |||
|theme title="[[Sky Waltz]]" | |||
|description=Clip of the theme that primarily plays in Nutty Noon - Stage 1. | |||
|previousstage=[[White Wafers - Stage 6]] | |previousstage=[[White Wafers - Stage 6]] | ||
|nextstage=[[Nutty Noon - Stage 2]] | |nextstage=[[Nutty Noon - Stage 2]] | ||
}} | }} | ||
'''Nutty Noon - Stage 1''' (simply called '''Stage 1''' or '''5-1''' in-game) is the first stage of [[Nutty Noon]] in ''[[Kirby's Return to Dream Land]]'' and its remake—''[[Kirby's Return to Dream Land Deluxe]]''. There are four [[Energy Sphere]]s in this stage. | |||
'''Nutty Noon - Stage 1''' is the first stage of [[Nutty Noon]] in ''Kirby's Return to Dream Land''. There are four [[Energy Sphere]]s in this stage. | |||
==Overview== | ==Overview== | ||
The stage begins on a high hill in the country. A [[Warp Star]] awaits up top, but a [[Parasol]] [[Copy Essence]] can be found tucked away on the other side of the hill. Taking the Warp Star will shoot Kirby high into the clouds. | [[File:KRtDLD Nutty Noon Stage 1 screenshot 03.png|thumb|left|250px|Kirby uses his Parasol to gently glide up this chimney of clouds.]] | ||
The stage begins on a high hill in the country. A [[Warp Star]] awaits up top, but a [[Parasol]] [[Copy Essence]] can be found tucked away on the other side of the hill. In ''Kirby's Return to Dream Land Deluxe'', [[Merry Magoland]] can be seen far off in the distance. Taking the Warp Star will shoot Kirby high into the clouds. | |||
The Warp Star deposits Kirby in a high clouded area with vines and floating ground pieces acting as platforms. Kirby will need to proceed with caution here, as all places bear the possibility of falling into the [[bottomless pit]] below. The door to the next area can be found tucked away in a cloud nook to the right. | The Warp Star deposits Kirby in a high clouded area with vines and floating ground pieces acting as platforms. Kirby will need to proceed with caution here, as all places bear the possibility of falling into the [[bottomless pit]] below. The door to the next area can be found tucked away in a cloud nook to the right. | ||
The next area is a tall vertical cloud column with a weak updraft. Kirby can use a Parasol to glide gently upward while remaining protected from the [[Foley]]s falling from above. | The next area is a tall vertical cloud column with a weak updraft. Kirby can use a Parasol to glide gently upward while remaining protected from the [[Foley]]s falling from above, through there are also [[Gordo]]s to watch out for. | ||
In the following area, Kirby will need to traverse the underside of a huge cloud with vine platforms underneath to hop from. As these often serve as the only platforms to use, Kirby will need to mind when using a cutting weapon. | In the following area, Kirby will need to traverse the underside of a huge cloud with vine platforms underneath to hop from. As these often serve as the only platforms to use, Kirby will need to mind when using a cutting weapon. | ||
| Line 23: | Line 26: | ||
From there, Kirby ventures deep into the clouds, passing through a long winding tunnel. The [[Tornado]] ability can come in handy here. | From there, Kirby ventures deep into the clouds, passing through a long winding tunnel. The [[Tornado]] ability can come in handy here. | ||
In the final area, Kirby will need to mind several passages where large spiky | In the final area, Kirby will need to mind several passages where large spiky [[boulder]]s will fall at him and alongside his path. After bypassing these, the stage exit can be found at the end. | ||
===Energy Sphere | ===Energy Sphere guide=== | ||
*In the vertical cloud column, a round-trip door can be found encased in [[Star Block]]s. Inside the door, the sphere can be obtained past some [[Como]]s on guard over a crumbling bridge. | *In the vertical cloud column, a round-trip door can be found encased in [[Star Block]]s. Inside the door, the first sphere can be obtained past some [[Como]]s on guard over a crumbling bridge. | ||
*In the hanging vine platform area, Kirby will need to use a cutting weapon to cut a platform tucked in an upper portion of the area to reveal a round-trip door. Inside the door, | *In the hanging vine platform area, Kirby will need to use a cutting weapon to cut a platform tucked in an upper portion of the area to reveal a round-trip door. Inside the door, the second sphere can be obtained atop a crumbling platform. | ||
*In the [[Tornado]] cloud passage, a side-tunnel near the end leads to | *In the [[Tornado]] cloud passage, a side-tunnel near the end leads to the third sphere. | ||
*In the last area, Kirby will need to | *In the last area, Kirby will need to keep ahead of the large spiky boulder rolling behind the smaller one to get the last sphere at the end of the path before it is closed off. | ||
==Enemies, Mid-Bosses and | ==Enemies, Mid-Bosses and abilities== | ||
{| style="border: 3px solid #E47575; {{round}};background: #F69D99" cellspacing="2" | {| style="border: 3px solid #E47575; {{round}};background: #F69D99" cellspacing="2" | ||
! width="420px" | '''Regular Enemies''' | ! width="420px" | '''Regular Enemies''' | ||
| Line 43: | Line 46: | ||
*[[Broom Hatter]] | *[[Broom Hatter]] | ||
*[[Bulby]] | *[[Bulby]] | ||
*[[Cappy]]* | |||
*[[Cerulean]] | *[[Cerulean]] | ||
*[[Como]] | *[[Como]] | ||
{{col-break|width=33%}} | |||
*[[Foley]] | *[[Foley]] | ||
*[[Gordo]] | *[[Gordo]] | ||
*[[Jackle]] | *[[Jackle]] | ||
| Line 55: | Line 59: | ||
{{col-break|width=34%}} | {{col-break|width=34%}} | ||
*[[Puppet Waddle Dee]] | *[[Puppet Waddle Dee]] | ||
*[[Sandran]] <small>(KRtDLD only)</small> | |||
*[[Shotzo]] | *[[Shotzo]] | ||
*[[Twister]] | *[[Twister]] | ||
| Line 78: | Line 83: | ||
*[[Leaf]] | *[[Leaf]] | ||
*[[Parasol]] | *[[Parasol]] | ||
*[[Sand]] <small>(KRtDLD only)</small> | |||
{{col-break|width=50%}} | |||
*[[Sleep]] | *[[Sleep]] | ||
*[[Spear]] | *[[Spear]] | ||
*[[Sword]] | *[[Sword]] | ||
| Line 91: | Line 97: | ||
{{col-end}} | {{col-end}} | ||
|} | |} | ||
<small>*Only appears in Extra Mode in ''Kirby's Return to Dream Land Deluxe''</small> | |||
==Gallery== | ==Gallery== | ||
=== ''Kirby's Return to Dream Land'' === | |||
<gallery> | <gallery> | ||
KRtDL Nutty Noon Stage 1 screenshot.png|Kirby takes his first ascent up the cloudscapes lined with giant vines. | |||
KRtDL Nutty Noon Stage 1-1.jpg|The Foleys are violently knocked aside by Kirby's gently rising Parasol. | KRtDL Nutty Noon Stage 1-1.jpg|The Foleys are violently knocked aside by Kirby's gently rising Parasol. | ||
KRtDL Nutty Noon Stage 1-2.jpg|Kirby makes something explode with a spear. | KRtDL Nutty Noon Stage 1-2.jpg|Kirby makes something explode with a spear. | ||
KRtDL Nutty Noon Stage 1-3.jpg|Kirby minds the spiked boulders. | KRtDL Nutty Noon Stage 1-3.jpg|Kirby minds the spiked boulders. | ||
KRTDL-map-A-5-1.jpg|Stage map | |||
</gallery> | |||
===''Kirby's Return to Dream Land Deluxe''=== | |||
<gallery> | |||
KRtDLD Nutty Noon Stage 1 screenshot 01.png|While preparing to board the Warp Star, Kirby can catch a glimpse of Merry Magoland in the distance. | |||
KRtDLD Nutty Noon Stage 1 screenshot 02.png|Kirby carefully crosses the fragile Star Block bridges high in the sky. | |||
KRtDLD Nutty Noon Stage 1 screenshot 04.png|Kirby cuts one of the vine platforms while attacking his foes. | |||
KRtDLD Nutty Noon Stage 1 screenshot 05.png|Kirby spies a partially hidden pathway in a cloud wall. | |||
KRtDLD Nutty Noon Stage 1 screenshot 06.png|Kirby moves quickly to avoid the spiky boulders. | |||
</gallery> | </gallery> | ||
==Video | ==Video walkthroughs== | ||
{{Youtube|_6R2lI0RP7g|300|100% walkthrough of Nutty Noon - Stage 1.}} | {{Youtube|_6R2lI0RP7g|300|100% walkthrough of Nutty Noon - Stage 1 in ''Kirby's Return to Dream Land''.}} | ||
{{Youtube|updmKiA7HPI|300|100% walkthrough of Nutty Noon - Stage 1 in Extra Mode in ''Kirby's Return to Dream Land Deluxe''.}} | |||
{{clear}} | {{clear}} | ||
{{Navbox-KRtDL}} | {{Navbox-KRtDL/KRtDLD}} | ||
Latest revision as of 14:04, 23 June 2023
| ||||||||||||||
| ||||||||||||||
| ||||||||||||||
|
| ||||||||||||||

Nutty Noon - Stage 1 (simply called Stage 1 or 5-1 in-game) is the first stage of Nutty Noon in Kirby's Return to Dream Land and its remake—Kirby's Return to Dream Land Deluxe. There are four Energy Spheres in this stage.
Overview[edit]

The stage begins on a high hill in the country. A Warp Star awaits up top, but a Parasol Copy Essence can be found tucked away on the other side of the hill. In Kirby's Return to Dream Land Deluxe, Merry Magoland can be seen far off in the distance. Taking the Warp Star will shoot Kirby high into the clouds.
The Warp Star deposits Kirby in a high clouded area with vines and floating ground pieces acting as platforms. Kirby will need to proceed with caution here, as all places bear the possibility of falling into the bottomless pit below. The door to the next area can be found tucked away in a cloud nook to the right.
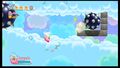
The next area is a tall vertical cloud column with a weak updraft. Kirby can use a Parasol to glide gently upward while remaining protected from the Foleys falling from above, through there are also Gordos to watch out for.
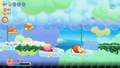
In the following area, Kirby will need to traverse the underside of a huge cloud with vine platforms underneath to hop from. As these often serve as the only platforms to use, Kirby will need to mind when using a cutting weapon.
From there, Kirby ventures deep into the clouds, passing through a long winding tunnel. The Tornado ability can come in handy here.
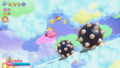
In the final area, Kirby will need to mind several passages where large spiky boulders will fall at him and alongside his path. After bypassing these, the stage exit can be found at the end.
Energy Sphere guide[edit]
- In the vertical cloud column, a round-trip door can be found encased in Star Blocks. Inside the door, the first sphere can be obtained past some Comos on guard over a crumbling bridge.
- In the hanging vine platform area, Kirby will need to use a cutting weapon to cut a platform tucked in an upper portion of the area to reveal a round-trip door. Inside the door, the second sphere can be obtained atop a crumbling platform.
- In the Tornado cloud passage, a side-tunnel near the end leads to the third sphere.
- In the last area, Kirby will need to keep ahead of the large spiky boulder rolling behind the smaller one to get the last sphere at the end of the path before it is closed off.
Enemies, Mid-Bosses and abilities[edit]
| Regular Enemies | Mid-Boss | ||||
|---|---|---|---|---|---|
|
| ||||
| Abilities | Super Ability | ||||
|
|
|
*Only appears in Extra Mode in Kirby's Return to Dream Land Deluxe
Gallery[edit]
Kirby's Return to Dream Land[edit]

Kirby takes his first ascent up the cloudscapes lined with giant vines.

The Foleys are violently knocked aside by Kirby's gently rising Parasol.
Kirby makes something explode with a spear.
Kirby minds the spiked boulders.

Stage map


Kirby's Return to Dream Land Deluxe[edit]

While preparing to board the Warp Star, Kirby can catch a glimpse of Merry Magoland in the distance.

Kirby carefully crosses the fragile Star Block bridges high in the sky.
Kirby cuts one of the vine platforms while attacking his foes.

Kirby spies a partially hidden pathway in a cloud wall.
Kirby moves quickly to avoid the spiky boulders.


Video walkthroughs[edit]
100% walkthrough of Nutty Noon - Stage 1 in Kirby's Return to Dream Land.
|
100% walkthrough of Nutty Noon - Stage 1 in Extra Mode in Kirby's Return to Dream Land Deluxe.
|