Abandoned Beach: Difference between revisions
m (Minor fixes) |
|||
| (17 intermediate revisions by 10 users not shown) | |||
| Line 1: | Line 1: | ||
{{Infobox-KatFLStage | {{Infobox-KatFLStage | ||
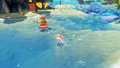
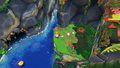
|image=[[File:KatFL Abandoned Beach select screenshot.png|350px]] | |image=[[File:KatFL Abandoned Beach select screenshot.png|350px]] | ||
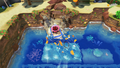
|caption='''Abandoned Beach''' in the [[Everbay Coast]] hub | |caption='''Abandoned Beach''' in the [[Everbay Coast]] hub | ||
|level=[[Everbay Coast]] | |level=[[Everbay Coast]] | ||
|waddledee=9 | |waddledee=9 | ||
|mouthful=[[Ring Mouth]] | |mouthful=[[Ring Mouth]] | ||
|midboss=[[Wild Bonkers]] | |midboss=[[Wild Bonkers]] | ||
|theme music= | |theme music=[[File:KatFL Abandoned Beach.mp3]] | ||
|theme title=[[Abandoned Beach (theme)]] | |theme title="[[Abandoned Beach (theme)|Abandoned Beach]]" | ||
|description=Main theme for the stage. | |description=Main theme for the stage. | ||
|previousstage=[[The Brawl at the Mall]] | |previousstage=[[The Brawl at the Mall]] | ||
|nextstage=[[Concrete Isles]] | |nextstage=[[Concrete Isles]] | ||
}} | }} | ||
'''Abandoned Beach''' is the first stage of [[Everbay Coast]] in ''[[Kirby and the Forgotten Land]]''. In this stage, Kirby traverses a rocky seaside, dodging [[Gnawcodile]]s and using the [[Hammer]] ability from [[Wild Bonkers]] to pound [[stake]]s and free trapped [[Waddle Dee]]s. Further in, Kirby dodges | '''Abandoned Beach''' is the first stage of [[Everbay Coast]] in ''[[Kirby and the Forgotten Land]]''. In this stage, [[Kirby]] traverses a rocky seaside, dodging [[Gnawcodile]]s and using the [[Hammer]] ability from [[Wild Bonkers]] to pound [[stake]]s and free trapped [[Waddle Dee]]s. Further in, Kirby dodges [[whirlpool]]s in tight [[Water (environment)|water]] channels, then makes use of [[Ring Mouth]] to blow away his foes and steer a boat to the gold cage at the end. | ||
There are two | There are two Capsules from Vol. 1 to collect in this stage, and five [[Mission (Kirby and the Forgotten Land)|missions]] to complete. There are a total of nine Waddle Dees to rescue here, when including the mission objectives. | ||
== Stage overview == | ==Stage overview== | ||
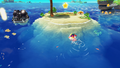
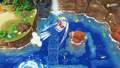
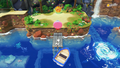
[[File:KatFL Abandoned Beach screenshot 10.png|thumb|left|250px|Kirby using [[Ring Mouth]] to hit a Windmill Switch as he traverses the narrow sand banks | [[File:KatFL Abandoned Beach screenshot 10.png|thumb|left|250px|Kirby using [[Ring Mouth]] to hit a Windmill Switch as he traverses the narrow sand banks]] | ||
This stage takes place in four main areas, with one side room accessible from the third area. | This stage takes place in four main areas, with one side room accessible from the third area. | ||
| Line 28: | Line 27: | ||
In the last area, Kirby finds a sunken hotel building, atop which he can inhale a light hoop to gain [[Ring Mouth]]. From here, he will need to make his way through a series of narrow walkways through the area, blowing gusts of wind at anything that gets in the way. Kirby can head straight to the gold cage at the end from here, but there might be some more rewards to find if he blows at the [[Switch|Windmill Switch]]es off the path. One of these will give him access to a boat which he can steer using his gusts of wind and collect the things in the water. | In the last area, Kirby finds a sunken hotel building, atop which he can inhale a light hoop to gain [[Ring Mouth]]. From here, he will need to make his way through a series of narrow walkways through the area, blowing gusts of wind at anything that gets in the way. Kirby can head straight to the gold cage at the end from here, but there might be some more rewards to find if he blows at the [[Switch|Windmill Switch]]es off the path. One of these will give him access to a boat which he can steer using his gusts of wind and collect the things in the water. | ||
{{clear|left}} | |||
===Differences between difficulties=== | |||
=== Differences between difficulties === | |||
In Wild Mode, there are two Gnawcodiles swimming in the narrow water passage in the third area, as opposed to just one in Spring-Breeze Mode. In the hidden area where the last Waddle Dee is, there are three Gnawcodiles in Wild Mode, as opposed to two in Spring-Breeze Mode. Everything else is the same between the difficulties. | In Wild Mode, there are two Gnawcodiles swimming in the narrow water passage in the third area, as opposed to just one in Spring-Breeze Mode. In the hidden area where the last Waddle Dee is, there are three Gnawcodiles in Wild Mode, as opposed to two in Spring-Breeze Mode. Everything else is the same between the difficulties. | ||
=== Missions === | ===Missions=== | ||
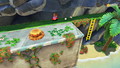
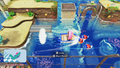
[[File:KatFL Abandoned Beach screenshot 08.png|thumb|250px|Kirby taking on a timed challenge to save a Waddle Dee in the side room | [[File:KatFL Abandoned Beach screenshot 08.png|thumb|250px|Kirby taking on a timed challenge to save a Waddle Dee in the side room]] | ||
Abandoned Beach has five missions to complete, as follows: | Abandoned Beach has five missions to complete, as follows: | ||
*'''"Clear the stage"''' - Kirby must complete the stage. | *'''"Clear the stage"''' - Kirby must complete the stage. | ||
*'''"Save the hidden Waddle Dees"''' - Kirby must find and rescue the three hidden Waddle Dees in silver cages. Their locations are as follows: | *'''"Save the hidden Waddle Dees"''' - Kirby must find and rescue the three hidden Waddle Dees in silver cages. Their locations are as follows: | ||
**Waddle Dee 1: This Waddle Dee can be found in the second area, shortly after defeating Wild Bonkers. To find him, Kirby needs to locate the Glunk in front of a [[ladder]], and use it to find a stake to pound, lowering a wall and revealing this Waddle Dee. | **Waddle Dee 1: This Waddle Dee can be found in the second area, shortly after defeating Wild Bonkers. To find him, Kirby needs to locate the Glunk in front of a [[ladder]], and use it to find a stake to pound, lowering a wall and revealing this Waddle Dee. | ||
**Waddle Dee 2: This Waddle Dee can be found in the side area from the third main area. To find the room in question, Kirby should locate a sleeping [[Awoofy]] on the cliffside to the right shortly before the tight waterway with the patrolling Gnawcodiles. From there, he can climb up footholds on the cliff to reach a stake, and pound it to open the passageway. Once inside the room, Kirby needs to race against a timer | **Waddle Dee 2: This Waddle Dee can be found in the side area from the third main area. To find the room in question, Kirby should locate a sleeping [[Awoofy]] on the cliffside to the right shortly before the tight waterway with the patrolling Gnawcodiles. From there, he can climb up footholds on the cliff to reach a stake, and pound it to open the passageway. Once inside the room, Kirby needs to race against a timer [[Clocker]] to save the Waddle Dee. | ||
**Waddle Dee 3: This Waddle Dee can be found in the last area, hidden in a room accessible from behind a fragile wall in the cliffside. Kirby can break through this wall using [[Ring Mouth]] to propel the boat into it. To get the boat, Kirby needs to head down away from the passageway with the [[Buffahorn]] and activate a Windmill Switch to raise the part of the walkway with the boat at the end. | **Waddle Dee 3: This Waddle Dee can be found in the last area, hidden in a room accessible from behind a fragile wall in the cliffside. Kirby can break through this wall by using [[Ring Mouth]] to propel the boat into it. To get the boat, Kirby needs to head down away from the passageway with the [[Buffahorn]] and activate a Windmill Switch to raise the part of the walkway with the boat at the end. | ||
*'''"Crack open 3 Knock-Knock Nuts"''' - Kirby must find and break all three [[Knock-Knock Nut]]s in the stage. Their locations are as follows: | *'''"Crack open 3 Knock-Knock Nuts"''' - Kirby must find and break all three [[Knock-Knock Nut]]s in the stage. Their locations are as follows: | ||
**Nut 1: Can be found on the main path in the first area. | **Nut 1: Can be found on the main path in the first area. | ||
| Line 47: | Line 45: | ||
**Nut 3: Can be found in the last area in the upper-right corner near a whirlpool. Ring-Mouth Kirby on a boat is needed to reach it. | **Nut 3: Can be found in the last area in the upper-right corner near a whirlpool. Ring-Mouth Kirby on a boat is needed to reach it. | ||
*'''"Destroy the animal sand sculpture"''' - Kirby must find and destroy the [[Awoofy]] sand sculpture. It is located at the end of the second area, just to the right of the door. | *'''"Destroy the animal sand sculpture"''' - Kirby must find and destroy the [[Awoofy]] sand sculpture. It is located at the end of the second area, just to the right of the door. | ||
*'''"Complete the sign on the rooftop"''' - After Kirby obtains [[Ring Mouth]], he must stand in the gap in-between the letters that spell "Hotel" in the | *'''"Complete the sign on the rooftop"''' - After Kirby obtains [[Ring Mouth]], he must stand in the gap in-between the letters that spell "Hotel" in the [[Fictional languages in the Kirby series#Kirby and the Forgotten Land|new world script]] on the rooftop. | ||
=== Enemies and Abilities === | ===Enemies and Abilities=== | ||
{| style="border: 3px solid #E47575; {{round}};background: #F69D99" cellspacing="2" | {| style="border: 3px solid #E47575; {{round}};background: #F69D99" cellspacing="2" | ||
! width="420px" | '''Regular Enemies''' | ! width="420px" | '''Regular Enemies''' | ||
| Line 97: | Line 95: | ||
|} | |} | ||
== Gallery == | ==Trivia== | ||
*It is possible to skip the battle with Wild Bonkers in this stage by having Kirby hop up onto the canopies of the tree shortly before the battle area, and then hover over the barrier keeping him from moving in front of the walkway. From here, he can swim past the battle area without triggering Wild Bonkers to appear. | |||
==Gallery== | |||
<gallery> | <gallery> | ||
KatFL Abandoned Beach screenshot 01.png|Kirby swimming through the first area | KatFL Abandoned Beach screenshot 01.png|Kirby swimming through the first area | ||
| Line 111: | Line 112: | ||
KatFL Abandoned Beach screenshot 13.png|Crashing through the fragile cliffside to find a hidden room | KatFL Abandoned Beach screenshot 13.png|Crashing through the fragile cliffside to find a hidden room | ||
KatFL Abandoned Beach screenshot 14.png|Heading for the gold cage at the end of the stage | KatFL Abandoned Beach screenshot 14.png|Heading for the gold cage at the end of the stage | ||
NSO KatFL April 2022 Week 3 - Background 1 - Abandoned Beach.png|[[Nintendo Switch|Nintendo Switch Online]] profile icon background, depicting Abandoned Beach | |||
</gallery> | </gallery> | ||
=== Video walkthrough === | ===Video walkthrough=== | ||
{{Youtube|pgxOGQh-9AU|300|100% walkthrough of Abandoned Beach.}} | {{Youtube|pgxOGQh-9AU|300|100% walkthrough of Abandoned Beach.}} | ||
| Line 120: | Line 122: | ||
==Names in other languages== | ==Names in other languages== | ||
{{names | {{names | ||
|ja= | |ja={{furi|泳|およ}}げ!ひろびろビーチ | ||
|jaR=Oyoge! Hirobiro Bīchi | |jaR=Oyoge! Hirobiro Bīchi | ||
|jaM=Let's Swim! Such a Spacious Beach | |jaM=Let's Swim! Such a Spacious Beach | ||
| | |zhTrad=游泳吧!廣闊海灘 | ||
| | |zhTradR=Yóuyǒng Ba!Guǎngkuò Hǎitān | ||
|zhM=Let's go swimming!Such a Spacious Beach | |zhSimp=游泳吧!广阔海滩 | ||
|zhSimpR=Yóuyǒng Ba!Guǎngkuò Hǎitān | |||
|zhM=Let's go swimming! Such a Spacious Beach | |||
|ko=헤엄쳐라! 널찍널찍 비치 | |ko=헤엄쳐라! 널찍널찍 비치 | ||
|koR=Heeomchyeora! Neoljjakneoljjak Bichi | |koR=Heeomchyeora! Neoljjakneoljjak Bichi | ||
| Line 135: | Line 139: | ||
|de=Einsamer Strand | |de=Einsamer Strand | ||
|deM=Lonely Beach | |deM=Lonely Beach | ||
|it=Spiaggia abbandonata | |||
|itM=Abandoned Beach | |||
|nl=Verlaten strand | |||
|nlM=Deserted beach | |||
}} | }} | ||
Latest revision as of 16:33, 19 January 2024
| ||||||||||||||
| ||||||||||||||
| ||||||||||||||
|
| ||||||||||||||

Abandoned Beach is the first stage of Everbay Coast in Kirby and the Forgotten Land. In this stage, Kirby traverses a rocky seaside, dodging Gnawcodiles and using the Hammer ability from Wild Bonkers to pound stakes and free trapped Waddle Dees. Further in, Kirby dodges whirlpools in tight water channels, then makes use of Ring Mouth to blow away his foes and steer a boat to the gold cage at the end.
There are two Capsules from Vol. 1 to collect in this stage, and five missions to complete. There are a total of nine Waddle Dees to rescue here, when including the mission objectives.
Stage overview[edit]

This stage takes place in four main areas, with one side room accessible from the third area.
In the first area, Kirby makes his way across a series of small coastlines at the edge of the sea, dealing with enemies along the way. Near the end, he finds a small island with a Gnawcodile swimming around it, where a Warp Star can be accessed.
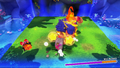
In the second area, Kirby makes his way to the right with a tall cliffside to his left. Shortly into this path, he has to battle Wild Bonkers, and defeat him to gain the Hammer ability. From here, Kirby can bash his way though containers and enemies, and pound stakes to open up hidden passageways and chambers. The main door forward can be found to the right, guarded by two Scarfies.
In the third area, Kirby needs to swim through a tight water-filled crevasse full of hazardous whirlpools, Glunks, and patrolling Gnawcodiles. A hidden passage to a side chamber can be found here by scaling the cliff on the right hand side and pounding a stake. The main door forward lays past more whirlpools.
In the last area, Kirby finds a sunken hotel building, atop which he can inhale a light hoop to gain Ring Mouth. From here, he will need to make his way through a series of narrow walkways through the area, blowing gusts of wind at anything that gets in the way. Kirby can head straight to the gold cage at the end from here, but there might be some more rewards to find if he blows at the Windmill Switches off the path. One of these will give him access to a boat which he can steer using his gusts of wind and collect the things in the water.
Differences between difficulties[edit]
In Wild Mode, there are two Gnawcodiles swimming in the narrow water passage in the third area, as opposed to just one in Spring-Breeze Mode. In the hidden area where the last Waddle Dee is, there are three Gnawcodiles in Wild Mode, as opposed to two in Spring-Breeze Mode. Everything else is the same between the difficulties.
Missions[edit]

Abandoned Beach has five missions to complete, as follows:
- "Clear the stage" - Kirby must complete the stage.
- "Save the hidden Waddle Dees" - Kirby must find and rescue the three hidden Waddle Dees in silver cages. Their locations are as follows:
- Waddle Dee 1: This Waddle Dee can be found in the second area, shortly after defeating Wild Bonkers. To find him, Kirby needs to locate the Glunk in front of a ladder, and use it to find a stake to pound, lowering a wall and revealing this Waddle Dee.
- Waddle Dee 2: This Waddle Dee can be found in the side area from the third main area. To find the room in question, Kirby should locate a sleeping Awoofy on the cliffside to the right shortly before the tight waterway with the patrolling Gnawcodiles. From there, he can climb up footholds on the cliff to reach a stake, and pound it to open the passageway. Once inside the room, Kirby needs to race against a timer Clocker to save the Waddle Dee.
- Waddle Dee 3: This Waddle Dee can be found in the last area, hidden in a room accessible from behind a fragile wall in the cliffside. Kirby can break through this wall by using Ring Mouth to propel the boat into it. To get the boat, Kirby needs to head down away from the passageway with the Buffahorn and activate a Windmill Switch to raise the part of the walkway with the boat at the end.
- "Crack open 3 Knock-Knock Nuts" - Kirby must find and break all three Knock-Knock Nuts in the stage. Their locations are as follows:
- Nut 1: Can be found on the main path in the first area.
- Nut 2: Can be found on the island with the Warp Star on it in the first area.
- Nut 3: Can be found in the last area in the upper-right corner near a whirlpool. Ring-Mouth Kirby on a boat is needed to reach it.
- "Destroy the animal sand sculpture" - Kirby must find and destroy the Awoofy sand sculpture. It is located at the end of the second area, just to the right of the door.
- "Complete the sign on the rooftop" - After Kirby obtains Ring Mouth, he must stand in the gap in-between the letters that spell "Hotel" in the new world script on the rooftop.
Enemies and Abilities[edit]
| Regular Enemies | Bosses & Mid-Bosses | ||||
|---|---|---|---|---|---|
|
|
| ||||
| Abilities | Mouthful Mode(s) | ||||
|
|
|
Trivia[edit]
- It is possible to skip the battle with Wild Bonkers in this stage by having Kirby hop up onto the canopies of the tree shortly before the battle area, and then hover over the barrier keeping him from moving in front of the walkway. From here, he can swim past the battle area without triggering Wild Bonkers to appear.
Gallery[edit]
Kirby swimming through the first area
Approaching the island patrolled by a Gnawcodile
Lighting Wild Bonkers ablaze using Volcano Fire
Finding a stake off the main path

Finding the animal sand sculpture
Swimming past whirlpools
Finding a hidden stake up on the cliff

Completing the sign on top of the sunken building
Steering a boat using gusts from Ring Mouth
Finding the last Knock-Knock Nut in the water
Crashing through the fragile cliffside to find a hidden room
Heading for the gold cage at the end of the stage
Nintendo Switch Online profile icon background, depicting Abandoned Beach


Video walkthrough[edit]
100% walkthrough of Abandoned Beach.
|
Names in other languages[edit]
| Language | Name | Meaning |
|---|---|---|
| Japanese | 泳げ!ひろびろビーチ Oyoge! Hirobiro Bīchi |
Let's Swim! Such a Spacious Beach |
| Traditional Chinese | 游泳吧!廣闊海灘 Yóuyǒng Ba!Guǎngkuò Hǎitān |
Let's go swimming! Such a Spacious Beach |
| Simplified Chinese | 游泳吧!广阔海滩 Yóuyǒng Ba!Guǎngkuò Hǎitān | |
| Dutch | Verlaten strand | Deserted beach |
| French | Plage à l'abandon | Abandoned beach |
| German | Einsamer Strand | Lonely Beach |
| Italian | Spiaggia abbandonata | Abandoned Beach |
| Korean | 헤엄쳐라! 널찍널찍 비치 Heeomchyeora! Neoljjakneoljjak Bichi |
Let's Swim Around! Such a Spacious Beach |
| Spanish | Playa Abandonada | Abandoned Beach |