Revenge of Meta Knight - Chapter 6: Difference between revisions
m (Text replacement - "\|theme title=\[\[(.*)\]\]" to "|theme title="$1"") |
|||
| (9 intermediate revisions by 7 users not shown) | |||
| Line 1: | Line 1: | ||
{{Infobox-Super Star Stage | {{Infobox-Super Star Stage | ||
|title=Chapter 6 | |title=Chapter 6 | ||
|image=[[File:KSSU RoMK Chapter 6. | |image=[[File:KSSU RoMK Chapter 6.png|256px]] | ||
|caption=[[Kirby]] | |caption=[[Kirby]] flaps through the gates on the way to the [[Reactor]] in ''[[Kirby Super Star Ultra]]''. | ||
|main_game=[[Revenge of Meta Knight]] | |main_game=[[Revenge of Meta Knight]] | ||
|boss=[[Reactor]] | |boss=[[Reactor]] | ||
| Line 11: | Line 10: | ||
|next=[[Revenge of Meta Knight - Chapter 7|Chapter 7]] | |next=[[Revenge of Meta Knight - Chapter 7|Chapter 7]] | ||
|theme music=[[File:Kirby Super Star Havoc Aboard the Halberd Sample.oga]] | |theme music=[[File:Kirby Super Star Havoc Aboard the Halberd Sample.oga]] | ||
|theme title=[[Havoc Aboard the Halberd]] | |theme title="[[Havoc Aboard the Halberd]]" | ||
|description=Clip of the theme that plays in '''Chapter 6''', from ''Kirby Super Star'' | |description=Clip of the theme that plays in '''Chapter 6''', from ''Kirby Super Star'' | ||
}} | }} | ||
'''Chapter 6''' of [[Revenge of Meta Knight]] is the sixth of seven chapters in this game-mode from ''[[Kirby Super Star]]'' and ''[[Kirby Super Star Ultra]]''. In this chapter, [[Kirby]] climbs deep into the hull of the ship to find the [[Reactor|central battery]] and destroy it, crippling the [[Halberd]]'s ability to fly completely. | '''Chapter 6''' of [[Revenge of Meta Knight]] is the sixth of seven chapters in this game-mode from ''[[Kirby Super Star]]'' and ''[[Kirby Super Star Ultra]]''. In this chapter, [[Kirby]] climbs deep into the hull of the ship to find the [[Reactor|central battery]] and destroy it, crippling the [[Halberd]]'s ability to fly completely. | ||
==Intro | ==Intro cutscene== | ||
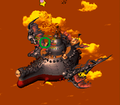
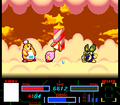
In the opening scene, Kirby flies around the Halberd as the right wing explodes, leaving both wings smoldering as Kirby heads back toward the ship to continue his mission. | In the opening scene, Kirby flies around the Halberd as the right wing explodes, leaving both wings smoldering as Kirby heads back toward the ship to continue his mission. | ||
<gallery> | <gallery> | ||
KSS RoMK Chapter 6 screenshot 01.png|Kirby goes in for more after taking out both wings of the ship. | KSS RoMK Chapter 6 screenshot 01.png|Kirby goes in for more after taking out both wings of the ship. | ||
KSSU RoMK Chapter 6 Scene. | KSSU RoMK Chapter 6 Scene.png|Same scene, but in ''Kirby Super Star Ultra'' | ||
</gallery> | </gallery> | ||
| Line 29: | Line 28: | ||
The next area takes place along the base of the ship, with a strong wind current and not much room to stand. | The next area takes place along the base of the ship, with a strong wind current and not much room to stand. | ||
The door leads into the ship interior, where Kirby will have to move past [[Switch]] [[Gate]]s. From there, the path diverges into several [[Elevator]]s guarded by [[Moto Shotzo]]s. At the end | The door leads into the ship interior, where Kirby will have to move past [[Switch]] [[Gate]]s. From there, the path diverges into several [[Elevator]]s guarded by [[Moto Shotzo]]s. At the end of the hall, Kirby will have to get past a horde of [[Tookey]]s and [[Twizzy]]s (after raiding [[Mace Knight]]'s secret stash of [[food]] and [[1-Up]]s of course). | ||
Kirby has the option of obtaining the [[Bomb]] ability before heading into the [[Reactor]] chamber. Here, he can overhear the conversation of the crew to learn its weakness. Exploiting this, Kirby can destroy the reactor and free all the [[Wheelie]]s inside, dooming the Halberd to drop and moving Kirby to the final chapter. | Kirby has the option of obtaining the [[Bomb]] ability before heading into the [[Reactor]] chamber. Here, he can overhear the conversation of the crew to learn its weakness. Exploiting this, Kirby can destroy the reactor and free all the [[Wheelie]]s inside, dooming the Halberd to drop and moving Kirby to the final chapter. | ||
| Line 228: | Line 227: | ||
!Name | !Name | ||
!Copy Ability | !Copy Ability | ||
|- | |||
|align=center|[[File:KSS Blade Knight.png]] [[File:KSSU Blade Knight Sprite.png]] | |||
|[[Blade Knight]] | |||
|style="border-style: solid; border-width: 1px 3px 1px 1px"|[[Sword]] | |||
|align=center|[[File:KSS Noddy.png]] [[File:KSSU Noddy Sprite.png]] | |||
|[[Noddy]] | |||
|[[Sleep]] | |||
|- | |- | ||
|align=center|[[File:KSS Bomber.png]] [[File:KSSU Bomber Sprite.png]] | |align=center|[[File:KSS Bomber.png]] [[File:KSSU Bomber Sprite.png]] | ||
| Line 250: | Line 256: | ||
|N/A | |N/A | ||
|- | |- | ||
|align=center|[[File:KSS | |align=center|[[File:KSS Gordo.png]] [[File:KSSU Gordo Sprite.png]] | ||
|[[ | |[[Gordo]] | ||
|style="border-style: solid; border-width: 1px 3px 1px 1px"| | |style="border-style: solid; border-width: 1px 3px 1px 1px"|N/A | ||
|align=center|[[File:KSS Tookey.png]] [[File:KSSU Tookey Sprite.png]] | |align=center|[[File:KSS Tookey.png]] [[File:KSSU Tookey Sprite.png]] | ||
|[[Tookey]] | |[[Tookey]] | ||
|None | |None | ||
|- | |- | ||
|align=center|[[File:KSS | |align=center|[[File:KSS Knuckle Joe.png]] [[File:KSSU Knuckle Joe Sprite.png]] | ||
|[[ | |[[Knuckle Joe]] | ||
|style="border-style: solid; border-width: 1px 3px 1px 1px"|[[ | |style="border-style: solid; border-width: 1px 3px 1px 1px"|[[Fighter]] | ||
|align=center|[[File:KSS Twizzy.png]] [[File:KSSU Twizzy Sprite.png]] | |align=center|[[File:KSS Twizzy.png]] [[File:KSSU Twizzy Sprite.png]] | ||
|[[Twizzy]] | |[[Twizzy]] | ||
| Line 295: | Line 301: | ||
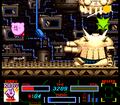
===Boss: Reactor=== | ===Boss: Reactor=== | ||
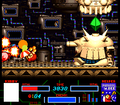
[[File:KSSU Reactor | [[File:KSSU Reactor.png|thumb|right|200px|Kirby finds the central power unit of the ship, though he does not intend to leave it be]] | ||
{{main|Reactor}} | {{main|Reactor}} | ||
Like with the [[Combo Cannon]], the Reactor is a stationary boss, though its central piece cannot be harmed by any of Kirby's attacks. In addition to the central body of the reactor, flamethrower gun and flamethrower traps in the floor must also be contended with. Kirby is able to destroy the secondary flamethrower on the base to make his life a little easier, however. The Reactor primarily attacks by dropping down a laser gun which aims carefully at Kirby before firing. Once it does, the laser travel slowly in a straight line and bounces several times on surfaces. If the laser hits the reactor core (the diamond-shaped object suspended in the middle), the reactor will take damage. Once it sustains three such hits, the reactor will be destroyed, and the chapter complete. | Like with the [[Combo Cannon]], the Reactor is a stationary boss, though its central piece cannot be harmed by any of Kirby's attacks. In addition to the central body of the reactor, flamethrower gun and flamethrower traps in the floor must also be contended with. Kirby is able to destroy the secondary flamethrower on the base to make his life a little easier, however. The Reactor primarily attacks by dropping down a laser gun which aims carefully at Kirby before firing. Once it does, the laser travel slowly in a straight line and bounces several times on surfaces. If the laser hits the reactor core (the diamond-shaped object suspended in the middle), the reactor will take damage. Once it sustains three such hits (four if the battle started with a [[Helper]] in tow), the reactor will be destroyed, and the chapter complete. | ||
{{clear}} | {{clear}} | ||
| Line 314: | Line 320: | ||
KSS RoMK Chapter 6 screenshot 11.png|The Wheelies powering the ship escape after the reactor is damaged. | KSS RoMK Chapter 6 screenshot 11.png|The Wheelies powering the ship escape after the reactor is damaged. | ||
KSS RoMK Chapter 6 hidden tomatoes screenshot.png|Kirby finds Mace Knight's hidden food stash. | KSS RoMK Chapter 6 hidden tomatoes screenshot.png|Kirby finds Mace Knight's hidden food stash. | ||
KSSU-map-RoMK-6.png|Stage map | |||
</gallery> | </gallery> | ||
Revision as of 20:30, 19 January 2024
| ||||||||||||||
| ||||||||||||||
| ||||||||||||||
|
| ||||||||||||||

Chapter 6 of Revenge of Meta Knight is the sixth of seven chapters in this game-mode from Kirby Super Star and Kirby Super Star Ultra. In this chapter, Kirby climbs deep into the hull of the ship to find the central battery and destroy it, crippling the Halberd's ability to fly completely.
Intro cutscene
In the opening scene, Kirby flies around the Halberd as the right wing explodes, leaving both wings smoldering as Kirby heads back toward the ship to continue his mission.
Kirby goes in for more after taking out both wings of the ship.

Same scene, but in Kirby Super Star Ultra


Overview
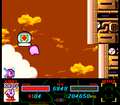
The timer resets to 7000 as Kirby lands in the back of the ship. From here, he will head toward the main reactor of the ship to take that out. The path leads downward past some Rotating Cannons. A secret door can be found along the way which leads to a cloud cache with more Copy Essences and an Invincible Candy.
The next area takes place along the base of the ship, with a strong wind current and not much room to stand.
The door leads into the ship interior, where Kirby will have to move past Switch Gates. From there, the path diverges into several Elevators guarded by Moto Shotzos. At the end of the hall, Kirby will have to get past a horde of Tookeys and Twizzys (after raiding Mace Knight's secret stash of food and 1-Ups of course).
Kirby has the option of obtaining the Bomb ability before heading into the Reactor chamber. Here, he can overhear the conversation of the crew to learn its weakness. Exploiting this, Kirby can destroy the reactor and free all the Wheelies inside, dooming the Halberd to drop and moving Kirby to the final chapter.
Dialogue
Intermittently, the Halberd crew can be heard by the player through dialogue boxes which pop up as Kirby makes his way through the stage. The following table lists off their dialogue in chronological order:
| Chapter 6 Dialogue in Revenge of Meta Knight | |||||
|---|---|---|---|---|---|
| Character | Portraits | Dialogue (KSS) | Dialogue (KSSU) | Dialogue (Japanese) | Notes |
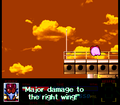
| Mace Knight | "Major damage to the right wing!" |
Looks like the explosion from Heavy Lobster took out the right wing! |
「ヘビーロブスターの爆発で、 右ウィングもこわれただス!」 |
||
| Captain Vul | "Don't worry! We've regained our balance." |
Hm. Hmm. Having both wings destroyed may be just what we needed... |
「ふ、ふ~んだ。左右がこわれて、 ちょうどいいわいっ。」 |
||
| Meta Knight | "................" | ... ... ... ... | 「……………。」 | ||
| Axe Knight | "Kirby's outside! He's going under the ship!" |
Kirby is climbing around the outside of the ship, heading for the helm. |
「カービィは、外壁をつたって 戦艦底部に向かうようです。」 |
||
| Mace Knight | "Mmm! I don't see Kirby on the radar screen." |
Ack! Kirby's disappeared from the radar! |
「ややっ!? カービィがレーダーから消えただス!」 |
This dialogue appears only if Kirby finds the secret door in the clouds. | |
| Captain Vul | "Get Kirby! NOW!!" | You lost him?! Find him! Do it now! |
「見失ったのか!? さがせさがせぃ!」 |
This dialogue appears only if Kirby finds the secret door in the clouds. | |
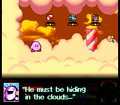
| Meta Knight | "He must be hiding in the clouds..." |
He's hiding in the clouds, it seems... He'll come out soon... |
「雲の中にまぎれたようだな…。 そのうち出てくるだろう。」 |
This dialogue appears only if Kirby finds the secret door in the clouds. | |
| Axe Knight | "Kirby's entered from underneath the ship." |
Kirby is moving along the base of the ship. |
「カービィは戦艦底部を進行中。」 | ||
| Captain Vul | "The bottom's weak... the wind is too strong." |
Not much we can do to him there... But the wind is strong. |
「手薄なところだな… しかし風が強い。」 |
||
| Sailor Waddle Dee | "It's too cold." | And it's cold. | 「さむい。」 | ||
| Axe Knight | "I'm afraid of heights!" | And it's high. | 「たかい。」 | ||
| Mace Knight | "No way! I ain't goin'!" | And it's scary. | 「こわいだス。」 | ||
| Captain Vul | "You chickens!" | ...All right, you lot. | 「………おまえら。」 | ||
| Mace Knight | "Oh no! Those are my hidden tomatoes!" |
Nooo! My secret stash of food and 1-UPs! |
「あああぁぁ!わしのへそくりの トマトと1upがあぁぁぁ!」 |
This dialogue appears only if Kirby finds the secret stash. | |
| Captain Vul | "You idiot! You hid those?" |
So you were the one hoarding them! You scallywag! |
「おまえそんなものをためこんで いたのかぁ!バカものぉ!」 |
This dialogue appears only if Kirby finds the secret stash. | |
| Sailor Waddle Dee | "They look delicious." | (...They looked delicious.) | 「(…おいしそう)」 | This dialogue appears only if Kirby finds the secret stash. | |
| Axe Knight | "Kirby is heading toward the reactor!" |
Kirby is headed for the reactor! |
「カービィがリアクターに 向かっています!」 |
||
| Mace Knight | "If we lose power, we're doomed!!" |
If we lose the reactor, this is all over for sure! |
「動力がなくなったら、 こんどこそアウトだスよ!!」 |
||
| Captain Vul | "Relax. The reactor can't be defeated!" |
Never fear. I don't think Kirby can do anything to the reactor. |
「案ずるな。リアクターはカービィ のどんな攻撃も受け付けまい!」 |
||
| Sailor Waddle Dee | "I hope no reflect lasers hit the reactor!" |
So long as a reflected laser doesn't hit the reactor, it will be invincible. |
「反射レーザーがリアクターに 当たらなければムテキだね。」 |
||
| Captain Vul | "Shhh! That's a SECRET!" | Eeeyah! Don't even say things like that! |
「しぃぃぃぃぃぃぃぃぃっ! よけいなこと言うなっ!」 |
||
| Axe Knight | "Bad news! The reactor's been damaged!" |
The reactor has been destroyed! |
「リアクターを破壊されました!」 | ||
| Mace Knight | "The Wheelies are abandoning ship!" |
All of our Wheelie power sources are escaping! |
「動力であるウィリー達が 逃げていくダスぅ!」 |
||
| Captain Vul | "Urgggh! Do SOMETHING!" | Ahhh! What are you idiots doing?! |
「ええぃ、 なにをやっておるのだぁぁ!」 |
||
Enemies, mid-bosses, and boss
|

Boss: Reactor

- Main article: Reactor
Like with the Combo Cannon, the Reactor is a stationary boss, though its central piece cannot be harmed by any of Kirby's attacks. In addition to the central body of the reactor, flamethrower gun and flamethrower traps in the floor must also be contended with. Kirby is able to destroy the secondary flamethrower on the base to make his life a little easier, however. The Reactor primarily attacks by dropping down a laser gun which aims carefully at Kirby before firing. Once it does, the laser travel slowly in a straight line and bounces several times on surfaces. If the laser hits the reactor core (the diamond-shaped object suspended in the middle), the reactor will take damage. Once it sustains three such hits (four if the battle started with a Helper in tow), the reactor will be destroyed, and the chapter complete.
Gallery
Kirby lands on the outskirts of the ship after damaging both wings.
Falling down the side of the ship past a cannon
Entering a hidden cloud area
Optional battle with Chef Kawasaki and Bugzzy

Hopping along platforms on the underside of the ship
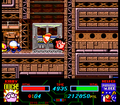
Kirby being harassed by a Moto Shotzo inside the ship
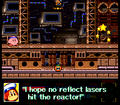
Sailor Waddle Dee inadvertently reveals how to defeat the Reactor.
Kirby and Parasol Waddle Dee are struck by one of the Reactor's blasts.
A reflect laser hits the Reactor.
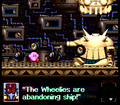
The Wheelies powering the ship escape after the reactor is damaged.
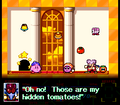
Kirby finds Mace Knight's hidden food stash.
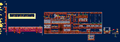
Stage map


