Revenge of Meta Knight - Chapter 3: Difference between revisions
No edit summary |
m (Text replacement - "\|theme title=\[\[(.*)\]\]" to "|theme title="$1"") |
||
| (28 intermediate revisions by 8 users not shown) | |||
| Line 1: | Line 1: | ||
{{Infobox-Super Star Stage | {{Infobox-Super Star Stage | ||
|title=Chapter 3 | |title=Chapter 3 | ||
|image=[[File:RoMK | |image=[[File:KSSU RoMK Chapter 3.png|256px]] | ||
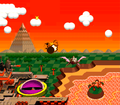
|caption=[[Kirby]] climbs the mountain, [[Sword]] in hand, to stop the flying battleship in | |caption=[[Kirby]] climbs the mountain, [[Sword]] in hand, to stop the flying battleship in ''[[Kirby Super Star Ultra]]''. | ||
|main_game=[[Revenge of Meta Knight]] | |main_game=[[Revenge of Meta Knight]] | ||
|midboss=[[Bonkers|Twin Bonkers]] | |midboss=[[Bonkers|Twin Bonkers]] | ||
|time=6500 | |time=6500 | ||
|previous=[[Revenge of Meta Knight - Chapter 2|Chapter 2]] | |previous=[[Revenge of Meta Knight - Chapter 2|Chapter 2]] | ||
|next=[[Revenge of Meta Knight - Chapter 4|Chapter 4]] | |next=[[Revenge of Meta Knight - Chapter 4|Chapter 4]] | ||
|theme music=[[File:KAR Candy Mountain theme sample.mp3]] | |||
|theme title="[[Candy Mountain (theme)]]" | |||
|description=Clip of the music used in Chapter 3 | |||
}} | }} | ||
'''Chapter 3''' of [[Revenge of Meta Knight]] is the third of seven chapters in this game-mode from ''[[Kirby Super Star]]'' and | '''Chapter 3''' of [[Revenge of Meta Knight]] is the third of seven chapters in this game-mode from ''[[Kirby Super Star]]'' and ''[[Kirby Super Star Ultra]]''. In this chapter, [[Kirby]] makes his way back up [[Candy Mountain]] in order to recruit the help of [[Dyna Blade]], and attempt a third boarding of the [[Halberd]]. | ||
==Intro | ==Intro cutscene== | ||
In the intro scene, Kirby uses the Warp Star he obtained from the previous chapter to attempt a landing on the Halberd, but is blasted out of the sky by the ship's primary gun and crashes into the woods. | In the intro scene, Kirby uses the Warp Star he obtained from the previous chapter to attempt a landing on the Halberd, but is blasted out of the sky by the ship's primary gun and crashes into the woods. | ||
<gallery> | <gallery> | ||
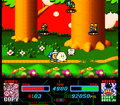
KSS RoMK Chapter 3 screenshot 01.png|Kirby is blasted out of the sky by the Halberd's main cannon. | |||
KSSU RoMK Chapter 3 Scene.png|Same scene, in ''Kirby Super Star Ultra'' | |||
</gallery> | </gallery> | ||
| Line 29: | Line 31: | ||
In the next area, Kirby will have to ascend the slope of the mountain, and deal with some swordsmen along the way. | In the next area, Kirby will have to ascend the slope of the mountain, and deal with some swordsmen along the way. | ||
Near the summit, Kirby will need to use the [[Fuse Cannon]] on the right to keep moving. However, the cannon's way of transportation is a bit... unconventional. | Near the summit, Kirby will need to use the [[Cannon|Fuse Cannon]] on the right to keep moving. However, the cannon's way of transportation is a bit... unconventional. | ||
The cannon leads Kirby to the nest of [[Dyna Blade]]. The giant bird agrees to take Kirby to the Halberd. | The cannon leads Kirby to the nest of [[Dyna Blade]]. The giant bird agrees to take Kirby to the Halberd. | ||
| Line 39: | Line 41: | ||
{| class="wikitable mw-collapsible mw-collapsed" border="1" cellpadding="2" | {| class="wikitable mw-collapsible mw-collapsed" border="1" cellpadding="2" | ||
!colspan= | !colspan=6|'''Chapter 3 Dialogue in Revenge of Meta Knight''' | ||
|- | |- | ||
! '''Character''' | ! '''Character''' | ||
| Line 45: | Line 47: | ||
! '''Dialogue''' (''KSS'') | ! '''Dialogue''' (''KSS'') | ||
! '''Dialogue''' (''KSSU'') | ! '''Dialogue''' (''KSSU'') | ||
! '''Dialogue''' (Japanese) | |||
! '''Notes''' | ! '''Notes''' | ||
|- | |- | ||
|[[Axe Knight]] | |[[Axe Knight]] | ||
|[[File: | |[[File:KSS Axe Knight Portrait 2.png]] [[File:KSSU Axe Knight Portrait 1.png]] | ||
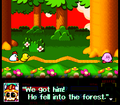
|''"We got him!<br>He fell into the forest."'' | |''"We got him!<br>He fell into the forest."'' | ||
|''Kirby is hit! He's fallen<br>in the woods.'' | |''Kirby is hit! He's fallen<br>in the woods.'' | ||
|「カービィ撃退!<br>森におちたようです。」 | |||
| | | | ||
|- | |- | ||
|[[Captain Vul]] | |[[Captain Vul]] | ||
|[[File: | |[[File:KSS Vul Portrait 3.png]] [[File:KSSU Captain Vul Portrait 6.png]] | ||
|''"Good.<br>He will never catch up."'' | |''"Good.<br>He will never catch up."'' | ||
|''All right. That should<br>take care of him now.'' | |''All right. That should<br>take care of him now.'' | ||
|「よしっ。今度こそ<br>追いつけまいっ。」 | |||
| | | | ||
|- | |- | ||
|[[Sailor Waddle Dee]] | |[[Sailor Waddle Dee]] | ||
|[[File: | |[[File:KSS Sailor Dee Portrait 2.png]] [[File:KSSU Sailor Waddle Dee Portrait 1.png]] | ||
|''"Are you sure?"'' | |''"Are you sure?"'' | ||
|''I wonder...'' | |''I wonder...'' | ||
|「そーかなー?」 | |||
| | | | ||
|} | |} | ||
| Line 71: | Line 77: | ||
<tab name="Enemies"> | <tab name="Enemies"> | ||
{| class="wikitable" | {| class="wikitable" | ||
!Sprite (''KSS''/'' | !Sprite (''KSS''/''KSSU'') | ||
!Name | !Name | ||
!style="border-style: solid; border-width: 1px 3px 1px 1px"|Copy Ability | !style="border-style: solid; border-width: 1px 3px 1px 1px"|Copy Ability | ||
!Sprite (''KSS''/'' | !Sprite (''KSS''/''KSSU'') | ||
!Name | !Name | ||
!Copy Ability | !Copy Ability | ||
|- | |- | ||
|align=center|[[File:KSS Blade Knight.png]] [[File: | |align=center|[[File:KSS Blade Knight.png]] [[File:KSSU Blade Knight Sprite.png]] | ||
|[[Blade Knight]] | |[[Blade Knight]] | ||
|style="border-style: solid; border-width: 1px 3px 1px 1px"|[[Sword]] | |style="border-style: solid; border-width: 1px 3px 1px 1px"|[[Sword]] | ||
|align=center|[[File:Scarfy | |align=center|[[File:KSS Scarfy sprite.png]] [[File:KSSU Scarfy Sprite.png]] | ||
|[[Scarfy]] | |[[Scarfy]] | ||
|[[Crash]] (if scanned with [[Copy]]) | |[[Crash]] (if scanned with [[Copy]]) | ||
|- | |- | ||
|align=center|[[File:KSS Burnin Leo.png]] [[File: | |align=center|[[File:KSS Burnin Leo.png]] [[File:KSSU Burning Leo Sprite.png]] | ||
|[[Burning Leo|Burnin' Leo]] | |[[Burning Leo|Burnin' Leo]] | ||
|style="border-style: solid; border-width: 1px 3px 1px 1px"|[[Fire]] | |style="border-style: solid; border-width: 1px 3px 1px 1px"|[[Fire]] | ||
|align=center|[[File:KSS Shotzo.png]] [[File: | |align=center|[[File:KSS Shotzo.png]] [[File:KSSU Shotzo Sprite.png]] | ||
|[[Shotzo]] | |[[Shotzo]] | ||
|N/A | |N/A | ||
|- | |- | ||
|align=center|[[File:KSS Cappy Cover.png]] [[File: | |align=center|[[File:KSS Cappy Cover.png]] [[File:KSSU Cappy Sprite.png]] | ||
|[[Cappy]] | |[[Cappy]] | ||
|style="border-style: solid; border-width: 1px 3px 1px 1px"|None | |style="border-style: solid; border-width: 1px 3px 1px 1px"|None | ||
|align=center|[[File:KSS TAC.png]] [[File: | |align=center|[[File:KSS TAC.png]] [[File:KSSU Tac Sprite.png]] | ||
|[[Tac|T.A.C.]] | |[[Tac|T.A.C.]] | ||
|[[Copy]] | |[[Copy]] | ||
|- | |- | ||
|align=center|[[File:KSS Kabu.png]] [[File: | |align=center|[[File:KSS Kabu.png]] [[File:KSSU Kabu Sprite.png]] | ||
|[[Kabu]] | |[[Kabu]] | ||
|style="border-style: solid; border-width: 1px 3px 1px 1px"|None | |style="border-style: solid; border-width: 1px 3px 1px 1px"|None | ||
|align=center|[[File:KSS Tookey.png]] [[File: | |align=center|[[File:KSS Tookey.png]] [[File:KSSU Tookey Sprite.png]] | ||
|[[Tookey]] | |[[Tookey]] | ||
|None | |None | ||
|- | |- | ||
|align=center|[[File:KSS Knuckle Joe.png]] [[File: | |align=center|[[File:KSS Knuckle Joe.png]] [[File:KSSU Knuckle Joe Sprite.png]] | ||
|[[Knuckle Joe]] | |[[Knuckle Joe]] | ||
|style="border-style: solid; border-width: 1px 3px 1px 1px"|[[Fighter]] | |style="border-style: solid; border-width: 1px 3px 1px 1px"|[[Fighter]] | ||
|align=center|[[File:KSS Twizzy.png]] [[File: | |align=center|[[File:KSS Twizzy.png]] [[File:KSSU Twizzy Sprite.png]] | ||
|[[Twizzy]] | |[[Twizzy]] | ||
|None | |None | ||
|- | |- | ||
|align=center|[[File:KSS Lovely.png]] [[File: | |align=center|[[File:KSS Lovely.png]] [[File:KSSU Lovely Sprite.png]] | ||
|[[Lovely]] | |[[Lovely]] | ||
|style="border-style: solid; border-width: 1px 3px 1px 1px"|N/A | |style="border-style: solid; border-width: 1px 3px 1px 1px"|N/A | ||
|align=center|[[File:KSS Walky.png]] [[File: | |align=center|[[File:KSS Walky.png]] [[File:KSSU Walky Sprite.png]] | ||
|[[Walky]] | |[[Walky]] | ||
|[[Mike]] | |[[Mike]] | ||
|- | |- | ||
|align=center|[[File:KSS Poppy Bros Jr Sprite.png]] [[File: | |align=center|[[File:KSS Poppy Bros Jr Sprite.png]] [[File:KSSU Poppy Bros Jr Sprite.png]] | ||
|[[Poppy Bros. Jr.]] | |[[Poppy Bros. Jr.]] | ||
|style="border-style: solid; border-width: 1px 3px 1px 1px"|None | |style="border-style: solid; border-width: 1px 3px 1px 1px"|None | ||
| Line 132: | Line 138: | ||
!Copy Ability | !Copy Ability | ||
|- | |- | ||
|align=center|[[File:KSS Bonkers.png]] [[File: | |align=center|[[File:KSS Bonkers.png]] [[File:KSSU Bonkers Sprite.png]] | ||
|[[Bonkers|Twin Bonkers]] | |[[Bonkers|Twin Bonkers]] | ||
|[[Hammer]] | |[[Hammer]] | ||
| Line 139: | Line 145: | ||
</tabs> | </tabs> | ||
|} | |} | ||
== Gallery == | |||
<gallery> | |||
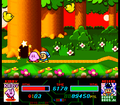
KSS RoMK Chapter 3 screenshot 02.png|Kirby is sent back to square one. | |||
KSS RoMK Chapter 3 screenshot 03.png|There are always doorways in the tree trunks. | |||
KSS RoMK Chapter 3 screenshot 04.png|Climbing up the scaffolding inside the hollow tree | |||
KSS RoMK Chapter 3 screenshot 05.png|Stopping momentarily to grab some supplies | |||
KSS RoMK Chapter 3 screenshot 06.png|Preparing for the Twin Bonkers fight | |||
KSS RoMK Chapter 3 screenshot 07.png|Climbing up Candy Mountain once again | |||
KSS RoMK Chapter 3 screenshot 08.png|Kirby gives his helper a lift. | |||
KSS RoMK Chapter 3 screenshot 09.png|The leftmost cannon is defective. | |||
KSS RoMK Chapter 3 screenshot 10.png|The rightmost cannon has an unconventional means of transporting Kirby. | |||
KSS RoMK Chapter 3 screenshot 11.png|Meeting up with Dyna Blade for a lift | |||
KSSU-map-RoMK-3.png|Stage map | |||
</gallery> | |||
{{clear}} | {{clear}} | ||
| Line 145: | Line 166: | ||
[[Category:Stages in Revenge of Meta Knight]] | [[Category:Stages in Revenge of Meta Knight]] | ||
Latest revision as of 20:30, 19 January 2024
| ||||||||||||
| ||||||||||||
| ||||||||||||
|
| ||||||||||||

Chapter 3 of Revenge of Meta Knight is the third of seven chapters in this game-mode from Kirby Super Star and Kirby Super Star Ultra. In this chapter, Kirby makes his way back up Candy Mountain in order to recruit the help of Dyna Blade, and attempt a third boarding of the Halberd.
Intro cutscene[edit]
In the intro scene, Kirby uses the Warp Star he obtained from the previous chapter to attempt a landing on the Halberd, but is blasted out of the sky by the ship's primary gun and crashes into the woods.
Kirby is blasted out of the sky by the Halberd's main cannon.
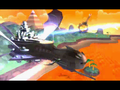
Same scene, in Kirby Super Star Ultra


Overview[edit]
The timer resets to 6500 after Kirby lands in the woods. As it happens, the woods in question are near Candy Mountain, so Kirby heads in that direction.
The door leads into a hollow tree log leading upward. There are a number of side chambers that can be accessed here for additional goodies, including an optional doorway which yields a 1-Up and the Copy Essences for Cutter, Sword, and Fighter.
The door leads to a dirt tunnel where Kirby gets ambushed by two Bonkers. Using the Hammer ability from these foes, Kirby can bust his way further in. Another secret chamber can be found which contains essences for Mirror, Parasol, and Ninja. A Wheel essence can be found elsewhere in the area.
In the next area, Kirby will have to ascend the slope of the mountain, and deal with some swordsmen along the way.
Near the summit, Kirby will need to use the Fuse Cannon on the right to keep moving. However, the cannon's way of transportation is a bit... unconventional.
The cannon leads Kirby to the nest of Dyna Blade. The giant bird agrees to take Kirby to the Halberd.
Dialogue[edit]
Intermittently, the Halberd crew can be heard by the player through dialogue boxes which pop up as Kirby makes his way through the stage. The following table lists off their dialogue in chronological order:
| Chapter 3 Dialogue in Revenge of Meta Knight | |||||
|---|---|---|---|---|---|
| Character | Portraits | Dialogue (KSS) | Dialogue (KSSU) | Dialogue (Japanese) | Notes |
| Axe Knight | "We got him! He fell into the forest." |
Kirby is hit! He's fallen in the woods. |
「カービィ撃退! 森におちたようです。」 |
||
| Captain Vul | "Good. He will never catch up." |
All right. That should take care of him now. |
「よしっ。今度こそ 追いつけまいっ。」 |
||
| Sailor Waddle Dee | "Are you sure?" | I wonder... | 「そーかなー?」 | ||
Enemies and mid-bosses[edit]
| ||||||||||||||||||||||||||||||||||||||||||||||||||||||
Gallery[edit]
Kirby is sent back to square one.
There are always doorways in the tree trunks.
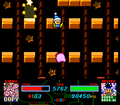
Climbing up the scaffolding inside the hollow tree
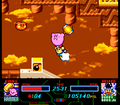
Stopping momentarily to grab some supplies
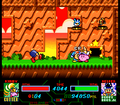
Preparing for the Twin Bonkers fight
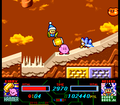
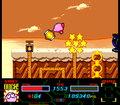
Climbing up Candy Mountain once again
Kirby gives his helper a lift.
The leftmost cannon is defective.
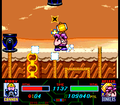
The rightmost cannon has an unconventional means of transporting Kirby.
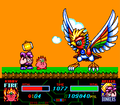
Meeting up with Dyna Blade for a lift

Stage map


