Gigabyte Grounds - Stage 1: Difference between revisions
m (Text replacement - "{{Good}}" to "") |
m (Minor fixes.) |
||
| (5 intermediate revisions by 5 users not shown) | |||
| Line 1: | Line 1: | ||
{{Infobox-KPRStage | {{Infobox-KPRStage | ||
|image=[[File:KPR Gigabyte Grounds Stage 1 1.png|350px]] | |image=[[File:KPR Gigabyte Grounds Stage 1 1.png|350px]] | ||
| Line 8: | Line 7: | ||
|sticker=3 | |sticker=3 | ||
|goldsticker=[[Meta Knight|Meta Knight Icon]] | |goldsticker=[[Meta Knight|Meta Knight Icon]] | ||
| | |theme music=[[File:Dried-up Sea KPR.mp3]] | ||
|theme title="[[Dried-up Sea (theme)|Dried-up Sea]]" | |||
|description=Clip of the music that primarily plays in Gigabyte Grounds - Stage 1. | |||
|previousstage=[[Overload Ocean - Stage 7 EX]] | |previousstage=[[Overload Ocean - Stage 7 EX]] | ||
|nextstage=[[Gigabyte Grounds - Stage 2]] | |nextstage=[[Gigabyte Grounds - Stage 2]] | ||
}} | }} | ||
'''Gigabyte Grounds - Stage 1''' is the first stage of [[Gigabyte Grounds]]. There are three [[Code Cube]]s and three [[Sticker (Kirby: Planet Robobot)|sticker]]s in this stage. The rare sticker is one depicting the [[Meta Knight]] Icon. | |||
'''Gigabyte Grounds - Stage 1''' is the first stage of [[Gigabyte Grounds]]. There are three [[Code Cube]]s and three [[Sticker (Kirby: Planet Robobot)|sticker]]s in this stage. The | |||
==Overview== | ==Overview== | ||
| Line 20: | Line 20: | ||
This leads into an area where the [[Robobot Armor]] can be utilized to clear the logs in the way. From there, its a trip up and down more steep dunes. After that is another rolling bar section, which leads to the stage exit. | This leads into an area where the [[Robobot Armor]] can be utilized to clear the logs in the way. From there, its a trip up and down more steep dunes. After that is another rolling bar section, which leads to the stage exit. | ||
===Code Cube & | ===Code Cube & Rare Sticker Guide=== | ||
*'''Code Cube 1''' - In the area with the logs, a path needs to be made using the [[Robobot Armor]] which can allow Kirby to carry the battery to the other side and use it to power a sawblade which will open the way to the cube. | *'''Code Cube 1''' - In the area with the logs, a path needs to be made using the [[Robobot Armor]] which can allow Kirby to carry the battery to the other side and use it to power a sawblade which will open the way to the cube. | ||
*'''Code Cube 2''' - In the second dune area, a side door can be found which leads to a rolling bar puzzle. Solving this puzzle yields this cube. | *'''Code Cube 2''' - In the second dune area, a side door can be found which leads to a rolling bar puzzle. Solving this puzzle yields this cube. | ||
*'''Code Cube 3''' - In the second rolling bar area, a hidden tunnel leads to a suit of [[Robobot Armor]], which Kirby can use to punch the rolling bars away. This is done near the end of the stage to obtain this cube from a golden block barrier. | *'''Code Cube 3''' - In the second rolling bar area, a hidden tunnel leads to a suit of [[Robobot Armor]], which Kirby can use to punch the rolling bars away. This is done near the end of the stage to obtain this cube from a golden block barrier. | ||
*''' | *'''Rare Sticker''' - In the second rolling bar area, this sticker can be found by climbing up the dune after traveling through the pipe. | ||
==Enemies, Mid-Bosses and Abilities== | ==Enemies, Mid-Bosses and Abilities== | ||
| Line 100: | Line 100: | ||
KPR Gigabyte Grounds Stage 1 5.png|Stone Kirby cannot be crushed. | KPR Gigabyte Grounds Stage 1 5.png|Stone Kirby cannot be crushed. | ||
KPR Gigabyte Grounds Stage 1 6.png|Kirby takes a swing at the long bars using the [[Robobot Armor]]. | KPR Gigabyte Grounds Stage 1 6.png|Kirby takes a swing at the long bars using the [[Robobot Armor]]. | ||
KPR-map41.jpg|Stage map | |||
</gallery> | </gallery> | ||
{{Navbox-KPR}} | {{Navbox-KPR}} | ||
Revision as of 06:05, 9 February 2024
| ||||||||||||||||
| ||||||||||||||||
| ||||||||||||||||
|
| ||||||||||||||||

Gigabyte Grounds - Stage 1 is the first stage of Gigabyte Grounds. There are three Code Cubes and three stickers in this stage. The rare sticker is one depicting the Meta Knight Icon.
Overview
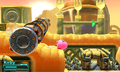
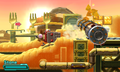
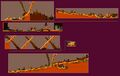
The stage begins out in a dusty desert landscape, as Haltmann Works drills for oil, and keeps it nice and slushy inside giant blenders. Kirby will have to make his way across dunes, pipes and rolling bars which can either squish him or send him flying into the screen depending on how Kirby is hit.
This leads into an area where the Robobot Armor can be utilized to clear the logs in the way. From there, its a trip up and down more steep dunes. After that is another rolling bar section, which leads to the stage exit.
Code Cube & Rare Sticker Guide
- Code Cube 1 - In the area with the logs, a path needs to be made using the Robobot Armor which can allow Kirby to carry the battery to the other side and use it to power a sawblade which will open the way to the cube.
- Code Cube 2 - In the second dune area, a side door can be found which leads to a rolling bar puzzle. Solving this puzzle yields this cube.
- Code Cube 3 - In the second rolling bar area, a hidden tunnel leads to a suit of Robobot Armor, which Kirby can use to punch the rolling bars away. This is done near the end of the stage to obtain this cube from a golden block barrier.
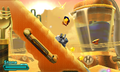
- Rare Sticker - In the second rolling bar area, this sticker can be found by climbing up the dune after traveling through the pipe.
Enemies, Mid-Bosses and Abilities
| Regular Enemies | Mid-Boss | ||||
|---|---|---|---|---|---|
|
|
| ||||
| Abilities | Robobot Armor Modes | ||||
|
|
|
Gallery
Kirby dashes for safety with his mouth full.
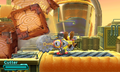
Kirby practices his woodcutting skills.
Stone Kirby slides down a slope.

Stone Kirby cannot be crushed.
Kirby takes a swing at the long bars using the Robobot Armor.
Stage map


