Royal Road - Stage 1: Difference between revisions
m (Text replacement - "{{Navbox-TD}}" to "{{Navbox-KTD}}") |
m (→HAL Room) |
||
| (15 intermediate revisions by 9 users not shown) | |||
| Line 1: | Line 1: | ||
{{Infobox-KTDStage | {{Infobox-KTDStage | ||
|image=[[File:KTD Royal Road Stage 1 | |image=[[File:KTD Royal Road Stage 1 select.png]] | ||
|caption= | |caption='''Stage 1''' on the [[Royal Road]] level hub. | ||
|level=[[Royal Road]] | |level=[[Royal Road]] | ||
|hypernova={{N}} | |hypernova={{N}} | ||
| Line 9: | Line 8: | ||
|goldkeychain=[[Galacta Knight]] | |goldkeychain=[[Galacta Knight]] | ||
|midboss=[[Gigant Edge]] | |midboss=[[Gigant Edge]] | ||
|theme music=[[File:KTD Moonlight Capital clip.mp3]] | |||
|theme title="[[Moonlight Capital]]" | |||
|description=Clip of the music that primarily plays in Royal Road - Stage 1. | |||
|previousstage=[[Endless Explosions - Stage 7 EX]] | |previousstage=[[Endless Explosions - Stage 7 EX]] | ||
|nextstage=[[Royal Road - Stage 2]] | |nextstage=[[Royal Road - Stage 2]] | ||
}} | }} | ||
'''Royal Road - Stage 1''' is the first stage in [[Royal Road]]. There are three [[Sun Stone]]s and 4 [[keychain]]s in this stage. The rare keychain is one depicting [[Galacta Knight]]. | |||
'''Royal Road - Stage 1''' is the first stage in [[Royal Road]]. There are three [[Sun Stone]]s and 4 [[ | |||
==Overview== | ==Overview== | ||
| Line 20: | Line 21: | ||
Inside the castle, Kirby must contend with the Sectra minions, which are bug versions of standard enemies. A couple of them pilot a [[Lollipop Tank|Sectra Tank]], which will prove a hassle. | Inside the castle, Kirby must contend with the Sectra minions, which are bug versions of standard enemies. A couple of them pilot a [[Lollipop Tank|Sectra Tank]], which will prove a hassle. | ||
The next area has Kirby battling [[Gigant Edge]] in a windy tunnel. Defeating it yields the way forward | The next area has Kirby battling [[Gigant Edge]] in a windy tunnel. Defeating it yields the way forward. | ||
From there, a series of [[Tilt Cannon]] | From there, a series of [[Cannon#Tilt Cannon|Tilt Cannons]] can be used to progress further. From there, Kirby will have to contend with the Sectra Tank again. The stage exit can be found at the end of this hall. | ||
===Sun Stone & | ===Sun Stone & Rare Keychain Guide=== | ||
*'''Sun Stone 1''' - In the first [[Lollipop Tank|Sectra Tank]] section, this stone can be found in an underground chamber inside a barrel, guarded by a [[Moonja]]. | *'''Sun Stone 1''' - In the first [[Lollipop Tank|Sectra Tank]] section, this stone can be found in an underground chamber inside a barrel, guarded by a [[Moonja]]. | ||
*'''Sun Stone 2''' - In the Tilt Cannon section, a side door can be found by firing into the ceiling. In here, Kirby has to solve a [[ | *'''Sun Stone 2''' - In the Tilt Cannon section, a side door can be found by firing into the ceiling. In here, Kirby has to solve a [[tilt weight]] puzzle to get this stone. | ||
*'''Sun Stone 3''' - In the second Sectra Tank section, a [[Bomb Block]] can be found in the floor which will drop the tank into a pit before it can run over a treasure chest up ahead. Kirby can then access the chest to get this stone. | *'''Sun Stone 3''' - In the second Sectra Tank section, a [[Bomb Block]] can be found in the floor which will drop the tank into a pit before it can run over a treasure chest up ahead. Kirby can then access the chest to get this stone. | ||
*''' | *'''Rare Keychain''' - After getting the third Sun Stone, this keychain can be found if Kirby ventures further left. | ||
===HAL Room=== | |||
[[File:KTD_HAL_Room_screenshot_2.png|thumb|left|200px|The HAL Room in this stage.]] | |||
After defeating [[Gigant Edge]], Kirby must simply float to the top-right corner of the stage to find a moon in the background. Kirby can enter this moon like a door to access the [[HAL Room]]. The HAL Room is composed of big [[Star Block]]s which are displaced between the foreground and background, specially arranged to create the illusion of forming the letters altogether. The [[Copy Essence]]s present are [[Circus]], [[Archer]], [[Beetle]] and [[Bell]], abilities introduced in ''[[Kirby: Triple Deluxe]]''. | |||
{{clear}} | |||
==Enemies, Mid-Bosses and Abilities== | ==Enemies, Mid-Bosses and Abilities== | ||
| Line 47: | Line 54: | ||
{{col-break|width=33%}} | {{col-break|width=33%}} | ||
*[[Rocky]] | *[[Rocky]] | ||
*[[Sectra Bronto Burt]] | *[[Bronto Burt#Kirby: Triple Deluxe|Sectra Bronto Burt]] | ||
*[[Sectra Dee]] | *[[Sectra Dee]] | ||
*[[Sectra Gordo]] | *[[Gordo#Kirby: Triple Deluxe|Sectra Gordo]] | ||
{{col-break|width=34%}} | {{col-break|width=34%}} | ||
*[[Sectra Lanzer]] | *[[Lanzer#Kirby: Triple Deluxe|Sectra Lanzer]] | ||
*[[Lollipop Tank|Sectra Tank]] | *[[Lollipop Tank|Sectra Tank]] | ||
*[[Shotzo]] | *[[Shotzo]] | ||
| Line 90: | Line 97: | ||
==Gallery== | ==Gallery== | ||
<gallery> | <gallery> | ||
KTD Royal Road Stage 1 2.png|Kirby | KTD Royal Road Stage 1 1.png|Kirby prepares to enter the palace. | ||
KTD Royal Road Stage 1 3.png|Kirby | KTD Royal Road Stage 1 2.png|Kirby passes one of the [[Lollipop Tank|Sectra Tanks]]. | ||
KTD Royal Road Stage 1 4.png|This | KTD Royal Road Stage 1 3.png|Kirby hops into a [[Cannon]] controlled by tilt controls. | ||
KTD Royal Road Stage 1 4.png|This Sectra Tank thinks it can take out Kirby. | |||
KTD Royal Road Stage 1 5.png|It was wrong. | KTD Royal Road Stage 1 5.png|It was wrong. | ||
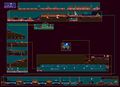
KTD-map61.jpg|Stage map | |||
</gallery> | </gallery> | ||
{{clear}} | |||
{{Navbox-KTD}} | {{Navbox-KTD}} | ||
Latest revision as of 07:42, 18 February 2024
| ||||||||||||||||||
| ||||||||||||||||||
| ||||||||||||||||||
|
| ||||||||||||||||||

Royal Road - Stage 1 is the first stage in Royal Road. There are three Sun Stones and 4 keychains in this stage. The rare keychain is one depicting Galacta Knight.
Overview[edit]
The stage begins with Kirby outside of the palace. He has to make his way to the Warp Star, which will allow him to bust through the main gate.
Inside the castle, Kirby must contend with the Sectra minions, which are bug versions of standard enemies. A couple of them pilot a Sectra Tank, which will prove a hassle.
The next area has Kirby battling Gigant Edge in a windy tunnel. Defeating it yields the way forward.
From there, a series of Tilt Cannons can be used to progress further. From there, Kirby will have to contend with the Sectra Tank again. The stage exit can be found at the end of this hall.
Sun Stone & Rare Keychain Guide[edit]
- Sun Stone 1 - In the first Sectra Tank section, this stone can be found in an underground chamber inside a barrel, guarded by a Moonja.
- Sun Stone 2 - In the Tilt Cannon section, a side door can be found by firing into the ceiling. In here, Kirby has to solve a tilt weight puzzle to get this stone.
- Sun Stone 3 - In the second Sectra Tank section, a Bomb Block can be found in the floor which will drop the tank into a pit before it can run over a treasure chest up ahead. Kirby can then access the chest to get this stone.
- Rare Keychain - After getting the third Sun Stone, this keychain can be found if Kirby ventures further left.
HAL Room[edit]

After defeating Gigant Edge, Kirby must simply float to the top-right corner of the stage to find a moon in the background. Kirby can enter this moon like a door to access the HAL Room. The HAL Room is composed of big Star Blocks which are displaced between the foreground and background, specially arranged to create the illusion of forming the letters altogether. The Copy Essences present are Circus, Archer, Beetle and Bell, abilities introduced in Kirby: Triple Deluxe.
Enemies, Mid-Bosses and Abilities[edit]
| Regular Enemies | Mid-Boss | ||||
|---|---|---|---|---|---|
|
|
| ||||
| Abilities | Special | ||||
|
|
|
Gallery[edit]

Kirby prepares to enter the palace.

Kirby passes one of the Sectra Tanks.

Kirby hops into a Cannon controlled by tilt controls.

This Sectra Tank thinks it can take out Kirby.

It was wrong.
Stage map


