Royal Road - Stage 5: Difference between revisions
No edit summary |
m (→HAL Room) |
||
| (27 intermediate revisions by 14 users not shown) | |||
| Line 1: | Line 1: | ||
{{Infobox-KTDStage | {{Infobox-KTDStage | ||
|image=[[File:Royal Road 5 | |image=[[File:KTD Royal Road Stage 5 select.png]] | ||
|caption= | |caption='''Stage 5''' on the [[Royal Road]] level hub. | ||
|level=[[Royal Road]] | |level=[[Royal Road]] | ||
|hypernova={{Y}} | |hypernova={{Y}} | ||
| Line 7: | Line 7: | ||
|keychain=5 | |keychain=5 | ||
|goldkeychain=[[HAL Laboratory|Golden Egg Statue]] | |goldkeychain=[[HAL Laboratory|Golden Egg Statue]] | ||
|midboss=[[Bonkers]], All DX Mid-Bosses | |midboss=[[Bonkers]], All DX Mid-Bosses | ||
|boss=[[Flowery Woods]] | |||
|theme music=[[File:KTD Beautiful Prison.mp3]] | |||
|theme title="[[Beautiful Prison]]" | |||
|description=Clip of the music that primarily plays in Royal Road - Stage 5. | |||
|previousstage=[[Royal Road - Stage 4]] | |previousstage=[[Royal Road - Stage 4]] | ||
|nextstage=[[Royal Road - Stage 6]] | |nextstage=[[Royal Road - Stage 6]] | ||
}} | }} | ||
'''Royal Road - Stage 5''' is the fifth stage in [[Royal Road]], and the final standard stage in ''[[Kirby: Triple Deluxe]]''. There are four [[Sun Stone]]s and 5 [[keychain]]s in this stage. The rare keychain is one depicting the [[HAL Laboratory|Golden Egg Statue]]. | |||
'''Royal Road - Stage 5''' is the fifth stage in [[Royal Road]], and the final standard stage in ''[[Kirby: Triple Deluxe]]''. There are four [[Sun Stone]]s and 5 [[ | |||
==Overview== | ==Overview== | ||
| Line 20: | Line 23: | ||
The next room has a gate with five bars on it. However, there are only four portals leading to different areas. Inside each are more prisoners to be rescued. These areas are as follows (starting clockwise from the leftmost portal): | The next room has a gate with five bars on it. However, there are only four portals leading to different areas. Inside each are more prisoners to be rescued. These areas are as follows (starting clockwise from the leftmost portal): | ||
*A hallway with background | *A hallway with [[Hazard|3D Securitrons]], background piston-like blocks that push forward at fixed intervals and slam Kirby into the screen. | ||
*Another open area with crystal platforms | *Another open area with crystal platforms, where [[Bonkers]] is fought. | ||
*A drop-zone lined with [[Bomb Block]] platforms. Kirby can use the [[ | *A drop-zone lined with [[Bomb Block]] platforms. Kirby can use the [[3D Helmet Cannon]] to progress here. | ||
*An open crystal platform zone with many [[3D Warp Star]]s inset. | *An open crystal platform zone with many [[3D Warp Star]]s inset. | ||
Once all of the prisoners from these areas are free, the fifth portal will appear, which leads to an area where Kirby will need to dodge many | Once all of the prisoners from these areas are free, the fifth portal will appear, which leads to an area where Kirby will need to dodge many 3D Securitrons in sequence before being allowed to move forward. At the end is the last prisoner who - along with the others - will open the door for Kirby at last. | ||
Through the door, Kirby ends up in a hall where [[Flame Galboros]] DXs are on patrol, guarding another prisoner. Up ahead, however, Kirby can get a [[Miracle Fruit]] and activate [[Hypernova]]. The rest of the area involves Kirby running through the halls, eating Mid-Bosses while freeing the rest of the [[People of the Sky]]. | Through the door, Kirby ends up in a hall where [[Flame Galboros]] DXs are on patrol, guarding another prisoner. Up ahead, however, Kirby can get a [[Miracle Fruit]] and activate [[Hypernova]]. The rest of the area involves Kirby running through the halls, eating Mid-Bosses while freeing the rest of the [[People of the Sky]]. | ||
In the last room, [[Flowery Woods]] appears one last time to try and stop Kirby. In [[Hypernova]] form, however, the big flowery tree is no match for the round hero, being gobbled up like everything else. That done, the People of the Sky bring the stage exit to Kirby. | In the last room, [[Flowery Woods]] appears one last time to try and stop Kirby. In [[Hypernova]] form, however, the big flowery tree is no match for the round hero, being gobbled up (including its health bar) like everything else. That done, the People of the Sky bring the stage exit to Kirby. | ||
===Sun Stone & | ===Sun Stone & Rare Keychain Guide=== | ||
*'''Sun Stone 1''' - In the area with the [[ | *'''Sun Stone 1''' - In the area with the [[3D Helmet Cannon]], Kirby will need to reach the bottom area and blast stone blocks containing both the [[Key]] and the gate to reach this stone. | ||
*'''Sun Stone 2''' - In the side-area where [[Bonkers]] is fought, there is a side-door which can be accessed by hitting a switch in the foreground. Inside is a rather complicated [[Tilt Fuse Box]] puzzle, which leads to this stone when solved. Kirby will need a Fire-making ability to light the fuse. | *'''Sun Stone 2''' - In the side-area where [[Bonkers]] is fought, there is a side-door which can be accessed by hitting a switch in the foreground. Inside is a rather complicated [[Fuse|Tilt Fuse Box]] puzzle, which leads to this stone when solved. Kirby will need a Fire-making ability to light the fuse. | ||
*'''Sun Stone 3''' - During the [[Hypernova]] section, eating [[Mr. Frosty]] DX will cause a [[3D Warp Star]] to appear. Kirby can take this star to reach this stone. | *'''Sun Stone 3''' - During the [[Hypernova]] section, eating [[Mr. Frosty]] DX will cause a [[3D Warp Star]] to appear. Kirby can take this star to reach this stone. | ||
*'''Sun Stone 4''' - During the [[Hypernova]] section, three [[Grand Wheelie]] DXs will appear. If Kirby eats all three, a [[3D Warp Star]] will appear which can take him to the background. There, Kirby can head to the left to find this stone. | *'''Sun Stone 4''' - During the [[Hypernova]] section, three [[Grand Wheelie]] DXs will appear. If Kirby eats all three, a [[3D Warp Star]] will appear which can take him to the background. There, Kirby can head to the left to find this stone. | ||
*''' | *'''Rare Keychain''' - In the side area from the furthest-right portal, this keychain can be uncovered by pounding a [[Stake]] on one of the platforms in the foreground. The keychain can then be found underneath that platform. | ||
===HAL Room=== | |||
[[File:KTD_HAL_Room_screenshot_3.png|thumb|right|200px|The end of the bonus area after the HAL Room.]] | |||
A special [[HAL Room]] appears in this stage. In the 5x5 3D Securitron segment, Kirby can wait 86 seconds after the door appears, which will result in all the 3D Securitrons retracting. Then, the blocks will pop in to form the letters H, A, and L in sequence, and a new door will appear. Kirby can enter it to access a bonus area containing two blue [[Point Star]]s, a [[Maxim Tomato]], a keychain and a [[1up]]. | |||
==Enemies, Mid-Bosses and Abilities== | ==Enemies, Mid-Bosses, Bosses and Abilities== | ||
{| style="border: 3px solid #E47575; {{round}};background: #F69D99" cellspacing="2" | {| style="border: 3px solid #E47575; {{round}};background: #F69D99" cellspacing="2" | ||
! width="420px" | '''Regular Enemies''' | ! width="420px" | '''Regular Enemies''' | ||
! width="180px" | '''Mid-Bosses''' | ! width="180px" | '''Mid-Bosses''' | ||
! width="180px" | '''Bosses''' | |||
|- bgcolor="E47575" | |- bgcolor="E47575" | ||
| | | | ||
| Line 53: | Line 60: | ||
*[[Hot Head]] | *[[Hot Head]] | ||
{{col-break|width=33%}} | {{col-break|width=33%}} | ||
*[[Poppy Bros. Jr]] | *[[Poppy Bros. Jr.]] | ||
*[[Searches]] | *[[Searches]] | ||
* | *[[Bronto Burt|Sectra Bronto Burt]] | ||
*[[Sectra Dee]] | *[[Sectra Dee]] | ||
{{col-break|width=34%}} | {{col-break|width=34%}} | ||
* | *[[Lanzer|Sectra Lanzer]] | ||
* | *[[Spynum|Sectra Spynum]] | ||
*[[Sir Kibble]] | *[[Sir Kibble]] | ||
*[[Tick]] | *[[Tick]] | ||
| Line 65: | Line 72: | ||
| | | | ||
{{col-begin|width=50%}} | {{col-begin|width=50%}} | ||
*[[Bonkers]] | |||
*[[Flame Galboros]] DX | |||
*[[Grand Wheelie]] DX | |||
*[[Blocky]] DX | *[[Blocky]] DX | ||
*[[ | *[[Mr. Frosty]] DX | ||
*[[Bonkers]] DX | *[[Bonkers]] DX | ||
*[[Gigant Edge]] DX | *[[Gigant Edge]] DX | ||
*[[Hornhead]] DX | *[[Hornhead]] DX | ||
*[[ | {{col-end}} | ||
| | |||
{{col-begin|width=50%}} | |||
*[[Flowery Woods]] | |||
{{col-end}} | {{col-end}} | ||
|- | |- | ||
! width="420px"| '''Abilities''' | ! width="420px"| '''Abilities''' | ||
! width=" | ! width="360px" | '''Special''' | ||
|- bgcolor="#E47575" | |- bgcolor="#E47575" | ||
| | | | ||
| Line 99: | Line 109: | ||
|} | |} | ||
== | ==Gallery== | ||
<gallery> | |||
KTD Royal Road Stage 5 1.png|Kirby enters the beautiful prison. | |||
KTD Royal Road Stage 5 2.png|Kirby rescues one of the [[People of the Sky]]. | |||
KTD Royal Road Stage 5 3.png|The door is partially unlocked. | |||
KTD Royal Road Stage 5 4.png|Kirby picks up the [[3D Helmet Cannon]] and starts shooting bombs. | |||
KTD Royal Road Stage 5 5.png|Kirby avoids being smashed. | |||
KTD People of the Sky unlocking a door.png|The People of the Sky use their magic to unlock a large gate for Kirby. | |||
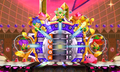
KTD Royal Road Stage 5 6.png|Kirby inhales [[Flowery Woods]] and the health bar, breaking the [[fourth wall]]. | |||
KTD People of the Sky bringing the Goal Door in.png|An example of a door being treated as a continuity-breaking object, with the People of the Sky bringing in the Goal Door for Kirby at the end of the stage. | |||
KTD-map65.jpg|Stage map | |||
</gallery> | |||
{{clear}} | |||
{{ref}} | |||
{{Navbox- | {{Navbox-KTD}} | ||
Latest revision as of 07:40, 18 February 2024
| ||||||||||||||||||||
| ||||||||||||||||||||
| ||||||||||||||||||||
|
| ||||||||||||||||||||

Royal Road - Stage 5 is the fifth stage in Royal Road, and the final standard stage in Kirby: Triple Deluxe. There are four Sun Stones and 5 keychains in this stage. The rare keychain is one depicting the Golden Egg Statue.
Overview[edit]
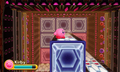
The stage begins outside a strange crystal structure. Kirby enters via a small hexagonal opening.
Inside, Kirby finds a locked gate, and a portal to another location. Taking the portal will lead Kirby to a large open room with no floor, and only gem-shaped platforms to jump across. A flower-like creature is being held in a cage in the foreground. If Kirby frees this captive, she will take him to the gate from earlier, and unlock it for him.
The next room has a gate with five bars on it. However, there are only four portals leading to different areas. Inside each are more prisoners to be rescued. These areas are as follows (starting clockwise from the leftmost portal):
- A hallway with 3D Securitrons, background piston-like blocks that push forward at fixed intervals and slam Kirby into the screen.
- Another open area with crystal platforms, where Bonkers is fought.
- A drop-zone lined with Bomb Block platforms. Kirby can use the 3D Helmet Cannon to progress here.
- An open crystal platform zone with many 3D Warp Stars inset.
Once all of the prisoners from these areas are free, the fifth portal will appear, which leads to an area where Kirby will need to dodge many 3D Securitrons in sequence before being allowed to move forward. At the end is the last prisoner who - along with the others - will open the door for Kirby at last.
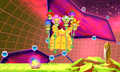
Through the door, Kirby ends up in a hall where Flame Galboros DXs are on patrol, guarding another prisoner. Up ahead, however, Kirby can get a Miracle Fruit and activate Hypernova. The rest of the area involves Kirby running through the halls, eating Mid-Bosses while freeing the rest of the People of the Sky.
In the last room, Flowery Woods appears one last time to try and stop Kirby. In Hypernova form, however, the big flowery tree is no match for the round hero, being gobbled up (including its health bar) like everything else. That done, the People of the Sky bring the stage exit to Kirby.
Sun Stone & Rare Keychain Guide[edit]
- Sun Stone 1 - In the area with the 3D Helmet Cannon, Kirby will need to reach the bottom area and blast stone blocks containing both the Key and the gate to reach this stone.
- Sun Stone 2 - In the side-area where Bonkers is fought, there is a side-door which can be accessed by hitting a switch in the foreground. Inside is a rather complicated Tilt Fuse Box puzzle, which leads to this stone when solved. Kirby will need a Fire-making ability to light the fuse.
- Sun Stone 3 - During the Hypernova section, eating Mr. Frosty DX will cause a 3D Warp Star to appear. Kirby can take this star to reach this stone.
- Sun Stone 4 - During the Hypernova section, three Grand Wheelie DXs will appear. If Kirby eats all three, a 3D Warp Star will appear which can take him to the background. There, Kirby can head to the left to find this stone.
- Rare Keychain - In the side area from the furthest-right portal, this keychain can be uncovered by pounding a Stake on one of the platforms in the foreground. The keychain can then be found underneath that platform.
HAL Room[edit]

A special HAL Room appears in this stage. In the 5x5 3D Securitron segment, Kirby can wait 86 seconds after the door appears, which will result in all the 3D Securitrons retracting. Then, the blocks will pop in to form the letters H, A, and L in sequence, and a new door will appear. Kirby can enter it to access a bonus area containing two blue Point Stars, a Maxim Tomato, a keychain and a 1up.
Enemies, Mid-Bosses, Bosses and Abilities[edit]
| Regular Enemies | Mid-Bosses | Bosses | |||||
|---|---|---|---|---|---|---|---|
|
|
|
| |||||
| Abilities | Special | ||||||
|
|
|
Gallery[edit]
Kirby enters the beautiful prison.
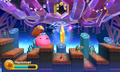
Kirby rescues one of the People of the Sky.
The door is partially unlocked.
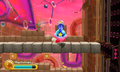
Kirby picks up the 3D Helmet Cannon and starts shooting bombs.
Kirby avoids being smashed.
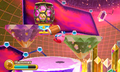
The People of the Sky use their magic to unlock a large gate for Kirby.

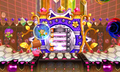
Kirby inhales Flowery Woods and the health bar, breaking the fourth wall.
An example of a door being treated as a continuity-breaking object, with the People of the Sky bringing in the Goal Door for Kirby at the end of the stage.
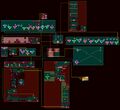
Stage map


