|
|
| (38 intermediate revisions by 16 users not shown) |
| Line 1: |
Line 1: |
| {{Infobox-KTDLevel | | {{Infobox-KTDLevel |
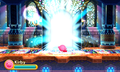
| |image=[[File:Royal Road Entry.jpg|300px]] | | |image=[[File:Royal Road Entry.png|300px]] |
| |caption=Screenshot from ''Kirby: Triple Deluxe''. | | |caption=Screenshot from ''Kirby: Triple Deluxe''. |
| |level=6 | | |level=6 |
| Line 6: |
Line 6: |
| |exstages=2 | | |exstages=2 |
| |sunstone=16 | | |sunstone=16 |
| |mid-boss=[[Bonkers]] (6-5), [[Gigant Edge]] (6-1), [[Gigant Edge]] DX (6-5, 6-EX), [[Hornhead]] DX (6-5, 6-EX), Every other DX Mid-Boss (6-5), Every Hypernova Mid-Boss (6-EX2) | | |mid-boss=[[Bonkers]] (6-5), [[Gigant Edge]] (6-1), [[Gigant Edge]] DX (6-5, 6-7 EX), [[Hornhead]] DX (6-5, 6-7 EX), Every other DX Mid-Boss (6-5), Every Hypernova Mid-Boss (6-8 EX) |
| |hypernova=6-3, 6-5, 6-EX2 | | |hypernova=6-3, 6-5, 6-8 EX |
| |boss=All Previous Bosses, [[Masked Dedede]], [[Queen Sectonia]], [[Shadow Dedede]], [[Dark Meta Knight]] | | |boss=All Previous Bosses, [[Masked Dedede]], [[Queen Sectonia]], [[Shadow Dedede]], [[Dark Meta Knight]] |
| |previous=[[Endless Explosions]] | | |previous=[[Endless Explosions]] |
| |next=[[Eternal Dreamland]] | | |next=[[Eternal Dreamland]] |
| }} | | }} |
| '''Royal Road''' is the sixth level of [[Kirby: Triple Deluxe]] and the last of the six lands in the kingdom of [[Floralia]]. It has five regular stages, a boss stage, and two EX stages. The level is effectively one big castle complex, with an additional floating prison complex above it. There are sixteen [[Sun Stone]]s to collect in this level, with one each in Stages 2, 4 and EX 2, three each in Stages 1, 3 and EX, and four in Stage 5. All the previous bosses are fought here again throughout the stages, and the primary bosses vary depending on which game-mode is being played. In Story Mode, the bosses are [[Masked Dedede]] and [[Queen Sectonia]]. In [[Extra Game|Dededetour!]], they are [[Queen Sectonia]] DX, [[Shadow Dedede]] and [[Dark Meta Knight]]'s Revenge. | | '''Royal Road''' is the sixth level of ''[[Kirby: Triple Deluxe]]'' and the last of the six lands in the kingdom of [[Floralia]]. It has five regular stages, a boss stage, and two EX stages. The level is effectively one big castle complex, with an additional floating prison complex above it. There are sixteen [[Sun Stone]]s to collect in this level, with one each in Stages 2, 4 and 8 EX, three each in Stages 1, 3 and 7 EX, and four in Stage 5. All the previous bosses are fought here again throughout the stages, and the primary bosses vary depending on which game-mode is being played. In Story Mode, the bosses are [[Masked Dedede]] and [[Queen Sectonia]]. In [[Dededetour!]], they are [[Queen Sectonia]] DX, [[Shadow Dedede]] and [[Dark Meta Knight]]'s Revenge. |
|
| |
|
| | {{clear|left}} |
| ==Stages== | | ==Stages== |
| {{construction}}
| |
| For details on each stage individually, click the name of the stage. | | For details on each stage individually, click the name of the stage. |
| {| class="sortable wikitable" border=1 cellpadding=2 | | {| class="sortable wikitable" border=1 cellpadding=2 |
| Line 22: |
Line 22: |
| !class=unsortable|Sun Stones | | !class=unsortable|Sun Stones |
| !class=unsortable|Hypernova? | | !class=unsortable|Hypernova? |
| | !class=unsortable|Bosses/Mid-Bosses |
| !class=unsortable|Notes | | !class=unsortable|Notes |
| |- | | |- |
| |[[Royal Road - Stage 1|Stage 1]] | | |{{center|[[File:KTD Royal Road Stage 1 select.png|200px]]<br>'''[[Royal Road - Stage 1|Stage 1]]'''}} |
| |N/A | | |N/A |
| |3 | | |3 |
| |{{N}} | | |{{N}} |
| | | | |[[Gigant Edge]] |
| | | |There is a [[HAL Room]] hidden in this stage. |
| |- | | |- |
| |[[Royal Road - Stage 2|Stage 2]] | | |{{center|[[File:KTD Royal Road Stage 2 select.png|200px]]<br>'''[[Royal Road - Stage 2|Stage 2]]'''}} |
| |Complete Stage 1. | | |Complete Stage 1. |
| |1 | | |1 |
| |{{N}} | | |{{N}} |
| |The bosses [[Coily Rattler]] and [[Kracko]] are re-fought here. | | |[[Coily Rattler]]<br>[[Kracko]] |
| | | | |
| |- | | |- |
| |[[Royal Road - Stage 3|Stage 3]] | | |{{center|[[File:KTD Royal Road Stage 3 select.png|200px]]<br>'''[[Royal Road - Stage 3|Stage 3]]'''}} |
| |Complete Stage 2. | | |Complete Stage 2. |
| |3 | | |3 |
| |{{Y}} | | |{{Y}} |
| | |{{N}} |
| | | | | |
|
| |
| |- | | |- |
| |[[Royal Road - Stage 4|Stage 4]] | | |{{center|[[File:KTD Royal Road Stage 4 select.png|200px]]<br>'''[[Royal Road - Stage 4|Stage 4]]'''}} |
| |Complete Stage 3. | | |Complete Stage 3. |
| |1 | | |1 |
| |{{N}} | | |{{N}} |
| |The bosses [[Paintra]], [[Flowery Woods]] and [[Pyribbit]] are re-fought here. | | |[[Paintra]]<br>[[Flowery Woods]]<br>[[Pyribbit]] |
| | | | |
| |- | | |- |
| |[[Royal Road - Stage 5|Stage 5]] | | |{{center|[[File:KTD Royal Road Stage 5 select.png|200px]]<br>'''[[Royal Road - Stage 5|Stage 5]]'''}} |
| |Complete Stage 4. | | |Complete Stage 4. |
| |4 | | |4 |
| |{{Y}} | | |{{Y}} |
| |[[Flowery Woods]] makes one last appearance here. | | |[[Bonkers]]<br>All DX Mid-Bosses<br>[[Flowery Woods]] |
| | | |There is a HAL Room hidden in this stage. |
| |- | | |- |
| |Stage 6: [[Masked Dedede]] & [[Queen Sectonia]] | | |{{center|[[File:KTD Royal Road Stage 6 select.png|200px]]<br>'''[[Royal Road - Stage 6|Stage 6]]'''}} |
| |Collect # [[Sun Stone]]s from prior Royal Road stages and complete Stage 5. | | |Collect 7 [[Sun Stone]]s from prior Royal Road stages and complete Stage 5. |
| |0 | | |0 |
| |{{N}} | | |{{N}} |
| | |[[Masked Dedede]]<br>[[Queen Sectonia]] |
| |Completing this stage leads into [[Eternal Dreamland]]. | | |Completing this stage leads into [[Eternal Dreamland]]. |
|
| |
| |- | | |- |
| |[[Royal Road - Stage EX|Stage 7 EX]] | | |{{center|[[File:KTD Royal Road Stage 7 EX select.png|200px]]<br>'''[[Royal Road - Stage 7 EX|Stage 7 EX]]'''}} |
| |Collect all prior Royal Road Sun Stones. | | |Collect all prior Royal Road Sun Stones. |
| |3 | | |3 |
| |{{N}} | | |{{N}} |
| | |[[Gigant Edge]] DX<br>[[Hornhead]] DX |
| |This is an EX stage, so completing it is not required to finish the game. | | |This is an EX stage, so completing it is not required to finish the game. |
|
| |
| |- | | |- |
| |[[Royal Road - Stage EX 2|Stage 8 EX]] | | |{{center|[[File:KTD Royal Road Stage 8 EX select.png|200px]]<br>'''[[Royal Road - Stage 8 EX|Stage 8 EX]]'''}} |
| |Collect all prior Royal Road Sun Stones and complete Stage 7 EX. | | |Complete Stage 7 EX. |
| |1 | | |1 |
| |{{Y}} | | |{{Y}} |
| | |All Hypernova Mid-Bosses |
| |This is an EX stage, so completing it is not required to finish the game. | | |This is an EX stage, so completing it is not required to finish the game. |
|
| |
| |} | | |} |
|
| |
|
| ===Stage 4 (Bosses: [[Paintra]], [[Flowery Woods]], [[Pyribbit]])=== | | ==In Dededetour!== |
| [[File:Royal Road 4.jpg|thumb|right|250px|Kirby makes a meal of a spear-wielding soldier in Stage 4.]]
| | Once Lvl. 6 begins, King Dedede plays through all of the EX stages from previous levels and Stage 7 EX first. From there, all remaining stages of Royal Road are played in one sequence in [[Dededetour!]] except for Stage 8 EX and the sections of stages where [[Hypernova]] is used. Through this sequence, 6 [[Keychain]]s can be found. |
| Section 1: The stage begins in the interior metallic chambers as seen in Stage 2. It starts in a small box with a 3-D Warp Star in the middle and a couple flowers on the ground. Using the Warp Star transports Kirby to a background chamber which is a bit larger and contains a [[Moonja]]. From there, Kirby hops back and forth between floating metal cubes, each with their own set of platforms and enemies. The third cube contains a [[Hammer]] Copy Pedestal in the lower right corner and a Keychain in the upper left. The fourth cube contains some food. Bandana Waddle Dee appears in the fifth cube to do his normal thing. [[Waddle Doo]] and [[Chilly]] can be found in the sixth cube. The seventh and last cube contains a warp to the next section.
| |
|
| |
|
| Boss Fight 1: Kirby is warped to the chamber where he fought [[Paintra]], and must fight it again. Here, Paintra has reduced HP and may use a different order to its attack patterns. Defeating it opens the warp to the next section.
| | In addition, many enemies are re-sized - changing their [[Health]] and also possibly movement speed - and [[Queen Sectonia]] and the [[Mid-Bosses]] are changed to their DX forms. |
|
| |
|
| Section 2: The warp leads back to the metallic chambers, where Kirby can get an Energy Drink from a Bomb Block compartment. The path consists of cubes fused together at the corners, with more enemies and other objects appearing in each room in their own Bomb Block compartments. A Keychain can be found along with a [[Spynum]] in one of these compartments. Bandana Waddle Dee appears again here, just before the path tilts upward to lead to the warp to the next section.
| | Finally, in place of [[Sun Stone]]s, Warp Holes can be found in many areas allowing [[King Dedede]] to skip parts of the stages. In Royal Road, there are 13 Warp Holes in total. |
|
| |
|
| Boss Fight 2: The warp leads to the field where Kirby fought [[Flowery Woods]] and they must fight again, with the same rules as in the previous boss encounter on this stage. Defeating Flowery causes the warp to the next section to appear.
| | Once [[Queen Sectonia]] DX is defeated, King Dedede is pitted against two more foes, not seen in the main Story Mode. These are [[Shadow Dedede]] and [[Dark Meta Knight|Dark Meta Knight's Revenge]]. |
|
| |
|
| Section 3: The warp leads back to the metallic cube complex, this time leading to a very small cube with a 3-D Warp Star in it. The section consists of a mess of nested chambers in both the foreground and background, which Kirby must traverse by going back and forth along ladders and passageways. On the outer edge, after dealing with Bandana Waddle Dee, cannons are used to fire along the passageway, which can loop around to reveal the stage's only Sun Stone inside a metal block. The warp to the next section can be found at the bottom of the loop.
| | ==Trivia== |
| | *Throughout Royal Road, numerous enemies encountered in previous levels now sport an insectoid design. These enemies are referred to with the prefix "Sectra", and include [[Sectra Dee]]s, [[Bronto Burt|Sectra Burt]]s, [[Gordo|Sectra Gordo]]s, [[Lanzer|Sectra Knight]]s, and [[Spynum|Sectra Shooter]]s. |
| | **However, Stage 7 EX features both Sectra and normal variants of enemies that would otherwise be Sectra only. |
|
| |
|
| Boss Fight 3: The warp leads to the caldera where [[Pyribbit]] was fought, and Kirby must battle him again, with the same rules as what applied to the previous boss encounters on this stage. Upon Pyribbit's defeat, the warp to the next section appears.
| | ==Gallery== |
| | <gallery> |
| | KTD Royal Road final door.png|Kirby opens the final door, in quite dramatic fashion. |
| | KTD Masked Dedede battle 7.png|Kirby battling [[Masked Dedede]], controlled by [[Taranza]] |
| | KTD Queen Sectonia battle 2.png|Kirby does battle with [[Queen Sectonia]]. |
| | KTD Dededetour Shadow Dedede Mirror.png|King Dedede encounters the [[Dimension Mirror]] after defeating Queen Sectonia DX. |
| | KTD Dededetour Dark Meta Knight Mirror.png|[[Dark Meta Knight]] emerges from the [[Dimension Mirror]] in [[Dededetour!]] |
| | KTD Dededetour Dark Meta Knight Battle.png|Dedede is whisked away to a familiar netherworld to battle. |
| | KTD Dededetour Ending.png|Dedede finishes the job. |
| | </gallery> |
|
| |
|
| Section 4: The warp leads back to the cube complex, this time in a single cube with a [[Maxim Tomato]] in it and a Bomb Block formation guarding a 3-D Warp Star which will take Kirby to the stage exit in the background cube. However, a breakable wall segment exists in the foreground cube, which will allow Kirby to exit the cube and find a cannon on the outside pointing down. Taking this cannon nets Kirby a 1Up and a unique Golden Keychain.
| | ==Names in other languages== |
| | | {{Names |
| ====Enemies, Mid-bosses, and Abilities==== | | |ja=ロイヤル ロード |
| {| style="border: 3px solid #E47575; {{round}};background: #F69D99" cellspacing="2"
| | |jaR=Roiyaru Rōdo |
| ! width="420px" | '''Regular Enemies'''
| | |jaM=Royal Road |
| ! width="180px" | '''Mid-Boss'''
| | |fr=Intrigue Impériale |
| |- bgcolor="E47575"
| | |frM=Imperial Plot |
| |
| | |de=Nächtliche Noblesse |
| {{col-begin}}
| | |deM=Nightly Noblesse |
| {{col-break|width=33%}}
| | |it=Nuvola Nobile |
| *[[Leafan]]
| | |itM=Noble Cloud |
| *[[Moonja]]
| | |ko=로열 로드 |
| *[[Mumbies]]
| | |koR=Loyeol Lodeu |
| *[[Ringle]]
| | |koM=Royal Road |
| *[[Waddle Doo]]
| | |es=Largo Linaje |
| {{col-break|width=33%}}
| | |esM=Long Lineage |
| *[[Bronto Burt]]
| | }} |
| *[[Chilly]]
| |
| *[[Lanzer]]
| |
| *[[Parasol Waddle Dee]]
| |
| *[[Tick]]
| |
| {{col-break|width=34%}}
| |
| *[[Sir Kibble]]
| |
| *[[Spynum]]
| |
| *[[Waddle Dee]]
| |
| *[[Wheelie]]
| |
| {{col-end}}
| |
| |
| |
| {{col-begin|width=50%}}
| |
| *N/A
| |
| {{col-end}} | |
| |-
| |
| ! width="420px"| '''Abilities'''
| |
| ! width="180px" | '''Special'''
| |
| |- bgcolor="#E47575"
| |
| |
| |
| {{col-begin}}
| |
| {{col-break|width=50%}}
| |
| *[[Archer]]
| |
| *[[Beam]]
| |
| *[[Leaf]]
| |
| *[[Ninja]]
| |
| *[[Spear]]
| |
| *[[Wheel]]
| |
| {{col-break|width=50%}}
| |
| *[[Bell]]
| |
| *[[Cutter]]
| |
| *[[Hammer]]
| |
| *[[Ice]]
| |
| *[[Needle]]
| |
| *[[Parasol]]
| |
| {{col-end}}
| |
| | | |
| {{col-begin}}
| |
| *N/A
| |
| {{col-end}}
| |
| |}
| |
| | |
| ===Stage 5===
| |
| [[File:Royal Road 5.jpg|thumb|right|250px|Kirby hops and swashbuckles across the floating gems in Stage 5.]]
| |
| Prelude: The stage begins at the bottom of a vertical shaft, albeit in an open space, where only the wind can be heard and a [[Blade Knight]] patrols just above on a soft platform. Above is a 3-D Warp Star which will take Kirby to the background, where two Bronto Burts guard the entrance to a strange crystalline structure floating just above the platform.
| |
| | |
| Section 1: The door leads to a small room with a barred door in the middle and a rift that leads to a different area.
| |
| | |
| Section 1 Sub: The rift leads to a wide chamber made of bizarre material, as Kirby must hop along floating crystalline platforms suspended over a bottomless pit. In the foreground, a strange floral fairy-looking creature has been caged and is distraught. Kirby must bash his way through Sectonian soldiers, which include [[Spynum]]s and [[Lanzer]]s, transitioning into the foreground as he does so. Kirby can then pull a switch on the underside of the cage to free the sprite, who then takes Kirby back to Section 1 and unlocks the barred door, allowing him to progress to the next section.
| |
| | |
| Section 2 Hub: The door leads to a wider chamber, this time with a much larger barred door with five bars on it, and four rifts surrounding it. Each rift takes Kirby to a different area, and he can take them in any order.
| |
| | |
| Section 2 Sub 1: The bottom-left rift leads to a hallway where large piston blocks in the background push in, which can cause Kirby to hit the screen if he gets struck by them. The sections that are about to push in flash red and emit a sound before doing so. A Keychain can be found along this hallway in the top right corner. At the end, a cell containing another sprite can be opened, returning Kirby to the hub an opening the bar with the triangle symbol on it.
| |
| | |
| Section 2 Sub 2: The top-left rift leads to a wide chamber like the one in Section 1 Sub where Bandana Waddle Dee appears to give Kirby a food item. A 3-D Warp Star then takes Kirby to the background and past a [[Tick]], then back to the foreground where another prisoner can be seen in the background. A platform emerges where Kirby must face and defeat Bonkers, gaining the [[Hammer]] ability in the process. From there, a switch can be pressed to open up a compartment with a Key in it in the background that automatically unlocks a door beneath as Kirby bashes through more enemies. The optional door that is unlocked leads to a room where Kirby can eventually get a Sun Stone. From there, Kirby can free the prisoner sprite, who returns him to the hub and unlocks the bar with the triangle symbol struck through with a line on it.
| |
| | |
| Section 2 Sub 3: The top-right rift leads to a wide vertical shaft with floors made of Bomb Block barriers in the foreground and background. A [[3-D Helmet Cannon]] can be found to the right, which can be used to pave the way forward. Enemies in the background will attempt to fire upon Kirby as he makes his way down the shaft, and Kirby can also blast away Star Blocks to get at items which fall down as well. At the bottom, Kirby can take a 3-D Warp Star to reach the background, and if he still has the Helmet Cannon, can now use it to fire into the foreground. Doing this, he can free a Key from a stone block container, then return to the foreground to open up a chamber containing a Sun Stone. From there, a [[Search]] guards the room where another prisoner sprite is being held. Freeing the prisoner returns Kirby to the hub, where the sprite unlocks the bar with the symbol consisting of three triangles spaced compactly on it.
| |
| | |
| Section 2 Sub 4: The bottom-right rift leads to another open chamber with floating crystal platforms over a bottomless pit. Here, the path splits into both foreground and background, and either can be traversed. A Keychain can be found in the background guarded by two Spynums, as well as a [[Beetley]]. Using [[Beetle]], Kirby can pound a stake in the foreground which contains a Golden Keychain. To the far right in the background, the prisoner sprite can be found. After opening the cell, the sprite returns Kirby to the hub and unlocks the bar with the box symbol with an x through it on it.
| |
| | |
| Once the four sub-sections are dealt with, a fifth rift opens up directly above the door in the hub.
| |
| | |
| Section 2 Sub 5-1: Going through the last rift takes Kirby to a small chamber with more piston blocks in the background. The blocks push forward in a fixed pattern, then after enough time, a door opens up to the next section.
| |
| | |
| Sub 5-2: The door leads to another room, this time with a 3x3 arrangement of piston blocks. Dodging them all opens the door to the next section.
| |
| | |
| Sub 5-3: The door leads to another room, this time with a 5x5 arrangement of piston blocks. Their pattern resets a couple times after each pattern, making this dodging session last longer than the others. Once all the patterns are exhausted, the door to the next section opens.
| |
| | |
| Sub 5-4: The door leads to a hall where many enemies attempt to block Kirby's path forward. A Keychain can be found in one of the Star Block barricades. At the end of the hall, the cell containing another prisoner can be found. After being freed, the sprite returns them to the hub and unlocks the last bar. From there, all 5 of them channel their energy and open the door, finally allowing Kirby to move forward.
| |
| | |
| [[File:Royal Road 5-2.jpg|thumb|right|250px|The [[People of the Sky]] get to work on the door in unison.]]
| |
| | |
| Section 3: The door leads to a hallway where two [[Flame Galboros]] DXs can be seen in the background guarding another prisoner sprite. The path continues to the right, where Kirby finds a Miracle Fruit Vine and gains the Hypernova ability. To the right, another Flame Galboros DX attempts to get in the way, but Kirby inhales it, defeating it in one fell swoop. To the right, a prisoner sprite can be freed and gives Kirby a 3-D Warp Star before flying off. From there, Kirby can inhale the other two Galboros and free the other prisoner, who gives Kirby another 3-D Warp Star to take him to a separate chamber in the foreground. From there, Kirby inhales a [[Blocky]] DX before freeing another prisoner, allowing him to access the background again. From there, he inhales [[Mr. Frosty]] DX and can find a 3-D Warp Star in the wall up a ladder which leads to a Sun Stone and a 1Up, though the ladder continues up to a separate chamber where Kirby can use a large block to crush two more hapless Mid-Bosses and free a prisoner who opens the door to the next section.
| |
| | |
| Section 4: The door leads to a small room where Kirby is ambushed by two Bonkers DX, but they are easily dispatched. Up one of two ladders, another prisoner can be freed who provides a way to the background where three [[Gigant Edge]] DXs can be inhaled simultaneously. Doing this allows access to the next prisoner, who provides a path to the foreground where three [[Grand Wheelie]] DXs are inhaled, one of which tries to attack from the background. The last Sun Stone of the stage can be found in the background here if Kirby ventures left. One more prisoner can be found above in a separate chamber, who provides a 3-D Warp Star leading to one more open chamber where four different Mid-Bosses all attempt to attack Kirby at once. They never stood a chance. The last prisoner freed provides a regular Warp Star, which takes Kirby to the next section.
| |
| | |
| Section 5: Kirby lands in a chamber with [[Flowery Woods]]. Here, Kirby can inhale it, much like he did with the the trees back in [[Fine Fields]], causing not only Flowery Woods to be sucked in, but also its life meter to peel off the screen and enter Kirby's mouth. After that, a large group of the [[People of the Sky]] come in, carrying the stage exit. They drop it for Kirby to use, then cheer him as he finishes the stage.
| |
| | |
| ====Enemies, Mid-bosses, and Abilities====
| |
| {| style="border: 3px solid #E47575; {{round}};background: #F69D99" cellspacing="2"
| |
| ! width="420px" | '''Regular Enemies'''
| |
| ! width="180px" | '''Mid-Bosses'''
| |
| |- bgcolor="E47575" | |
| | | |
| {{col-begin}}
| |
| {{col-break|width=33%}}
| |
| *[[Blade Knight]]
| |
| *[[Hot Head]]
| |
| *[[Lanzer]]
| |
| *[[Search]]
| |
| {{col-break|width=33%}}
| |
| *[[Bronto Burt]]
| |
| *[[Gordo]]
| |
| *[[Sir Kibble]]
| |
| *[[Waddle Dee]]
| |
| {{col-break|width=34%}}
| |
| *[[Beetley]]
| |
| *[[Poppy Bros. Jr]]
| |
| *[[Spynum]]
| |
| *[[Tick]]
| |
| {{col-end}}
| |
| | | |
| {{col-begin|width=50%}}
| |
| *[[Blocky]] DX
| |
| *[[Bonkers]]
| |
| *[[Bonkers]] DX
| |
| *[[Flame Galboros]] DX
| |
| *[[Flowery Woods]]
| |
| *[[Gigant Edge]] DX
| |
| *[[Grand Wheelie]] DX
| |
| *[[Hornhead]] DX
| |
| *[[Mr. Frosty]] DX
| |
| {{col-end}}
| |
| |- | |
| ! width="420px"| '''Abilities'''
| |
| ! width="180px" | '''Special'''
| |
| |- bgcolor="#E47575"
| |
| | | |
| {{col-begin}}
| |
| {{col-break|width=50%}}
| |
| *[[Beetle]]
| |
| *[[Bomb]]
| |
| *[[Needle]]
| |
| *[[Spear]]
| |
| *[[Sword]]
| |
| {{col-break|width=50%}}
| |
| *[[Archer]]
| |
| *[[Crash]]
| |
| *[[Cutter]]
| |
| *[[Hammer]]
| |
| {{col-end}}
| |
| |
| |
| {{col-begin}}
| |
| *[[Hypernova]]
| |
| {{col-end}}
| |
| |}
| |
| | |
| ===Stage 6 (Bosses)===
| |
| | |
| ====Story Mode (Bosses: [[Masked Dedede]], [[Queen Sectonia]])====
| |
| [[File:Royal Road Boss.jpg|thumb|right|250px|Kirby opens the final door, in quite dramatic fashion.]]
| |
| The stage begins as Kirby rushes down the hall to the main audience chamber, as Taranza flies ahead with [[King Dedede]] as usual. Kirby has the choice along the way between all of the new abilities, [[Archer]], [[Beetle]], [[Bell]] and [[Circus]]. From there, Kirby will reach a giant ornate door, which will slowly open upon activation.
| |
| | |
| Inside, a cut-scene begins, where Taranza finally speaks to Kirby, chiding him for his persistence, still thinking him little more than a pest. He relays to Kirby the backstory, wherein he sought to foil the plans of the [[People of the Sky]] by stealing the hero their [[Dreamstalk]] had meant to bring up. From there, he [[Masked Dedede|masks Dedede]], and sends him after Kirby to beat him into submission.
| |
| | |
| The boss fight takes place on two separate life-bars. Dedede begins the fight by using his hammer, which has been augmented with a missile launcher, and doing his other moves as usual. In the second phase, his mask is damaged, and his hammer destroyed, so he grabs a large axe from one of the statues in the background to continue the fight with. Dedede renews the assault with rapid axe slashes, accompanied by magical assistance from Taranza.
| |
| | |
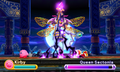
| When Dedede is finally beaten down, the mask breaks, and he falls unconscious, leaving Taranza to rue the occasion. In his disbelief at having lost, he finally realizes that Kirby is the true hero, and calls on the queen to stop him. When [[Queen Sectonia]] appears before Taranza, she swats him away for his incompetence, then begins to monologue in Kirby's direction about her power and beauty. She then engages Kirby in combat herself, using her two staves and her magic arsenal.
| |
| | |
| [[File:Sectonia Fight 1.jpg|thumb|right|250px|Kirby does battle with Queen Sectonia.]]
| |
| | |
| This fight takes place in three phases, with the second one taking place on a large gem platform in the background. Queen Sectonia fights by swinging her staves to cast magic bolts, summoning minions, and changing her staves to swords to slash with style. Ultimately, despite all this power, she is defeated at the hands of Kirby, which prompts her to take a more drastic approach in the final level, [[Eternal Dreamland]].
| |
| {{clear}}
| |
| | |
| ====Dededetour! (Bosses: [[Queen Sectonia]] DX, [[Shadow Dedede]], [[Dark Meta Knight]]'s Revenge)====
| |
| [[File:Royal Road Dedede 1.jpg|thumb|250px|right|Dedede encounters the [[Dimension Mirror]] after defeating Sectonia.]]
| |
| In [[DededeTour!]], Dedede finds himself in the audience chamber, where Queen Sectonia DX appears to fight him without any sort of introduction. The fight plays out similarly to the one in the Main Game, but Sectonia's attacks are more forceful.
| |
| | |
| Once she is defeated, Dedede makes a triumphant pose, when out of nowhere, the [[Dimension Mirror]] appears behind him. Out from the mirror pops a [[Shadow Dedede|dark shadowy copy of the king]], which engages his normal world counterpart in combat. The fight is similar to the main game fight with Masked Dedede, but takes place on one bar of [[Vitality]]. In addition, Shadow Dedede will conjure his own energy orbs from his belly, instead of relying on Taranza (who remains uninvolved in this mode). Upon defeat, Shadow Dedede is knocked down, and shatters into glass shards which then dissipate.
| |
| | |
| [[File:Royal Road Dedede 2.jpg|thumb|250px|left|Dedede is whisked to a familiar netherworld.]]
| |
| King Dedede then hops into the Dimension Mirror, and is taken to a shadowy colosseum, reminiscent of the one from ''[[Kirby and the Amazing Mirror]]''. Here the Dimension Mirror appears again, this time releasing a dimly shaded clone of [[Meta Knight]], with a white mask and a silver sword. [[Dark Meta Knight|This dark swordsman]], who had previously been bested by Kirby, now seeks revenge, and Dedede just happens to be the closest target. They fight a battle that takes place in two phases. The first phase is similar to any given encounter with Meta Knight, but the second involves Dark Meta Knight creating mirror images of himself, and causing giant sword spikes to emerge from the ground.
| |
| | |
| [[File:Royal Road Dedede 3.jpg|thumb|250px|right|Dedede finishes the job.]]
| |
| Upon defeat, Dark Meta Knight is sucked back into the Dimension Mirror. Taking advantage of this opportunity, Dedede leaps up, and smashes the mirror with his hammer. Once destroyed, Dedede does a victory dance, and the game is complete.
| |
|
| |
|
| {{clear}} | | {{clear}} |
|
| |
|
| ===Stage EX===
| | {{Navbox-KTD}} |
| [[File:Royal Road EX.jpg|thumb|right|250px|Kirby carries a Key through the prison complex in Stage EX.]]
| |
| Section 1: The stage begins in a verdant plain area with pine trees in the background. A wall blocks off the left side, and the path continues to the right over bottomless pits. Water bars on loan from [[Endless Explosions]] can be found to the right, as Waddle Dees in the background attempt to chop down the trees and have them fall on Kirby in the foreground. Ahead, a machine in the background is tossing dirt boulders into the foreground, creating a crushing hazard. The stage continues past more water bars and a waterfall, one of which contains a warp that leads to the next section. However, the right wall contains a breakable section that leads to a Keychain being guarded by a [[Hot Head]] and a [[Clown Acrobot]]. Acquiring one of these abilities will be useful for the next section.
| |
| | |
| Section 2: The warp leads to a hallway in the toy box complex as seen in [[Lollipop Land]]. The floor leading left is almost entirely made of ice blocks, which can be broken through to reveal safe zones from the springy hand pistons that line the hall. The path then moves into the foreground, where now spike pits must be contended with along with the icy floors. Under a particularly long chain of springy hands, an optional doorway can be found which leads to a Sun Stone. Additionally, a Keychain can be found to the bottom right over a bottomless pit. A warp can be found on the top-side of the bridge that leads to the next section.
| |
| | |
| Section 3: The door leads to an area which looks similar to the prison complex from Stage 5. Here, Kirby needs to carry a Key, using the square piston blocks that come out of the wall as stepping stones to the door. From there, a ladder leads up to a hall with some enemies in it. A [[Paclower]] guards a key which Kirby needs to carry over more piston blocks to reach the next door. This leads up to a room with another Kay and even more piston blocks, extending in a difficult pattern to follow. This leads to a warp that leads to the next section.
| |
| | |
| Section 4: The warp leads to a tundra hillside with a wind blowing to the right and fire bars on loan from [[Endless Explosions]], in addition to snowballs pounding in from the background. Further in, skiing [[Hairy Dee]]s and Waddle Dees come pouring out of more igloos. Eventually, Kirby reaches a 3-D Warp Star which takes him to the background. After passing more snowballs, Kirby can enter the igloo to obtain a [[1Up]] as well as access to a Ringle and a [[Noddy]]. The path continues with a wind blowing to the left past more Waddle Dees and another fire bar. Using Bell can allow Kirby to more safely pass this area before reaching the warp to the next section.
| |
| | |
| Section 5: The warp leads to the golden temple interior as seen in [[Wild World]], where a [[Tilt Gondola]] spans over a bottomless pit to the left. Serpent statues fire at Kirby as he has to take a bundle of [[Timed Dynamite]] across the pit in the gondola and try to avoid getting hit. He then rides into the foreground on a 3-D Warp Star and must take another gondola over a spiked pit, again trying to keep the dynamite safe. If successful, Kirby can blast a stone block and reveal a Keychain in the wall. From here, Kirby can ride another gondola past a rotating spike column, again trying to avoid getting hit by the spike bars. Along the way down, another Timed Dynamite bundle can be found, which can be carried the rest of the way to yield an optional doorway that leads to another Sun Stone. From there, a Beetley guards the warp to the next section.
| |
| | |
| Section 6: The warp leads to a hall inside the prison complex lined by piston blocks. In the background, [[Scarfy|Scarfies]] will attempt to attack Kirby as he moves forward. As the path moves down, a Keychain can be found in a breakable wall section. Past a [[Sparky]], the path continues past more piston blocks. After a couple more bouts with Scarfies, a Chilly guards the warp to the next section.
| |
| | |
| Section 7: The warp leads to an underground magma tunnel from Endless Explosions, with numerous lava spews coming from the ceiling. From here, Kirby must past a tilting wall section with fire blocks in the midst that can be removed with [[Ice]] or [[Parasol]]. On the other side, a [[Clown Acrobot]]'s [[Circus]] power can be used to break through some ice blocks in the upper right corner, revealing some food and a green star. From there, another tilting wall section is found past more lava spews. Inside an ice block barricade is a Key, which unlocks a door, behind which is a Golden Keychain blocked by fire blocks. A local Chilly can then be used to break through these. Past another spewing lava section, another tilting wall area can be found with more ice blocks and a nearby [[Flamer]] that can help thaw them out. This is again alternated by swallowing a Chilly to get rid of some fire blocks. From there, a Bomb Block barrier opens up to reveal the warp to the next section.
| |
| | |
| Section 8: The warp leads to the underground metal complex seen throughout Royal Road, where a tank in the background can be dropped into a pit. Further down the hall, another Bomb Block can be triggered to drop a [[Gigatzo]] into a hole. Down the second hole, a Keychain can be found in a breakable wall section. Another tank is dropped in the next hall, which leads to another section with a Gigatzo to drop. This leads to one more tank chase hallway, where the Bomb Block to drop it can be found in the air if Kirby jumps. A ladder at the end leads to the warp to the next section.
| |
| | |
| Section 9: The warp leads to a spike-filled cavern in the prison complex, with a gondola spanning it. Bandana Waddle Dee appears to give Kirby a food item, and from there a 3-D Warp Star takes Kirby to another gondola hall. The [[Sleep]] and [[Beetle]] abilities are available on Copy Pedestals, and from there lies a room with a spiked ceiling where [[Hornhead]] DX is fought. After its defeat, the [[Sleep]] and [[Sword]] abilities can be found on additional pedestals just to the right, where a 3-D Warp Star leads to another room, this time with spiked walls and ceiling where [[Gigant Edge]] DX is fought. Additionally, a Shotzo is firing from the background during this fight. After defeating this Mid-Boss, Kirby can take a 3-D Warp Star to reach the reward room, which, while covered in spikes, contains numerous collectibles and a chest containing the last Sun Stone of the stage. The stage exit can then be found to the right up a flight of stairs.
| |
| | |
| ====Enemies, Mid-bosses, and Abilities====
| |
| {| style="border: 3px solid #E47575; {{round}};background: #F69D99" cellspacing="2"
| |
| ! width="420px" | '''Regular Enemies'''
| |
| ! width="180px" | '''Mid-Bosses'''
| |
| |- bgcolor="E47575"
| |
| |
| |
| {{col-begin}}
| |
| {{col-break|width=33%}}
| |
| *[[Gigatzo]]
| |
| *[[Hairy Dee]]
| |
| *[[Lanzer]]
| |
| *[[Mamanti]]
| |
| *[[Paclower]]
| |
| *[[Parasol Waddle Dee]]
| |
| *[[Scarfy]]
| |
| *[[Waddle Dee]]
| |
| {{col-break|width=33%}}
| |
| *[[Bronto Burt]]
| |
| *[[Flamer]]
| |
| *[[Gordo]]
| |
| *[[Hot Head]]
| |
| *[[Noddy]]
| |
| *[[Sir Kibble]]
| |
| *[[Sparky]]
| |
| *[[Spynum]]
| |
| {{col-break|width=34%}}
| |
| *[[Beetley]]
| |
| *[[Chilly]]
| |
| *[[Chip]]
| |
| *[[Clown Acrobot]]
| |
| *[[Knuckle Joe]]
| |
| *[[Ringle]]
| |
| *[[Tick]]
| |
| *[[Whippy]]
| |
| {{col-end}}
| |
| |
| |
| {{col-begin|width=50%}}
| |
| *[[Gigant Edge]] DX
| |
| *[[Hornhead]] DX
| |
| {{col-end}}
| |
| |-
| |
| ! width="420px"| '''Abilities'''
| |
| ! width="180px" | '''Special'''
| |
| |- bgcolor="#E47575"
| |
| |
| |
| {{col-begin}}
| |
| {{col-break|width=50%}}
| |
| *[[Bell]]
| |
| *[[Cutter]]
| |
| *[[Fire]]
| |
| *[[Parasol]]
| |
| *[[Sleep]]
| |
| *[[Spark]]
| |
| *[[Sword]]
| |
| *[[Whip]]
| |
| {{col-break|width=50%}}
| |
| *[[Archer]]
| |
| *[[Beetle]]
| |
| *[[Circus]]
| |
| *[[Fighter]]
| |
| *[[Ice]]
| |
| *[[Needle]]
| |
| *[[Spear]]
| |
| {{col-end}}
| |
| |
| |
| {{col-begin}}
| |
| *N/A
| |
| {{col-end}}
| |
| |}
| |
| | |
| ===Stage EX 2===
| |
| [[File:Royal Road EX 2.jpg|thumb|right|250px|Kirby moves past a tapestry depicting his sprite history in Stage EX 2.]]
| |
| Prelude: The stage begins inside the prison complex, on a platform that rises out of the bottomless pit. A series of platforms lead upward to a warp that will take Kirby to the next section.
| |
| | |
| Section 1: The warp leads to a series of floating platforms over what looks like the background from Endless Explosions. The path eventually leads to a familiar-looking bridge and platform, where Kirby finds a Miracle Fruit Vine and gains the [[Hypernova]] ability. From here, the [[Winged Eggers]] appear to attack Kirby. After defeating them, a warp opens to the next section.
| |
| | |
| Section 2: The warp leads to the interior wide chamber from the prison compound, with more floating platforms spanning to the right. The [[Waddle Dee Steel Fortress]] appears from the right side, this time carrying Sectonian Waddle Dees. Defeating it yields the warp to the next section.
| |
| | |
| Section 3: The warp leads to the room where the [[Ace Fuwa Rover]] was fought, and they must battle again. This time, however, the Ace only possesses the painting and the grand piano before it goes down for the count, opening the warp to the next section.
| |
| | |
| Section 4: The warp leads to a room in the prison compound with two [[Land Barbar]] that attempt to eat Kirby. He must first eat the lower Barbar and use its pipe to enter the foreground and activate a secondary platform before he can eat the upper Barbar and progress to the next room. From there, the warp to the next section can be found, though if Kirby first looks down the pit, he can find two Keychains at the end of another pipe.
| |
| | |
| Section 5: The warp leads to a cloud canopy area as seen at the very beginning of the game. Kirby needs to use Hypernova to pull out a metal block and cause it to crash through some barrier blocks and open the way down. From here, Kirby can choose to either have the block crash through a path containing some stars, or a path full of Lanzers. After that, one more block drop is needed to reach a room where the warp to the next section lies.
| |
| | |
| Section 6: The warp leads to a series of platforms inside the prison compound where Kirby must fight the [[Gigant Chicks]] using a turnip. Defeating them opens a warp to the next section, though a Keychain can be found beneath the right platform.
| |
| | |
| Section 7: The warp leads to an open plain in the Endless Explosions landscape. Venturing right leads to an encounter with a particularly nasty looking member of the [[Mowlee Bros.]], who tosses flaming spiky balls at Kirby. The Winged Eggers can be seen in the background, defeated from Kirby's previous encounter with them. Defeating him causes him to fly back into the Eggers and knock all of them off the back platform, causing a warp to appear to the next section.
| |
| | |
| Section 8: The warp leads to a hallway in Royal Road with a clear background. To the right, a large cured drape can be seen. Kirby can unfurl it by inhaling its bauble to reveal a tapestry outlining the 'evolution' of Kirby, starting with his original sprite from ''[[Kirby's Dream Land]]'' and finishing with a depiction of him in his Hypernova form. Additionally, an animated portion of the tapestry just to the right of this diagram shows a scene from the original fight with [[King Dedede]] as the very last Sun Stone in the game is available to collect, along with the stage exit. However, one last secret remains, and if Kirby wishes to get all the food in the world, three 1Ups and three Keychains, one of which is Golden, he must wish to the moon.
| |
| | |
| ====Enemies, Mid-bosses, and Abilities====
| |
| {| style="border: 3px solid #E47575; {{round}};background: #F69D99" cellspacing="2"
| |
| ! width="420px" | '''Regular Enemies'''
| |
| ! width="180px" | '''Mid-Bosses'''
| |
| |- bgcolor="E47575"
| |
| |
| |
| {{col-begin}}
| |
| {{col-break|width=33%}}
| |
| *[[Waddle Dee]]
| |
| {{col-break|width=33%}} | |
| *[[Land Barbar]]
| |
| {{col-break|width=34%}}
| |
| *[[Lanzer]]
| |
| {{col-end}}
| |
| |
| |
| {{col-begin|width=50%}}
| |
| *[[Ace Fuwa Rover]]
| |
| *[[Gigant Chicks]]
| |
| *[[Mowlee Bros.]] DX
| |
| *[[Waddle Dee Steel Fortress]]
| |
| *[[Winged Eggers]]
| |
| {{col-end}}
| |
| |-
| |
| ! width="420px"| '''Abilities'''
| |
| ! width="180px" | '''Special'''
| |
| |- bgcolor="#E47575"
| |
| |
| |
| {{col-begin}}
| |
| {{col-break|width=50%}}
| |
| *N/A
| |
| {{col-break|width=50%}}
| |
| | |
| {{col-end}}
| |
| |
| |
| {{col-begin}}
| |
| *[[Hypernova]]
| |
| {{col-end}}
| |
| |}
| |
| | |
| ==Trivia==
| |
| [[File:Royal Road Stage Select.jpg|thumb|right|250px|A portion of the Stage Select area for Royal Road.]]
| |
| *Throughout Royal Road, numerous enemies encountered in previous levels now sport an insectoid design. These include [[Waddle Dee]]s, [[Bronto Burt]]s, [[Gordo]]s, [[Lanzer]]s, and [[Spynum]]s.
| |
| **However, Stage EX features both Sectonian and normal variants of enemies that would otherwise be Sectonian only.
| |
| *Stage 3 and Stage EX 2 are the only stages in the game from which it is impossible to obtain any Copy Abilities.
| |
| **Additionally, Stage EX 2 is the only EX stage to feature [[Hypernova]].
| |
| *Stage EX 2 features the Fountain of Dreams theme from ''[[Kirby Air Ride]]'' when Kirby gains Hypernova, which itself is a remix of the [[Gourmet Race]] theme from ''[[Kirby Super Star]]''.
| |
| | |
| <br clear=all>
| |
| {{KirbyTD}}
| |
| [[Category:Places]] | | [[Category:Places]] |
| [[Category:Levels in Kirby: Triple Deluxe]] | | [[Category:Levels in Kirby: Triple Deluxe]] |
| [[Category:Floralia Locations]] | | [[Category:Floralia locations]] |
| | [[Category:Popstar locations]] |