Ice Cream Island - Stage 3: Difference between revisions
Pinkyoshifan (talk | contribs) m (Text replacement - "(<tab name=".*)'(.*">)" to "$1’$2") |
|||
| (12 intermediate revisions by 6 users not shown) | |||
| Line 1: | Line 1: | ||
{{Infobox-KAStage | {{Infobox-KAStage | ||
|image=[[File:Ice Cream Island | |image=[[File:KNiDL Ice Cream Island Stage 3.png]] | ||
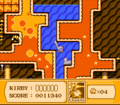
|caption=Kirby swipes at a [[Bronto Burt]] in the caves in ''Kirby: Nightmare in Dream Land''. | |caption=Kirby swipes at a [[Bronto Burt]] in the caves in ''Kirby: Nightmare in Dream Land''. | ||
|level=[[Ice Cream Island]] | |level=[[Ice Cream Island]] | ||
|midboss=[[Meta-Knights]] | |midboss=[[Meta-Knights]] | ||
|switch={{N}} | |switch={{N}} | ||
|theme music= | |||
<tabs> | |||
<tab name="Kirby’s Adventure"> | |||
[[File:Ice Cream Island KA.oga]] | |||
</tab> | |||
<tab name="Kirby: Nightmare in Dream Land"> | |||
[[File:KNiDL Ice Cream Island Sample.oga]] | |||
</tab> | |||
</tabs> | |||
|theme title="[[Ice Cream Island (theme)|Ice Cream Island]]" | |||
|description=Clips of the music that plays in Ice Cream Island - Stage 3 | |||
|previousstage=[[Ice Cream Island - Stage 2]] | |previousstage=[[Ice Cream Island - Stage 2]] | ||
|nextstage=[[Ice Cream Island - Stage 4]] | |nextstage=[[Ice Cream Island - Stage 4]] | ||
| Line 14: | Line 24: | ||
The stage takes place in four primary areas. The first features two isolated landmasses, with Kirby on one and the [[door]] forward on the other. Kirby can use a [[Parasol]] to cross in style. | The stage takes place in four primary areas. The first features two isolated landmasses, with Kirby on one and the [[door]] forward on the other. Kirby can use a [[Parasol]] to cross in style. | ||
The second area is a winding cavern, with parts dipping below water. This area is fairly perilous, containing [[spike]]s and many foes. To the left is a [[Bomb Block]] formation, behind which is a door leading to a side-room containing a [[UFO (enemy)|UFO]] and [[Maxim Tomato]]. In the middle of the main passage, a route can be taken which leads to a [[1-Up]] if Kirby still has an ability that can strike the block in the ceiling. | |||
In the | In the third area, Kirby is ambushed by the [[Meta-Knights]]. All of them need to be defeated in order to proceed. | ||
In the last area, Kirby can go diving for an [[Energy Drink]], then proceed to the stage exit. | In the last area, Kirby can go diving for an [[Energy Drink]] guarded by two [[Blipper]]s, then proceed to the stage exit. | ||
==Enemies and Mid-Bosses== | ==Enemies and Mid-Bosses== | ||
| Line 25: | Line 35: | ||
<tab name="Enemies"> | <tab name="Enemies"> | ||
{| class="wikitable" | {| class="wikitable" | ||
!Sprite ('' | !Sprite (''KA''/''KNiDL'') | ||
!Name | !Name | ||
!style="border-style: solid; border-width: 1px 3px 1px 1px"|Copy Ability | !style="border-style: solid; border-width: 1px 3px 1px 1px"|Copy Ability | ||
!Sprite ('' | !Sprite (''KA''/''KNiDL'') | ||
!Name | !Name | ||
!Copy Ability | !Copy Ability | ||
|- | |- | ||
|align=center|[[File:KA Blipper sprite.png]] [[File: | |align=center|[[File:KA Blipper sprite.png]] [[File:KNiDL Blipper sprite.png]] | ||
|[[Blipper]] | |[[Blipper]] | ||
|style="border-style: solid; border-width: 1px 3px 1px 1px"|None | |style="border-style: solid; border-width: 1px 3px 1px 1px"|None | ||
|align=center|[[File: | |align=center|[[File:KA Parasol sprite.png]] [[File:KNiDL Parasol enemy sprite.png]] | ||
|[[Parasol (enemy)|Parasol]] | |[[Parasol (enemy)|Parasol]] | ||
|[[Parasol]] | |[[Parasol]] | ||
|- | |- | ||
|align=center|[[File:KA Bronto Burt sprite.png]] [[File: | |align=center|[[File:KA Bronto Burt sprite.png]] [[File:KNiDL Bronto Burt sprite.png]] | ||
|[[Bronto Burt]] | |[[Bronto Burt]] | ||
|style="border-style: solid; border-width: 1px 3px 1px 1px"|None | |style="border-style: solid; border-width: 1px 3px 1px 1px"|None | ||
|align=center|[[File: | |align=center|[[File:KA Sword Knight sprite.png]] [[File:KNiDL Sword Knight sprite.png]] | ||
|[[Sword Knight]] | |[[Sword Knight]] | ||
|[[Sword]] | |[[Sword]] | ||
|- | |- | ||
|align=center|[[File:KA Cappy sprite.png]] [[File: | |align=center|[[File:KA Cappy sprite.png]] [[File:KNiDL Cappy sprite.png]] | ||
|[[Cappy]] | |[[Cappy]] | ||
|style="border-style: solid; border-width: 1px 3px 1px 1px"|None | |style="border-style: solid; border-width: 1px 3px 1px 1px"|None | ||
|align=center|[[File: | |align=center|[[File:KA UFO sprite.png]] [[File:KNiDL UFO enemy sprite.png]] | ||
|[[UFO (enemy)|UFO]] | |[[UFO (enemy)|UFO]] | ||
|[[UFO]] | |[[UFO]] | ||
|- | |- | ||
|align=center|[[File:KA Gordo sprite.png]] [[File: | |align=center|[[File:KA Gordo sprite.png]] [[File:KNiDL Gordo sprite.png]] | ||
|[[Gordo]] | |[[Gordo]] | ||
|style="border-style: solid; border-width: 1px 3px 1px 1px"|N/A | |style="border-style: solid; border-width: 1px 3px 1px 1px"|N/A | ||
| Line 60: | Line 70: | ||
|None | |None | ||
|- | |- | ||
|align=center|[[File:KA Kabu sprite.png]] [[File: | |align=center|[[File:KA Kabu sprite.png]] [[File:KNiDL Kabu sprite.png]] | ||
|[[Kabu]] | |[[Kabu]] | ||
|style="border-style: solid; border-width: 1px 3px 1px 1px"|None | |style="border-style: solid; border-width: 1px 3px 1px 1px"|None | ||
| Line 69: | Line 79: | ||
<tab name="Mid-Bosses"> | <tab name="Mid-Bosses"> | ||
{| class="wikitable" width=25% | {| class="wikitable" width=25% | ||
!Sprite ('' | !Sprite (''KA''/''KNiDL'') | ||
!Name | !Name | ||
!Copy Ability | !Copy Ability | ||
|- | |- | ||
|align=center|[[File:KA Axe Knight sprite.png]] [[File:Axe Knight | |align=center|[[File:KA Axe Knight sprite.png]] [[File:KNiDL Axe Knight sprite.png]] [[File:KA Mace Knight sprite.png]] [[File:KNiDL Mace Knight sprite.png]] [[File:KA Trident Knight sprite.png]] [[File:KNiDL Trident Knight sprite.png]] | ||
|[[Meta-Knights]] ([[Axe Knight]], [[Mace Knight]], and [[Trident Knight]]) | |[[Meta-Knights]] ([[Axe Knight]], [[Mace Knight]], and [[Trident Knight]]) | ||
|None | |None | ||
| Line 83: | Line 93: | ||
==Gallery== | ==Gallery== | ||
<gallery> | <gallery> | ||
KA Ice Cream Island Stage 3 screenshot 01.png|Kirby falls with his parasol across the gap in the first area. | |||
KA Ice Cream Island Stage 3 screenshot 02.png|Kirby busts through a barricade to reach a side chamber in the caves. | |||
KA Ice Cream Island Stage 3 screenshot 03.png|Kirby stumbles into a hidden room with a UFO and a Maxim Tomato. | |||
KA Ice Cream Island Stage 3 screenshot 04.png|Kirby swims through a winding watery tunnel with sword in hand. | |||
KA Ice Cream Island Stage 3 screenshot 05.png|Kirby dives deep in a cave to get a 1-Up. | |||
KA Ice Cream Island Stage 3 screenshot 06.png|Kirby battles Meta Knight's faithful minions out on the coast. | |||
KA Ice Cream Island Stage 3 screenshot 07.png|Kirby dives into a pool to grab an Energy Drink and recover his dwindling strength. | |||
</gallery> | </gallery> | ||
| Line 90: | Line 105: | ||
{{Navbox-KA/KNiDL}} | {{Navbox-KA/KNiDL}} | ||
Latest revision as of 12:42, 21 April 2024
| ||||||||||||
| ||||||||||||
| ||||||||||||
|
| ||||||||||||

Ice Cream Island - Stage 3 is the third stage of Ice Cream Island, the second level of Kirby's Adventure and its Game Boy Advance remake, Kirby: Nightmare in Dream Land. It is the first location where Kirby fights the Meta-Knights.
Overview[edit]
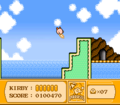
The stage takes place in four primary areas. The first features two isolated landmasses, with Kirby on one and the door forward on the other. Kirby can use a Parasol to cross in style.
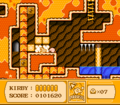
The second area is a winding cavern, with parts dipping below water. This area is fairly perilous, containing spikes and many foes. To the left is a Bomb Block formation, behind which is a door leading to a side-room containing a UFO and Maxim Tomato. In the middle of the main passage, a route can be taken which leads to a 1-Up if Kirby still has an ability that can strike the block in the ceiling.
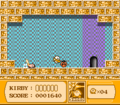
In the third area, Kirby is ambushed by the Meta-Knights. All of them need to be defeated in order to proceed.
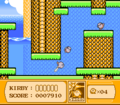
In the last area, Kirby can go diving for an Energy Drink guarded by two Blippers, then proceed to the stage exit.
Enemies and Mid-Bosses[edit]
| ||||||||||||||||||||||||||||||||||||||||||
Gallery[edit]
Kirby falls with his parasol across the gap in the first area.
Kirby busts through a barricade to reach a side chamber in the caves.
Kirby stumbles into a hidden room with a UFO and a Maxim Tomato.
Kirby swims through a winding watery tunnel with sword in hand.
Kirby dives deep in a cave to get a 1-Up.
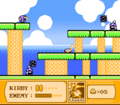
Kirby battles Meta Knight's faithful minions out on the coast.
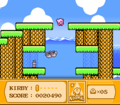
Kirby dives into a pool to grab an Energy Drink and recover his dwindling strength.


