Yogurt Yard: Difference between revisions
m (→Gallery) |
Pinkyoshifan (talk | contribs) m (Text replacement - "(<tab name=".*)'(.*">)" to "$1’$2") |
||
| (9 intermediate revisions by 6 users not shown) | |||
| Line 1: | Line 1: | ||
{{Infobox-KAWorld | {{Infobox-KAWorld | ||
|image= | |image= | ||
<tabs> | <tabs> | ||
<tab name=" | <tab name="Kirby’s Adventure"> | ||
[[File:KA Yogurt Yard intro screenshot.png]] | [[File:KA Yogurt Yard intro screenshot.png]] | ||
</tab> | </tab> | ||
| Line 10: | Line 9: | ||
</tab> | </tab> | ||
</tabs> | </tabs> | ||
|caption=A portion of the opening | |caption=A portion of the opening cutscene for '''Yogurt Yard'''. | ||
|levels=6 | |levels=6 | ||
|boss=[[Heavy Mole]] | |boss=[[Heavy Mole]] | ||
| Line 17: | Line 16: | ||
|minigames='''''Kirby's Adventure''''' | |minigames='''''Kirby's Adventure''''' | ||
Crane Fever Lvl. 1 | Crane Fever Lvl. 1 | ||
<br>Crane Fever Lvl. 3 (Extra Game) | |||
<br>Egg Catcher Lvl. 1 | <br>Egg Catcher Lvl. 1 | ||
<br>Egg Catcher Lvl. 3 (Extra Game) | |||
<br>Quick Draw Lvl. 1 | <br>Quick Draw Lvl. 1 | ||
<br>Quick Draw Lvl. 3 (Extra Game) | |||
<br> | <br> | ||
'''''Kirby: Nightmare in Dream Land'''''<br> Bomb Rally Lvl. 1 | '''''Kirby: Nightmare in Dream Land'''''<br>Bomb Rally Lvl. 1 | ||
<br>Bomb Rally Lvl. 3 (Extra | <br>Bomb Rally Lvl. 3 (Extra Game) | ||
<br>Kirby's Air Grind Lvl. 1 | |||
<br>Kirby's Air Grind Lvl. 3 (Extra Game) | |||
<br>Quick Draw Lvl. 1 | <br>Quick Draw Lvl. 1 | ||
<br>Quick Draw Lvl. 3 (Extra | <br>Quick Draw Lvl. 3 (Extra Game) | ||
|secretswitches={{Y}} (Stage 1, Stage 4, Stage 5, & Stage 6) | |secretswitches={{Y}} (Stage 1, Stage 4, Stage 5, & Stage 6) | ||
|theme music= | |theme music= | ||
<tabs> | <tabs> | ||
<tab name=" | <tab name="Kirby’s Adventure"> | ||
[[File:KA Yogurt Yard clip.mp3]] | [[File:KA Yogurt Yard clip.mp3]] | ||
</tab> | </tab> | ||
| Line 36: | Line 38: | ||
</tab> | </tab> | ||
</tabs> | </tabs> | ||
|theme title=[[Mountain Stage]] | |theme title="[[Mountain Stage]]" | ||
|description=Clips of the Yogurt Yard stage theme. | |description=Clips of the Yogurt Yard stage theme. | ||
|previousworld=[[Grape Garden]] | |previousworld=[[Grape Garden]] | ||
| Line 43: | Line 45: | ||
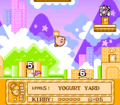
'''Yogurt Yard''' is the fifth level of ''[[Kirby's Adventure]]'' and its remake, ''[[Kirby: Nightmare in Dream Land]]''. It features six stages, and the museum has the [[Stone]] and [[Tornado]] copy abilities. The mid-boss in the Arena is [[Bonkers]], and the boss is [[Heavy Mole]]. | '''Yogurt Yard''' is the fifth level of ''[[Kirby's Adventure]]'' and its remake, ''[[Kirby: Nightmare in Dream Land]]''. It features six stages, and the museum has the [[Stone]] and [[Tornado]] copy abilities. The mid-boss in the Arena is [[Bonkers]], and the boss is [[Heavy Mole]]. | ||
== Intro | ==Intro cutscene== | ||
Before entering the hub for the first time, a brief | Before entering the hub for the first time, a brief cutscene plays adorned in a yellow frame with the level's name overhead in the scene. The opening cutscene shows [[Kirby]] climbing a steep hill, struggling to get a [[Maxim Tomato]]. He finally reaches the top and holds the tomato up triumphantly, only to have it roll out of his hand and down the other side of the hill. Kirby panics and runs after it, only to end up rolling down the hillside behind it. | ||
== Overview == | ==Overview== | ||
Yogurt Yard is dominated by steep elevation changes, mountainous terrain, and extensive cave structures. Yogurt Yard's interior sections are notoriously cramped, forcing Kirby to contend with enemies in close quarters. Many of the more open areas are more deliberate in their design than previous levels, with Stage 6 in particular pitting Kirby against a multitude of enemies and hazards. In addition, the puzzles that Kirby must solve to access the [[Big Switch]]es become more challenging and esoteric than in previous zones. | Yogurt Yard is dominated by steep elevation changes, mountainous terrain, and extensive cave structures. Yogurt Yard's interior sections are notoriously cramped, forcing Kirby to contend with enemies in close quarters. Many of the more open areas are more deliberate in their design than previous levels, with Stage 6 in particular pitting Kirby against a multitude of enemies and hazards. In addition, the puzzles that Kirby must solve to access the [[Big Switch]]es become more challenging and esoteric than in previous zones. | ||
=== Hub === | ===Hub=== | ||
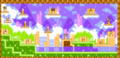
The Yogurt Yard hub features a lot of verticality, with a canyon-like structure and pools of shallow water near the bottom. Stage doors vary greatly in elevation, with some secondary doors being very high up on elevated platforms. Pressing the Big Switch in Stage 1 opens up the first sub-game ([[Crane Fever]] in ''Kirby's Adventure'', [[Bomb Rally]] in ''Kirby: Nightmare in Dream Land''). Clearing Stage 1 grants access to the [[Museum]] which contains the [[Stone]] and [[Tornado]] abilities. Clearing Stage 3 opens up the second sub-game ([[Egg Catcher]] in ''Kirby's Adventure'', [[Kirby's Air Grind]] in ''Kirby: Nightmare in Dream Land''). Pressing the Big Switch in Stage 4 unlocks the [[Arena (Kirby's Adventure)|Arena]] which pits Kirby against [[Bonkers]]. Pressing the Big Switch in Stage 5 unlocks the third sub-game of [[Quick Draw]]. Finally, pressing the Big Switch in Stage 6 unlocks the [[Warp Star Station|warp room]]. | The Yogurt Yard hub features a lot of verticality, with a canyon-like structure and pools of shallow water near the bottom. Stage doors vary greatly in elevation, with some secondary doors being very high up on elevated platforms. Pressing the Big Switch in Stage 1 opens up the first sub-game ([[Crane Fever]] in ''Kirby's Adventure'', [[Bomb Rally]] in ''Kirby: Nightmare in Dream Land''). Clearing Stage 1 grants access to the [[Museum]] which contains the [[Stone]] and [[Tornado]] abilities. Clearing Stage 3 opens up the second sub-game ([[Egg Catcher]] in ''Kirby's Adventure'', [[Kirby's Air Grind]] in ''Kirby: Nightmare in Dream Land''). Pressing the Big Switch in Stage 4 unlocks the [[Arena (Kirby's Adventure)|Arena]] which pits Kirby against [[Bonkers]]. Pressing the Big Switch in Stage 5 unlocks the third sub-game of [[Quick Draw]]. Finally, pressing the Big Switch in Stage 6 unlocks the [[Warp Star Station|warp room]]. | ||
The hub opens up to reveal a large mountainous fresco, with many different types of terrain in the midst. | The hub opens up to reveal a large mountainous fresco, with many different types of terrain in the midst. | ||
=== Stages === | ===Stages=== | ||
Each stage is unlocked in succession after clearing the previous one. Clearing Stage 7 is necessary to move on to [[Orange Ocean]]. For more information about a particular stage, click on the link to the stage's page in the table. | Each stage is unlocked in succession after clearing the previous one. Clearing Stage 7 is necessary to move on to [[Orange Ocean]]. For more information about a particular stage, click on the link to the stage's page in the table. | ||
{| class="sortable wikitable" border=1 cellpadding=2 | {| class="sortable wikitable" border=1 cellpadding=2 | ||
| Line 104: | Line 106: | ||
KA Yogurt Yard level hub screenshot.png|A portion of the Yogurt Yard level hub | KA Yogurt Yard level hub screenshot.png|A portion of the Yogurt Yard level hub | ||
TLODL Artwork 4.png|Artwork used for The Landscape of Dreamland merchandise series | TLODL Artwork 4.png|Artwork used for The Landscape of Dreamland merchandise series | ||
Kirby Cafe Yogurt yard drink.jpg|The "Yogurt yard drink" [[Kirby Café]] drink | |||
</gallery> | </gallery> | ||
==Names in other languages== | ==Names in other languages== | ||
{{Names | {{Names | ||
|ja= | |ja=YOGURT YARD<br>ヨーグルトヤード | ||
|jaR=Yōguruto Yādo | |jaR=Yōguruto Yādo | ||
|jaM=Yogurt Yard | |jaM=Yogurt Yard | ||
| Line 122: | Line 125: | ||
{{clear}} | {{clear}} | ||
{{Navbox-KA/KNiDL}} | {{Navbox-KA/KNiDL}} | ||
[[Category:Popstar locations]] | [[Category:Popstar locations]] | ||
Latest revision as of 12:42, 21 April 2024
| ||||||||||||||
| ||||||||||||||
| ||||||||||||||
| ||||||||||||||
|
| ||||||||||||||


Yogurt Yard is the fifth level of Kirby's Adventure and its remake, Kirby: Nightmare in Dream Land. It features six stages, and the museum has the Stone and Tornado copy abilities. The mid-boss in the Arena is Bonkers, and the boss is Heavy Mole.
Intro cutscene[edit]
Before entering the hub for the first time, a brief cutscene plays adorned in a yellow frame with the level's name overhead in the scene. The opening cutscene shows Kirby climbing a steep hill, struggling to get a Maxim Tomato. He finally reaches the top and holds the tomato up triumphantly, only to have it roll out of his hand and down the other side of the hill. Kirby panics and runs after it, only to end up rolling down the hillside behind it.
Overview[edit]
Yogurt Yard is dominated by steep elevation changes, mountainous terrain, and extensive cave structures. Yogurt Yard's interior sections are notoriously cramped, forcing Kirby to contend with enemies in close quarters. Many of the more open areas are more deliberate in their design than previous levels, with Stage 6 in particular pitting Kirby against a multitude of enemies and hazards. In addition, the puzzles that Kirby must solve to access the Big Switches become more challenging and esoteric than in previous zones.
Hub[edit]
The Yogurt Yard hub features a lot of verticality, with a canyon-like structure and pools of shallow water near the bottom. Stage doors vary greatly in elevation, with some secondary doors being very high up on elevated platforms. Pressing the Big Switch in Stage 1 opens up the first sub-game (Crane Fever in Kirby's Adventure, Bomb Rally in Kirby: Nightmare in Dream Land). Clearing Stage 1 grants access to the Museum which contains the Stone and Tornado abilities. Clearing Stage 3 opens up the second sub-game (Egg Catcher in Kirby's Adventure, Kirby's Air Grind in Kirby: Nightmare in Dream Land). Pressing the Big Switch in Stage 4 unlocks the Arena which pits Kirby against Bonkers. Pressing the Big Switch in Stage 5 unlocks the third sub-game of Quick Draw. Finally, pressing the Big Switch in Stage 6 unlocks the warp room.
The hub opens up to reveal a large mountainous fresco, with many different types of terrain in the midst.
Stages[edit]
Each stage is unlocked in succession after clearing the previous one. Clearing Stage 7 is necessary to move on to Orange Ocean. For more information about a particular stage, click on the link to the stage's page in the table.
| Stage | Mid-Boss(es) | Big Switch? | Notes |
|---|---|---|---|
| Bonkers | |||
| Meta-Knights | |||
| Fire Lion | |||
| Kirby fights the level boss, Heavy Mole. |


Gallery[edit]
Map of the level hub for Yogurt Yard in Kirby's Adventure

Map of the level hub for Yogurt Yard in Kirby: Nightmare in Dream Land
A portion of the Yogurt Yard level hub
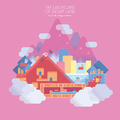
Artwork used for The Landscape of Dreamland merchandise series

The "Yogurt yard drink" Kirby Café drink


Names in other languages[edit]
| Language | Name | Meaning |
|---|---|---|
| Japanese | YOGURT YARD ヨーグルトヤード Yōguruto Yādo |
Yogurt Yard |
| French | Jardin du Raisin (Kirby's Adventure) Cour Yaourt (Kirby: Nightmare in Dream Land) |
Grape Garden (Not to be confused with the previous level) Yogurt Yard |
| German | Götterspeisental (Kirby's Adventure) Kekskaverne (Kirby: Nightmare in Dream Land) |
Jelly Valley Cookie Cavern |
| Italian | Monte Yogurt | Yogurt Mountain |
| Spanish | Pradera del Yogur | Yogurt Prairie |