Rainbow Resort - Stage 4: Difference between revisions
m (→Enemies) |
Pinkyoshifan (talk | contribs) m (Text replacement - "(<tab name=".*)'(.*">)" to "$1’$2") |
||
| (10 intermediate revisions by 6 users not shown) | |||
| Line 1: | Line 1: | ||
{{Infobox-KAStage | {{Infobox-KAStage | ||
|image=[[File:Rainbow Resort | |image=[[File:KNiDL Rainbow Resort Stage 4.png]] | ||
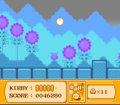
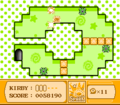
|caption=Kirby falls up a windward shaft. (''Kirby: Nightmare in Dream Land'') | |caption=Kirby falls up a windward shaft. (''Kirby: Nightmare in Dream Land'') | ||
|level=[[Rainbow Resort]] | |level=[[Rainbow Resort]] | ||
|switch={{N}} | |switch={{N}} | ||
|theme music= | |||
<tabs> | |||
<tab name="Kirby’s Adventure"> | |||
[[File:Grape Garden KA.mp3]] | |||
</tab> | |||
<tab name="Kirby: Nightmare in Dream Land"> | |||
[[File:KNiDL Grape Garden Sample.oga]] | |||
</tab> | |||
</tabs> | |||
|theme title="[[Grape Garden (theme)|Grape Garden]]" | |||
|description=Clips of the music that plays in Rainbow Resort - Stage 4 | |||
|previousstage=[[Rainbow Resort - Stage 3]] | |previousstage=[[Rainbow Resort - Stage 3]] | ||
|nextstage=[[Rainbow Resort - Stage 5]] | |nextstage=[[Rainbow Resort - Stage 5]] | ||
| Line 11: | Line 21: | ||
==Overview== | ==Overview== | ||
This stage consists of seven (six in ''Adventure'') main | This stage consists of seven (six in ''Kirby's Adventure'') main rooms. The first takes place in an open field with [[Bubbles]] bouncing around, and many enemies who would very much like to collide with Kirby. | ||
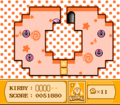
The | The second room is a small hall bent into a u-shape and segmented off using [[Star Block]]s. A Bubbles can be seen in each part of the hall. | ||
In the third room, Kirby encounters another similar area from before, but with [[Bounder]]s/[[Gip]]s inside. | |||
The fourth room is much the same, this one with [[Bronto Burt]]s. | |||
The fifth room is again much the same, but with [[Flamer]]s. | |||
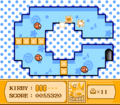
Kirby | In the sixth room, Kirby has to make his way across a series of pillars, with [[Gordo]]s patrolling the narrow gaps in-between them. Along the way, some enemies cached inside [[Bomb Block]] barricades will need to be slid past. | ||
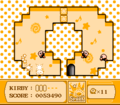
The last room is a complicated affair, tasking Kirby with moving his way up and around a series of outer halls filled with Gordos and other foes, then making his way to a room in the lower-middle where a wind current will carry him up and out toward the stage exit. | The last room is a complicated affair, tasking Kirby with moving his way up and around a series of outer halls filled with Gordos and other foes, then making his way to a room in the lower-middle where a wind current will carry him up and out toward the stage exit. | ||
===Differences between versions=== | ===Differences between versions=== | ||
The last room described in the overview does not appear at all in ''Kirby's Adventure'', with that version presenting the stage exit at the end of the | The last room described in the overview does not appear at all in ''Kirby's Adventure'', with that version presenting the stage exit at the end of the sixth room instead. | ||
==Enemies== | ==Enemies== | ||
{| class="wikitable" | {| class="wikitable" | ||
!Sprite ('' | !Sprite (''KA''/''KNiDL'') | ||
!Name | !Name | ||
!style="border-style: solid; border-width: 1px 3px 1px 1px"|Copy Ability | !style="border-style: solid; border-width: 1px 3px 1px 1px"|Copy Ability | ||
!Sprite ('' | !Sprite (''KA''/''KNiDL'') | ||
!Name | !Name | ||
!Copy Ability | !Copy Ability | ||
|- | |- | ||
|align=center|[[File:KA Bomber sprite.png]] [[File: | |align=center|[[File:KA Bomber sprite.png]] [[File:KNiDL Bomber sprite.png]] | ||
|[[Bomber]] | |[[Bomber]] | ||
|style="border-style: solid; border-width: 1px 3px 1px 1px"|[[Crash]] | |style="border-style: solid; border-width: 1px 3px 1px 1px"|[[Crash]] | ||
|align=center|[[File:KA Laser Ball sprite.png]] [[File: | |align=center|[[File:KA Laser Ball sprite.png]] [[File:KNiDL Laser Ball sprite.png]] | ||
|[[Laser Ball]] | |[[Laser Ball]] | ||
|[[Laser]] | |[[Laser]] | ||
|- | |- | ||
|align=center|[[File:KA Bronto Burt sprite.png]] [[File: | |align=center|[[File:KA Bronto Burt sprite.png]] [[File:KNiDL Bronto Burt sprite.png]] | ||
|[[Bronto Burt]] | |[[Bronto Burt]] | ||
|style="border-style: solid; border-width: 1px 3px 1px 1px"|None | |style="border-style: solid; border-width: 1px 3px 1px 1px"|None | ||
|align=center|[[File:KA Poppy Bros Jr sprite.png]] [[File: | |align=center|[[File:KA Poppy Bros Jr sprite.png]] [[File:KNiDL Poppy Bros Jr sprite.png]] | ||
|[[Poppy Bros. Jr.]] | |[[Poppy Bros. Jr.]] | ||
|None | |None | ||
|- | |- | ||
|align=center|[[File:KA Bubbles sprite.png]] [[File: | |align=center|[[File:KA Bubbles sprite.png]] [[File:KNiDL Bubbles sprite.png]] | ||
|[[Bubbles]] | |[[Bubbles]] | ||
|style="border-style: solid; border-width: 1px 3px 1px 1px"|[[Ball]] | |style="border-style: solid; border-width: 1px 3px 1px 1px"|[[Ball]] | ||
|align=center|[[File:KA Shotzo sprite.png]] [[File: | |align=center|[[File:KA Shotzo sprite.png]] [[File:KNiDL Shotzo sprite.png]] | ||
|[[Shotzo]] | |[[Shotzo]] | ||
|N/A | |N/A | ||
|- | |- | ||
|align=center|[[File:KA Bounder sprite.png]] [[File: | |align=center|[[File:KA Bounder sprite.png]] [[File:KNiDL Gip sprite.png]] | ||
|[[Bounder]]/[[Gip]] | |[[Bounder]]/[[Gip]] | ||
|style="border-style: solid; border-width: 1px 3px 1px 1px"|None | |style="border-style: solid; border-width: 1px 3px 1px 1px"|None | ||
|align=center|[[File:KA Sir Kibble sprite.png]] [[File: | |align=center|[[File:KA Sir Kibble sprite.png]] [[File:KNiDL Sir Kibble sprite.png]] | ||
|[[Sir Kibble]] | |[[Sir Kibble]] | ||
|[[Cutter]] | |[[Cutter]] | ||
|- | |- | ||
|align=center|[[File:KA Flamer sprite.png]] [[File: | |align=center|[[File:KA Flamer sprite.png]] [[File:KNiDL Flamer sprite.png]] | ||
|[[Flamer]] | |[[Flamer]] | ||
|style="border-style: solid; border-width: 1px 3px 1px 1px"|[[Burning|FireBall/Burning]] | |style="border-style: solid; border-width: 1px 3px 1px 1px"|[[Burning|FireBall/Burning]] | ||
|align=center|[[File:KA Sparky sprite.png]] [[File: | |align=center|[[File:KA Sparky sprite.png]] [[File:KNiDL Sparky sprite.png]] | ||
|[[Sparky]] | |[[Sparky]] | ||
|[[Spark]] | |[[Spark]] | ||
|- | |- | ||
|align=center|[[File:KA Gordo sprite.png]] [[File: | |align=center|[[File:KA Gordo sprite.png]] [[File:KNiDL Gordo sprite.png]] | ||
|[[Gordo]] | |[[Gordo]] | ||
|style="border-style: solid; border-width: 1px 3px 1px 1px"|N/A | |style="border-style: solid; border-width: 1px 3px 1px 1px"|N/A | ||
|align=center|[[File:KA Twister sprite.png]] [[File: | |align=center|[[File:KA Twister sprite.png]] [[File:KNiDL Twister sprite.png]] | ||
|[[Twister]] | |[[Twister]] | ||
|[[Tornado]] | |[[Tornado]] | ||
|- | |- | ||
|align=center|[[File:KA Hot Head sprite.png]] [[File: | |align=center|[[File:KA Hot Head sprite.png]] [[File:KNiDL Hot Head sprite.png]] | ||
|[[Hot Head]] | |[[Hot Head]] | ||
|style="border-style: solid; border-width: 1px 3px 1px 1px"|[[Fire]] | |style="border-style: solid; border-width: 1px 3px 1px 1px"|[[Fire]] | ||
|align=center|[[File:KA Twizzy sprite.png]] [[File: | |align=center|[[File:KA Twizzy sprite.png]] [[File:KNiDL Twizzy sprite.png]] | ||
|[[Twizzy]] | |[[Twizzy]] | ||
|None | |None | ||
|- | |- | ||
|align=center|[[File:KA Noddy sprite.png]] [[File: | |align=center|[[File:KA Noddy sprite.png]] [[File:KNiDL Noddy sprite.png]] | ||
|[[Noddy]] | |[[Noddy]] | ||
|style="border-style: solid; border-width: 1px 3px 1px 1px"|[[Sleep]] | |style="border-style: solid; border-width: 1px 3px 1px 1px"|[[Sleep]] | ||
| Line 96: | Line 106: | ||
==Gallery== | ==Gallery== | ||
<gallery> | <gallery> | ||
KA Rainbow Resort Stage 4 screenshot 01.png|Ball Kirby goes bouncing through the tall purple sunflower fields. | |||
KA Rainbow Resort Stage 4 screenshot 02.png|The first of the four bent hallways | |||
KA Rainbow Resort Stage 4 screenshot 03.png|The second of the four bent hallways | |||
KA Rainbow Resort Stage 4 screenshot 04.png|The third of the four bent hallways | |||
KA Rainbow Resort Stage 4 screenshot 05.png|The final of the four bent hallways | |||
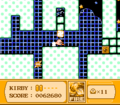
KA Rainbow Resort Stage 4 screenshot 06.png|Kirby slides under a Bomb Block barrier to avoid getting smacked in the head by a falling Shotzo. | |||
</gallery> | </gallery> | ||
| Line 104: | Line 117: | ||
{{Navbox-KA/KNiDL}} | {{Navbox-KA/KNiDL}} | ||
Latest revision as of 12:40, 21 April 2024
| ||||||||||
| ||||||||||
| ||||||||||
|
| ||||||||||

Rainbow Resort - Stage 4 is the fourth stage of Rainbow Resort in Kirby's Adventure and its remake, Kirby: Nightmare in Dream Land.
Overview[edit]
This stage consists of seven (six in Kirby's Adventure) main rooms. The first takes place in an open field with Bubbles bouncing around, and many enemies who would very much like to collide with Kirby.
The second room is a small hall bent into a u-shape and segmented off using Star Blocks. A Bubbles can be seen in each part of the hall.
In the third room, Kirby encounters another similar area from before, but with Bounders/Gips inside.
The fourth room is much the same, this one with Bronto Burts.
The fifth room is again much the same, but with Flamers.
In the sixth room, Kirby has to make his way across a series of pillars, with Gordos patrolling the narrow gaps in-between them. Along the way, some enemies cached inside Bomb Block barricades will need to be slid past.
The last room is a complicated affair, tasking Kirby with moving his way up and around a series of outer halls filled with Gordos and other foes, then making his way to a room in the lower-middle where a wind current will carry him up and out toward the stage exit.
Differences between versions[edit]
The last room described in the overview does not appear at all in Kirby's Adventure, with that version presenting the stage exit at the end of the sixth room instead.
Enemies[edit]
| Sprite (KA/KNiDL) | Name | Copy Ability | Sprite (KA/KNiDL) | Name | Copy Ability |
|---|---|---|---|---|---|
| Bomber | Crash | Laser Ball | Laser | ||
| Bronto Burt | None | Poppy Bros. Jr. | None | ||
| Bubbles | Ball | Shotzo | N/A | ||
| Bounder/Gip | None | Sir Kibble | Cutter | ||
| Flamer | FireBall/Burning | Sparky | Spark | ||
| Gordo | N/A | Twister | Tornado | ||
| Hot Head | Fire | Twizzy | None | ||
| Noddy | Sleep | Waddle Dee | None |
Gallery[edit]
Ball Kirby goes bouncing through the tall purple sunflower fields.
The first of the four bent hallways
The second of the four bent hallways
The third of the four bent hallways
The final of the four bent hallways
Kirby slides under a Bomb Block barrier to avoid getting smacked in the head by a falling Shotzo.


