Orange Ocean - Stage 1: Difference between revisions
m (Text replacement - "{{NinDL}}" to "{{Navbox-KAdv/NinDL}}") |
m (Text replacement - "\|theme title=\[\[(.*)\]\]" to "|theme title="$1"") |
||
| (18 intermediate revisions by 6 users not shown) | |||
| Line 1: | Line 1: | ||
{{Infobox-KAStage | {{Infobox-KAStage | ||
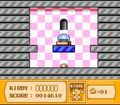
|image=[[File:Orange Ocean | |image=[[File:KNiDL Orange Ocean Stage 1.png]] | ||
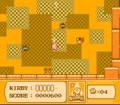
|caption=Kirby about to throw a [[Flamer]]. (''Nightmare in Dream Land'') | |caption=Kirby about to throw a [[Flamer]]. (''Kirby: Nightmare in Dream Land'') | ||
|level=[[Orange Ocean]] | |level=[[Orange Ocean]] | ||
|midboss=[[Rolling Turtle]] (''Adventure'')<br> [[Phan Phan]] (''Nightmare in Dream Land'') | |midboss=[[Rolling Turtle]] (''Kirby's Adventure'')<br> [[Phan Phan]] (''Kirby: Nightmare in Dream Land'') | ||
|switch={{Y}} | |switch={{Y}} | ||
|theme music= | |||
<tabs> | |||
<tab name="Kirby's Adventure"> | |||
[[File:Orange Ocean KA.mp3]] | |||
</tab> | |||
<tab name="Kirby: Nightmare in Dream Land"> | |||
[[File:KNiDL Orange Ocean Sample.oga]] | |||
</tab> | |||
</tabs> | |||
|theme title="[[Orange Ocean (theme)|Orange Ocean]]" | |||
|description=Clips of the music that plays in Orange Ocean - Stage 1 | |||
|previousstage=[[Yogurt Yard - Stage 7]] | |previousstage=[[Yogurt Yard - Stage 7]] | ||
|nextstage=[[Orange Ocean - Stage 2]] | |nextstage=[[Orange Ocean - Stage 2]] | ||
| Line 11: | Line 22: | ||
==Overview== | ==Overview== | ||
This stage consists of three main | This stage consists of three main rooms. The first plops Kirby in a large pool which he will need to swim through, A side door can take him to a battle with [[Rolling Turtle]]/[[Phan Phan]], but this fight is optional (and the shallow water makes the fight a bit tricky). Through an underwater passage, Kirby can find the door to the next area up out of the water. A [[1-Up]] can be grabbed behind some [[Block|stone blocks]] near the end of this room, with the intended way to access it being the [[Throw]] ability from the mid-boss encounter. | ||
In the | In the second room, Kirby will need to bounce across several small platforms, each patrolled by a [[Flamer]] and another enemy. Along the way, a door can be found which leads to a chamber containing blocked-off rooms. The middle room is blocked by a metal block, which can be destroyed most easily using [[Stone]] or [[Hammer]]. If Kirby doesn't have the right ability, he could potentially get one by activating a [[mix]] from the enemies outside. This will lead to a [[Big Switch]]. The proper door forward is back outside and further right. | ||
The last | The last room has Kirby bounding across narrow islands in a sea with no floor. The stage exit can be found to the right. | ||
==Enemies | ==Enemies and Mid-Boss== | ||
{| | {| width=50% | ||
! | |<tabs> | ||
! | <tab name="Enemies"> | ||
{| class="wikitable" | |||
!Sprite (''KA''/''KNiDL'') | |||
!Name | |||
!style="border-style: solid; border-width: 1px 3px 1px 1px"|Copy Ability | |||
!Sprite (''KA''/''KNiDL'') | |||
!Name | |||
!Copy Ability | |||
|- | |- | ||
|align=center|[[File:KA Blade Knight sprite.png]] [[File:KNiDL Blade Knight sprite.png]] | |||
|- | |[[Blade Knight]] | ||
| | |style="border-style: solid; border-width: 1px 3px 1px 1px"|[[Sword]] | ||
|align=center|[[File:KA Gordo sprite.png]] [[File:KNiDL Gordo sprite.png]] | |||
|[[Gordo]] | |||
|N/A | |||
|- | |||
|align=center|[[File:KA Blipper sprite.png]] [[File:KNiDL Blipper sprite.png]] | |||
{ | |[[Blipper]] | ||
|style="border-style: solid; border-width: 1px 3px 1px 1px"|None | |||
|align=center|[[File:KA Hot Head sprite.png]] [[File:KNiDL Hot Head sprite.png]] | |||
|[[Hot Head]] | |||
|[[Fire]] | |||
|- | |||
|align=center|[[File:KA Bounder sprite.png]] [[File:KNiDL Gip sprite.png]] | |||
|[[Bounder]]/[[Gip]] | |||
|style="border-style: solid; border-width: 1px 3px 1px 1px"|None | |||
|align=center|[[File:KA Sir Slippy sprite.png]] [[File:KNiDL Sir Slippy sprite.png]] | |||
|[[Slippy]] | |||
|None | |||
|- | |||
|align=center|[[File:KA Coner sprite.png]] [[File:KNiDL Coner sprite.png]] | |||
|[[Coner]] | |||
|style="border-style: solid; border-width: 1px 3px 1px 1px"|None | |||
|align=center|[[File:KA Sparky sprite.png]] [[File:KNiDL Sparky sprite.png]] | |||
|[[Sparky]] | |||
|[[Spark]] | |||
|- | |||
|align=center|[[File:KA Flamer sprite.png]] [[File:KNiDL Flamer sprite.png]] | |||
|[[Flamer]] | |||
|style="border-style: solid; border-width: 1px 3px 1px 1px"|[[Burning|FireBall/Burning]] | |||
|align=center|[[File:KA Twizzy sprite.png]] [[File:KNiDL Twizzy sprite.png]] | |||
|[[Twizzy]] | |||
|None | |||
|- | |||
|align=center|[[File:KA Glunk sprite.png]] [[File:KNiDL Glunk sprite.png]] | |||
|[[Glunk]] | |||
|style="border-style: solid; border-width: 1px 3px 1px 1px"|None | |||
!colspan=3| | |||
|} | |||
</tab> | |||
<tab name="Mid-Boss"> | |||
{| class="wikitable" width=25% | |||
!Sprite (''KA''/''KNiDL'') | |||
!Name | |||
!Copy Ability | |||
|- | |||
|align=center|[[File:KA Rolling Turtle sprite.png]] [[File:KNiDL Phan Phan sprite.png]] | |||
|[[Rolling Turtle]]/[[Phan Phan]] | |||
|[[Throw]] | |||
|} | |||
</tab> | |||
</tabs> | |||
|} | |} | ||
==Gallery== | ==Gallery== | ||
<gallery> | <gallery> | ||
KA Orange Ocean Stage 1 screenshot 01.png|Kirby takes a dip with many hostile aquatic creatures. | |||
KA Orange Ocean Stage 1 screenshot 02.png|Kirby dives into one of the hardest optional fights in the game. | |||
KA Orange Ocean Stage 1 screenshot 03.png|Kirby leaps between platforms with enemies that give easy access to [[Mix]]ing opportunities. | |||
KA Orange Ocean Stage 1 screenshot 04.png|Kirby makes use of a Mix to get an ability he can use to bust into the Big Switch room. | |||
KA Orange Ocean Stage 1 screenshot 05.png|Kirby enters the Big Switch room. | |||
KA Orange Ocean Stage 1 screenshot 06.png|Kirby defends himself from the enemies in the last area of the stage. | |||
</gallery> | </gallery> | ||
{{clear}} | {{clear}} | ||
{{Navbox- | {{Navbox-KA/KNiDL}} | ||
Revision as of 19:40, 19 January 2024
| ||||||||||||
| ||||||||||||
| ||||||||||||
|
| ||||||||||||

Orange Ocean - Stage 1 is the first stage of Orange Ocean, the sixth level of Kirby's Adventure and its remake, Kirby: Nightmare in Dream Land.
Overview
This stage consists of three main rooms. The first plops Kirby in a large pool which he will need to swim through, A side door can take him to a battle with Rolling Turtle/Phan Phan, but this fight is optional (and the shallow water makes the fight a bit tricky). Through an underwater passage, Kirby can find the door to the next area up out of the water. A 1-Up can be grabbed behind some stone blocks near the end of this room, with the intended way to access it being the Throw ability from the mid-boss encounter.
In the second room, Kirby will need to bounce across several small platforms, each patrolled by a Flamer and another enemy. Along the way, a door can be found which leads to a chamber containing blocked-off rooms. The middle room is blocked by a metal block, which can be destroyed most easily using Stone or Hammer. If Kirby doesn't have the right ability, he could potentially get one by activating a mix from the enemies outside. This will lead to a Big Switch. The proper door forward is back outside and further right.
The last room has Kirby bounding across narrow islands in a sea with no floor. The stage exit can be found to the right.
Enemies and Mid-Boss
Gallery
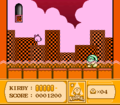
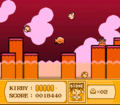
Kirby takes a dip with many hostile aquatic creatures.
Kirby dives into one of the hardest optional fights in the game.
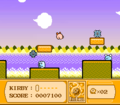
Kirby leaps between platforms with enemies that give easy access to Mixing opportunities.
Kirby makes use of a Mix to get an ability he can use to bust into the Big Switch room.
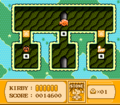
Kirby enters the Big Switch room.
Kirby defends himself from the enemies in the last area of the stage.


