Ice Cream Island - Stage 5: Difference between revisions
m (Text replacement - "{{NinDL}}" to "{{Navbox-KAdv/NinDL}}") |
m (Text replacement - "\|theme title=\[\[(.*)\]\]" to "|theme title="$1"") |
||
| (19 intermediate revisions by 7 users not shown) | |||
| Line 1: | Line 1: | ||
{{Infobox-KAStage | {{Infobox-KAStage | ||
|image=[[File:Ice Cream Island | |image=[[File:KNiDL Ice Cream Island Stage 5.png]] | ||
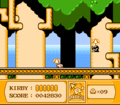
|caption=Kirby gets at a [[1Up]] cache using the [[Burning]] ability in ''Nightmare in Dream Land''. | |caption=Kirby gets at a [[1Up]] cache using the [[Burning]] ability in ''Kirby: Nightmare in Dream Land''. | ||
|level=[[Ice Cream Island]] | |level=[[Ice Cream Island]] | ||
|midboss=None | |midboss=None | ||
|switch={{N}} | |switch={{N}} | ||
|theme music= | |||
<tabs> | |||
<tab name="Kirby's Adventure"> | |||
[[File:Ice Cream Island KA.oga]] | |||
</tab> | |||
<tab name="Kirby: Nightmare in Dream Land"> | |||
[[File:KNiDL Ice Cream Island Sample.oga]] | |||
</tab> | |||
</tabs> | |||
|theme title="[[Ice Cream Island (theme)|Ice Cream Island]]" | |||
|description=Clips of the music that plays in Ice Cream Island - Stage 5 | |||
|previousstage=[[Ice Cream Island - Stage 4]] | |previousstage=[[Ice Cream Island - Stage 4]] | ||
|nextstage=[[Ice Cream Island - Stage 6]] (boss battle) | |nextstage=[[Ice Cream Island - Stage 6]] (boss battle) | ||
| Line 13: | Line 24: | ||
The stage consists of five main areas. The first is a forest down at the water level, where Kirby will need to contend with many [[Shotzo]]s and other foes before reaching the end of the path. | The stage consists of five main areas. The first is a forest down at the water level, where Kirby will need to contend with many [[Shotzo]]s and other foes before reaching the end of the path. | ||
In the second area, Kirby returns to the beach, where he can obtain the [[Wheel]] ability and ride forward. The path splits in two near the end, with the lower path leading to a side-chamber with a snack inside. The upper path is the way forward. | |||
The | The third main area is a clouded walkway past structures with arched windows and many enemies. Along the way, one of these windows looks a little different, and can be jumped into to reach a side area consisting if a small room with some [[Flamer]]s. | ||
The fourth area takes place up in a cloud chute. Kirby will need to make use of the [[Hi-Jump]] ability to proceed past a grid of [[Star Block]]s. | |||
In the last area, Kirby can hop along cloud platforms to reach the stage exit. Here, a [[Poppy Bros. Jr.]] can be found balancing on a [[Maxim Tomato]]. | In the last area, Kirby can hop along cloud platforms to reach the stage exit. Here, a [[Poppy Bros. Jr.]] can be found balancing on a [[Maxim Tomato]]. | ||
===Differences between versions=== | ===Differences between versions=== | ||
In ''Kirby | In ''Kirby: Nightmare in Dream Land'', The third room is a dry canyon area, with platforms situated over a large [[bottomless pit]]. To the left, a Bomb Block wall, when activated, reveals a doorway to a side chamber containing [[Flamer]]s. To the right, Kirby will need to pass many enemies, and can use the [[Burning]] ability to nab some [[1-Up]]s along the way. This room completely replaces the third room described above in ''Kirby's Adventure'', though the side-chambers of both are roughly the same (albeit hidden in different locations). | ||
==Enemies | ==Enemies== | ||
{| | {| class="wikitable" | ||
! | !Sprite (''KA''/''KNiDL'') | ||
! | !Name | ||
!style="border-style: solid; border-width: 1px 3px 1px 1px"|Copy Ability | |||
!Sprite (''KA''/''KNiDL'') | |||
!Name | |||
!Copy Ability | |||
|- | |- | ||
|align=center|[[File:KA Bomber sprite.png]] [[File:KNiDL Bomber sprite.png]] | |||
|- | |[[Bomber]] | ||
| | |style="border-style: solid; border-width: 1px 3px 1px 1px"|[[Crash]] | ||
|align=center|[[File:KA Poppy Bros Jr sprite.png]] [[File:KNiDL Poppy Bros Jr sprite.png]] | |||
|[[Poppy Bros. Jr.]] | |||
|None | |||
|- | |||
|align=center|[[File:KA Bronto Burt sprite.png]] [[File:KNiDL Bronto Burt sprite.png]] | |||
|[[Bronto Burt]] | |||
|style="border-style: solid; border-width: 1px 3px 1px 1px"|None | |||
|align=center|[[File:KA Shotzo sprite.png]] [[File:KNiDL Shotzo sprite.png]] | |||
|[[Shotzo]] | |||
|N/A | |||
|- | |||
|align=center|[[File:KA Flamer sprite.png]] [[File:KNiDL Flamer sprite.png]] | |||
|[[Flamer]] | |||
|style="border-style: solid; border-width: 1px 3px 1px 1px"|[[Burning|FireBall/Burning]] | |||
|align=center|[[File:KA Sir Kibble sprite.png]] [[File:KNiDL Sir Kibble sprite.png]] | |||
|[[Sir Kibble]] | |||
|[[Cutter]] | |||
|- | |||
|align=center|[[File:KA Gordo sprite.png]] [[File:KNiDL Gordo sprite.png]] | |||
|[[Gordo]] | |||
|style="border-style: solid; border-width: 1px 3px 1px 1px"|N/A | |||
|align=center|[[File:KA Starman sprite.png]] [[File:KNiDL Starman sprite.png]] | |||
|[[Starman]] | |||
|[[Hi-Jump]] | |||
|- | |||
|align=center|[[File:KA Kabu sprite.png]] [[File:KNiDL Kabu sprite.png]] | |||
|[[Kabu]] | |||
|style="border-style: solid; border-width: 1px 3px 1px 1px"|None | |||
|align=center|[[File:KA Sword Knight sprite.png]] [[File:KNiDL Sword Knight sprite.png]] | |||
|[[Sword Knight]] | |||
|[[Sword]] | |||
|- | |||
|align=center|[[File:KA Laser Ball sprite.png]] [[File:KNiDL Laser Ball sprite.png]] | |||
|[[Laser Ball]] | |||
|style="border-style: solid; border-width: 1px 3px 1px 1px"|[[Laser]] | |||
|align=center|[[File:KA Waddle Dee sprite.png]] [[File:KNiDL Waddle Dee sprite.png]] | |||
|[[Waddle Dee]] | |||
|None | |||
|- | |||
|align=center|[[File:KA Noddy sprite.png]] [[File:KNiDL Noddy sprite.png]] | |||
|[[Noddy]] | |||
|style="border-style: solid; border-width: 1px 3px 1px 1px"|[[Sleep]] | |||
|align=center|[[File:KA Waddle Doo sprite.png]] [[File:KNiDL Waddle Doo sprite.png]] | |||
|[[Waddle Doo]] | |||
|[[Beam]] | |||
|- | |||
|align=center|[[File:KA Parasol sprite.png]] [[File:KNiDL Parasol enemy sprite.png]] | |||
|[[Parasol (enemy)|Parasol]] | |||
|style="border-style: solid; border-width: 1px 3px 1px 1px"|[[Parasol]] | |||
|align=center|[[File:KA Wheelie sprite.png]] [[File:KNiDL Wheelie sprite.png]] | |||
|[[Wheelie]] | |||
|[[Wheel]] | |||
|} | |} | ||
==Gallery== | ==Gallery== | ||
<gallery> | <gallery> | ||
KA Ice Cream Island Stage 5 screenshot 01.png|Kirby takes cover as a Shotzo gets parasol'd in. | |||
KA Ice Cream Island Stage 5 screenshot 02.png|Wheel Kirby rills up the hillside towards a big pothole. | |||
KA Ice Cream Island Stage 5 screenshot 03.png|Kirby rolls into the chamber under the main path and busts the Bomb Block. | |||
KA Ice Cream Island Stage 5 screenshot 04.png|Kirby leaps towards a crowd of opponents in the cloud city. | |||
KA Ice Cream Island Stage 5 screenshot 05.png|Kirby stumbles into a side room with some [[Flamer]]s. | |||
KA Ice Cream Island Stage 5 screenshot 06.png|Hi-Jump Kirby busts through a large checkered blockade of Star Blocks. | |||
KA Ice Cream Island Stage 5 screenshot 07.png|Kirby eyes the Maxim Tomato that Poppy Bros. Jr. is balancing on. | |||
</gallery> | </gallery> | ||
{{clear}} | {{clear}} | ||
{{Navbox- | {{Navbox-KA/KNiDL}} | ||
Revision as of 19:40, 19 January 2024
| ||||||||||||
| ||||||||||||
| ||||||||||||
|
| ||||||||||||

Ice Cream Island - Stage 5 is the fifth stage of Ice Cream Island, the second level of Kirby's Adventure and its Game Boy Advance remake, Kirby: Nightmare in Dream Land. It is the last normal stage of Ice Cream Island, and occurs just before the boss battle against Paint Roller.
Overview
The stage consists of five main areas. The first is a forest down at the water level, where Kirby will need to contend with many Shotzos and other foes before reaching the end of the path.
In the second area, Kirby returns to the beach, where he can obtain the Wheel ability and ride forward. The path splits in two near the end, with the lower path leading to a side-chamber with a snack inside. The upper path is the way forward.
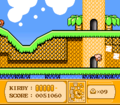
The third main area is a clouded walkway past structures with arched windows and many enemies. Along the way, one of these windows looks a little different, and can be jumped into to reach a side area consisting if a small room with some Flamers.
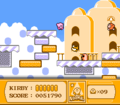
The fourth area takes place up in a cloud chute. Kirby will need to make use of the Hi-Jump ability to proceed past a grid of Star Blocks.
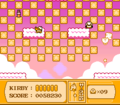
In the last area, Kirby can hop along cloud platforms to reach the stage exit. Here, a Poppy Bros. Jr. can be found balancing on a Maxim Tomato.
Differences between versions
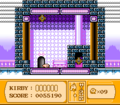
In Kirby: Nightmare in Dream Land, The third room is a dry canyon area, with platforms situated over a large bottomless pit. To the left, a Bomb Block wall, when activated, reveals a doorway to a side chamber containing Flamers. To the right, Kirby will need to pass many enemies, and can use the Burning ability to nab some 1-Ups along the way. This room completely replaces the third room described above in Kirby's Adventure, though the side-chambers of both are roughly the same (albeit hidden in different locations).
Enemies
| Sprite (KA/KNiDL) | Name | Copy Ability | Sprite (KA/KNiDL) | Name | Copy Ability |
|---|---|---|---|---|---|
| Bomber | Crash | Poppy Bros. Jr. | None | ||
| Bronto Burt | None | Shotzo | N/A | ||
| Flamer | FireBall/Burning | Sir Kibble | Cutter | ||
| Gordo | N/A | Starman | Hi-Jump | ||
| Kabu | None | Sword Knight | Sword | ||
| Laser Ball | Laser | Waddle Dee | None | ||
| Noddy | Sleep | Waddle Doo | Beam | ||
| Parasol | Parasol | Wheelie | Wheel |
Gallery
Kirby takes cover as a Shotzo gets parasol'd in.
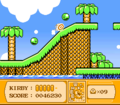
Wheel Kirby rills up the hillside towards a big pothole.
Kirby rolls into the chamber under the main path and busts the Bomb Block.
Kirby leaps towards a crowd of opponents in the cloud city.
Kirby stumbles into a side room with some Flamers.
Hi-Jump Kirby busts through a large checkered blockade of Star Blocks.

Kirby eyes the Maxim Tomato that Poppy Bros. Jr. is balancing on.


