|
|
| (48 intermediate revisions by 17 users not shown) |
| Line 1: |
Line 1: |
| {{Infobox-KAWorld | | {{Infobox-KAWorld |
| |image=[[File:TYogurtYard.png]] | | |image= |
| |caption=Kirby struggles up a steep hill to get a [[Maxim Tomato]].
| | <tabs> |
| | <tab name="Kirby’s Adventure"> |
| | [[File:KA Yogurt Yard intro screenshot.png]] |
| | </tab> |
| | <tab name="Kirby: Nightmare in Dream Land"> |
| | [[File:KNiDL Yogurt Yard opening screenshot.png]] |
| | </tab> |
| | </tabs> |
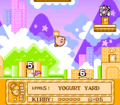
| | |caption=A portion of the opening cutscene for '''Yogurt Yard'''. |
| |levels=6 | | |levels=6 |
| |boss=[[Heavy Mole]] | | |boss=[[Heavy Mole]] |
| |arena=[[Bonkers]] ([[Hammer]]) | | |arena=[[Bonkers]] ([[Hammer]]) |
| |museum=[[Stone]] & [[Tornado]] | | |museum=[[Stone]] & [[Tornado]] |
| |minigames='''Kirby's Adventure''' | | |minigames='''''Kirby's Adventure''''' |
| <br/> | | Crane Fever Lvl. 1 |
| '''Kirby: Nightmare in Dream Land'''<br/> Bomb Rally Lvl. 1 | | <br>Crane Fever Lvl. 3 (Extra Game) |
| <br/> | | <br>Egg Catcher Lvl. 1 |
| <br/>Quick Draw Lvl. 1
| | <br>Egg Catcher Lvl. 3 (Extra Game) |
| <br/>Bomb Rally Lvl. 3 (Extra Mode)
| | <br>Quick Draw Lvl. 1 |
| <br/>Kirby's Air Grind Lvl. 1 | | <br>Quick Draw Lvl. 3 (Extra Game) |
| <br/>Kirby's Air Grind Lvl. 3 (Extra Mode) | | <br> |
| |secretswitches=Yes | | '''''Kirby: Nightmare in Dream Land'''''<br>Bomb Rally Lvl. 1 |
| | <br>Bomb Rally Lvl. 3 (Extra Game) |
| | <br>Kirby's Air Grind Lvl. 1 |
| | <br>Kirby's Air Grind Lvl. 3 (Extra Game) |
| | <br>Quick Draw Lvl. 1 |
| | <br>Quick Draw Lvl. 3 (Extra Game) |
| | |secretswitches={{Y}} (Stage 1, Stage 4, Stage 5, & Stage 6) |
| | |theme music= |
| | <tabs> |
| | <tab name="Kirby’s Adventure"> |
| | [[File:KA Yogurt Yard clip.mp3]] |
| | </tab> |
| | <tab name="Kirby: Nightmare in Dream Land"> |
| | [[File:KNiDL Yogurt Yard Sample.oga]] |
| | </tab> |
| | </tabs> |
| | |theme title="[[Mountain Stage]]" |
| | |description=Clips of the Yogurt Yard stage theme. |
| |previousworld=[[Grape Garden]] | | |previousworld=[[Grape Garden]] |
| |nextworld=[[Orange Ocean]] | | |nextworld=[[Orange Ocean]] |
| }} | | }} |
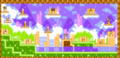
| '''Yogurt Yard''' is the fifth level of ''[[Kirby's Adventure]]'' and its remake, ''[[Kirby: Nightmare in Dream Land|Nightmare in Dream Land]]''. It features six stages, and the museum has the [[Stone]] and [[Tornado]] copy abilities. The mid-boss in the arena is [[Bonkers]], and the boss is [[Heavy Mole]]. | | '''Yogurt Yard''' is the fifth level of ''[[Kirby's Adventure]]'' and its remake, ''[[Kirby: Nightmare in Dream Land]]''. It features six stages, and the museum has the [[Stone]] and [[Tornado]] copy abilities. The mid-boss in the Arena is [[Bonkers]], and the boss is [[Heavy Mole]]. |
|
| |
|
| The cutscene: [[Kirby]] is seen climbing a steep hill, struggling to get a [[Maxim Tomato]]. He finally reaches the top and holds the tomato up triumphantly, only to have it roll out of his hand and down the other side of the hill. Kirby panics and runs after it, only to end up rolling down the hillside behind it. | | ==Intro cutscene== |
| | Before entering the hub for the first time, a brief cutscene plays adorned in a yellow frame with the level's name overhead in the scene. The opening cutscene shows [[Kirby]] climbing a steep hill, struggling to get a [[Maxim Tomato]]. He finally reaches the top and holds the tomato up triumphantly, only to have it roll out of his hand and down the other side of the hill. Kirby panics and runs after it, only to end up rolling down the hillside behind it. |
|
| |
|
| ==Stage 1== | | ==Overview== |
| [[File:Yogurt Yard NinDL Stage 1.jpg|thumb|right|250px|Kirby falls past various airborne enemies using [[Stone]] in Stage 1 (Nightmare in Dream Land).]]
| | Yogurt Yard is dominated by steep elevation changes, mountainous terrain, and extensive cave structures. Yogurt Yard's interior sections are notoriously cramped, forcing Kirby to contend with enemies in close quarters. Many of the more open areas are more deliberate in their design than previous levels, with Stage 6 in particular pitting Kirby against a multitude of enemies and hazards. In addition, the puzzles that Kirby must solve to access the [[Big Switch]]es become more challenging and esoteric than in previous levels. |
| Section 1: The stage begins on a walkway of clouds leading to the right. Pillars accentuate the cloud platforms in places, as [[Waddle Dee]]s float down on [[Parasol (enemy)|Parasols]], which then fly out of their hands and attempt to attack Kirby. Past an annoyingly placed [[Shotzo]] and [[Kabu]], the path continues across platforms of varying heights, more Shotzos and a [[Sword Knight]], along with a [[Cappy]] and [[Bomber]]. The door to the next section can be found at the far right, next to a Shotzo blocked off by a column.
| |
|
| |
|
| (A semi-secret door can be found in Section 1, if Kirby traverses the Shotzo clouds underneath the last big platform to find a semi-covered doorway behind a cloud. This leads to a side chamber containing two [[Rocky|Rockies]] and a [[1Up]]. Entering the door from this room leads directly to Section 2)
| | ===Hub=== |
| | The Yogurt Yard hub features a lot of verticality, with a canyon-like structure and pools of shallow water near the bottom. Stage doors vary greatly in elevation, with some secondary doors being very high up on elevated platforms. Pressing the Big Switch in Stage 1 opens up the first sub-game ([[Crane Fever]] in ''Kirby's Adventure'', [[Bomb Rally]] in ''Kirby: Nightmare in Dream Land''). Clearing Stage 1 grants access to the [[Museum]] which contains the [[Stone]] and [[Tornado]] abilities. Clearing Stage 3 opens up the second sub-game ([[Egg Catcher]] in ''Kirby's Adventure'', [[Kirby's Air Grind]] in ''Kirby: Nightmare in Dream Land''). Pressing the Big Switch in Stage 4 unlocks the [[Arena (Kirby's Adventure)|Arena]], which pits Kirby against [[Bonkers]]. Pressing the Big Switch in Stage 5 unlocks the third sub-game of [[Quick Draw]]. Finally, pressing the Big Switch in Stage 6 unlocks the [[Warp Star Station|warp room]]. |
|
| |
|
| Section 2: The door leads to an open area where Kirby immediately begins to fall downward. There is a cloud platform at the top if Kirby wishes to catch himself. Otherwise, the path leads straight down, past many falling enemies. The journey becomes significantly safer if Kirby has the [[Stone]] ability. Kirby will fall past many enemies, including [[Starman|Starmen]], [[Cool Spook]]s and [[Waddle Doo]]s with Parasols. Along the way, an [[Energy Drink]] will appear in mid-air and start to fall as well. If Kirby can reach the ground before it, he can grab it. At the bottom, the door to the next section can be found on a platform of [[Star Block]]s. This platform can be broken to reveal a lower section of Star Blocks. Behind a couple of these blocks is an alternate doorway. Entering this door leads to a side-chamber where a [[Big Switch]] can be found. Pressing this unlocks a Sub-Game in the Yogurt Yard hub.
| | The hub opens up to reveal a large mountainous fresco, with many different types of terrain in the midst. |
|
| |
|
| Section 3: The door leads to an open canyon area spanned by waterfalls and thin stone block platforms over a large abyss. To the right, upon these platforms are various enemies to get in the way as usual. From there, a large platform deck appears, patrolled by some [[Pengi]] and interlaced with jump-through platforms. The stage exit can then be found up a ramp that extends out of the abyss.
| | ===Stages=== |
| | | Each stage is unlocked in succession after clearing the previous one. Clearing Stage 7 is necessary to move on to [[Orange Ocean]]. For more information about a particular stage, click on the link to the stage's page in the table. |
| ===Enemies, Mid-Bosses, and Abilities===
| | {| class="sortable wikitable" border=1 cellpadding=2 |
| {| style="border: 3px solid #E47575; {{round}};background: #F69D99" cellspacing="2" | | !class=unsortable|Stage |
| ! width="267px" | '''Regular Enemies''' | | !class=unsortable|Mid-Boss(es) |
| ! width="133px" | '''Mid-Bosses''' | | !class=unsortable|Big Switch? |
| |- bgcolor="E47575" | | !class=unsortable|Notes |
| | | | |- |
| {{col-begin}}
| | |{{center|[[File:KA Yogurt Yard Stage 1 screenshot 07.png|100px]]<br>'''[[Yogurt Yard - Stage 1|Stage 1]]'''}} |
| {{col-break|width=50%}} | | |{{N}} |
| *[[Cappy]]
| | |{{Y}} |
| *[[Chilly]]
| |
| *[[Cool Spook]]
| |
| *[[Parasol (enemy)|Parasol]]
| |
| *[[Pengi]]
| |
| *[[Shotzo]]
| |
| *[[Sword Knight]]
| |
| *[[Waddle Doo]]
| |
| {{col-break|width=50%}} | |
| *[[Bomber]]
| |
| *[[Bronto Burt]]
| |
| *[[Kabu]]
| |
| *[[Needlous]]
| |
| *[[Rocky]]
| |
| *[[Starman]]
| |
| *[[Waddle Dee]]
| |
| {{col-end}} | |
| | | | | |
| {{col-begin}}
| |
| *None.
| |
| {{col-end}}
| |
| |- | | |- |
| ! colspan="2" width="404px"| '''Abilities'''
| | |{{center|[[File:KNiDL Yogurt Yard Stage 2.png|100px]]<br>'''[[Yogurt Yard - Stage 2|Stage 2]]'''}} |
| |- bgcolor="#E47575"
| | |[[Bonkers]] |
| | colspan="2" |
| | |{{N}} |
| {{col-begin}}
| |
| {{col-break|width=50%}} | |
| *[[Beam]]
| |
| *[[Crash]]
| |
| *[[Light]]
| |
| *[[Needle]]
| |
| *[[Sword]]
| |
| {{col-break|width=50%}}
| |
| *[[Freeze]]
| |
| *[[Hi-Jump]]
| |
| *[[Ice]]
| |
| *[[Parasol (ability)|Parasol]]
| |
| *[[Stone]]
| |
| {{col-end}}
| |
| |}
| |
| | |
| ==Stage 2==
| |
| [[File:Yogurt Yard NinDL Stage 2.jpg|thumb|right|250px|Kirby hops past a couple of enemies in a blue wooden cavern in Stage 2 (Nightmare in Dream Land).]]
| |
| Section 1: The stage begins on a rocky hillside , with a ladder leading down into a grotto, where the door to the next section can be found.
| |
| | |
| Section 2: The door leads to a cave stretching off to the right. In this cave is a pool of water, with a soft platforms stretching over it. A [[Blade Knight]] guards this platform. From there, the path leads into the pool and through a narrow channel. A number of separate rooms with doorways in them can be seen above the channel, each containing a different item. The channel opens up to another pool, this one with no bottom, and then proceeds back onto land. Then another pool appears to dive into, this one leading up a shaft to another room above water, with a [[Bubbles]] bouncing about and the door to the next section within.
| |
| | |
| Section 3: The door leads to a wooden shaft spanned by a bridge of logs. [[Scarfy|Scarfies]] can be seen just to the left, and [[Bounder]]s/[[Gip]]s can be seen below the bridge. The door to the next section is just to the left, on the other side of the bridge, though Kirby should be careful, as [[Coconut]]s are hanging just above his field of view, ready to drop down on him.
| |
| | |
| Section 4: The door leads to a wooden cavern, where, to the left, a series of platforms can be traversed. From there, two doorways can be seen inside a separate chamber, and another door can be found at the left end of the cave. This leads to one of the rooms in Section 2, specifically, the one with the Shotzo inside. The door to the next section can be found just to the left from here.
| |
| | |
| Section 5: The door leads to a wooden passage that leads upward past a number of enemies. A doorway can be seen on the other side, and Kirby will need to loop around to get to it. Entering the door leads to the small chamber in Section 4, where the door to the next section can be found just to the right.
| |
| | |
| Section 6: The door leads to the outer canyon area, though Kirby is still stuck inside a grotto. If he goes back through the door he came in from, he will (somehow) reach the room in Section 2 with the 1Up in it. Otherwise, the door to the next section can be found just to the left and up a ladder.
| |
| | |
| Section 7: The door leads to a square room where [[Bonkers]] must be fought. Defeating and swallowing him yields the [[Hammer]] ability, and opens a doorway. Entering this door leads back to Section 3, though this time, in the bottom area under the bridge. The door can be found just to the right from here, past a couple more enemies. This door leads back to Section 6, but this time, outside of the grotto. A number of Waddle Dees can be seen patrolling the hill as the path goes to the left, over the hill. The stage exit can be found on a soft platform on the other side, though if Kirby looks down the left-hand pit, he will find another 1Up.
| |
| | |
| ===Enemies, Mid-Bosses, and Abilities===
| |
| {| style="border: 3px solid #E47575; {{round}};background: #F69D99" cellspacing="2"
| |
| ! width="267px" | '''Regular Enemies'''
| |
| ! width="133px" | '''Mid-Bosses'''
| |
| |- bgcolor="E47575"
| |
| | | | | |
| {{col-begin}}
| |
| {{col-break|width=50%}}
| |
| *[[Blipper]]
| |
| *[[Coconut]]
| |
| *[[Coner]]
| |
| *[[Flamer]]
| |
| *[[Kabu]]
| |
| *[[Scarfy]]
| |
| {{col-break|width=50%}}
| |
| *[[Blade Knight]]
| |
| *[[Bounder]]/[[Gip]]
| |
| *[[Bubbles]]
| |
| *[[Shotzo]]
| |
| *[[Sparky]]
| |
| *[[Waddle Dee]]
| |
| {{col-end}}
| |
| |
| |
| {{col-begin}}
| |
| *[[Bonkers]]
| |
| {{col-end}}
| |
| |- | | |- |
| ! colspan="2" width="404px"| '''Abilities'''
| | |{{center|[[File:KA Yogurt Yard Stage 3 screenshot 04.png|100px]]<br>'''[[Yogurt Yard - Stage 3|Stage 3]]'''}} |
| |- bgcolor="#E47575"
| | |{{N}} |
| | colspan="2" |
| | |{{N}} |
| {{col-begin}}
| |
| {{col-break|width=50%}} | |
| *[[Burning]]
| |
| *[[Spark]]
| |
| *[[Sword]]
| |
| {{col-break|width=50%}}
| |
| *[[Ball]]
| |
| *[[Hammer]]
| |
| {{col-end}}
| |
| |}
| |
| | |
| ==Stage 3==
| |
| [[File:Yogurt Yard NinDL Stage 3.jpg|thumb|right|250px|Kirby rides down some [[Hot Head]]s in a deep forest in Stage 3 (Nightmare in Dream Land).]] | |
| Section 1: The stage begins at the bottom of a cavernous pit, with a couple of soft platforms making steps upward. At one point, a deck appears with a [[Starman]] waiting on it. From there, Kirby can use Hi-Jump to continue his ascent, using lines of fluttering enemies as guides to where he should jump. Along the way, many Shotzos will attempt to rain down bullets, but Kirby must keep jumping. The door to the next section is at the top of the shaft.
| |
| | |
| Section 2: The door leads to another thinner vertical shaft, this time with a strong upward wind current. Bounders/Gips are stuck in the walls, and will not hinder Kirby's progress. The door to the next section can be found at the top of the shaft, leading out of a volcanic-like cone.
| |
| | |
| Section 3: The door leads to a wooded area, as Kirby exits what resembles a crude hut made of logs. The path continues to the right across the forest floor, past a number of pits and obstructions. [[Wheelie]]s can be found here, which grant the [[Wheel]] ability when swallowed. This will allow Kirby to safely speed through this section, past more Wheelies and other baddies. This eventually leads to a large pit sparsed with platforms, each holding a distinct baddie. Using Wheel, Kirby can plow through all of them. Then, past a horde of Hot Heads, Poppy Bros. Jr. and a very rude spike pit, the door to the next section can be reached.
| |
| | |
| Section 4: The door leads to a canyon area, as sloped terrain extends to the right. Here, Kirby will have to run or ride across a pocked bridge of Star Blocks as [[Laser Ball]]s and a Shotzo hound him. The door to the next section can be found just to the right from there, past another Hot Head.
| |
| | |
| (A hidden doorway can be found in Section 4 which leads to a separate chamber containing a [[Maxim Tomato]] and a [[1Up]].)
| |
| | |
| Section 5: The door leads to a cavernous region where Kirby is immediately greeted by a [[Parasol Waddle Dee]]. Using the Parasol, Kirby might find it safer descending the pit below, which is lined with spikes in various places. At the bottom, an Energy Drink and the stage exit can be found.
| |
| | |
| ===Enemies, Mid-Bosses, and Abilities===
| |
| {| style="border: 3px solid #E47575; {{round}};background: #F69D99" cellspacing="2"
| |
| ! width="267px" | '''Regular Enemies'''
| |
| ! width="133px" | '''Mid-Bosses'''
| |
| |- bgcolor="E47575"
| |
| | | | | |
| {{col-begin}}
| |
| {{col-break|width=50%}}
| |
| *[[Laser Ball]]
| |
| *[[Parasol (enemy)|Parasol]]
| |
| *[[Shotzo]]
| |
| *[[Sparky]]
| |
| *[[Sword Knight]]
| |
| *[[Twizzy]]
| |
| *[[Waddle Dee]]
| |
| {{col-break|width=50%}}
| |
| *[[Bounder]]/[[Gip]]
| |
| *[[Hot Head]]
| |
| *[[Poppy Bros. Jr.]]
| |
| *[[Rocky]]
| |
| *[[Scarfy]]
| |
| *[[Starman]]
| |
| *[[Wheelie]]
| |
| {{col-end}}
| |
| |
| |
| {{col-begin}}
| |
| *None.
| |
| {{col-end}}
| |
| |- | | |- |
| ! colspan="2" width="404px"| '''Abilities'''
| | |{{center|[[File:KNiDL Yogurt Yard Stage 4.png|100px]]<br>'''[[Yogurt Yard - Stage 4|Stage 4]]'''}} |
| |- bgcolor="#E47575"
| | |[[Meta-Knights]] |
| | colspan="2" |
| | |{{Y}} |
| {{col-begin}} | |
| {{col-break|width=50%}}
| |
| *[[Fire]]
| |
| *[[Hi-Jump]]
| |
| *[[Laser]]
| |
| *[[Wheel]]
| |
| {{col-break|width=50%}}
| |
| *[[Parasol (ability)|Parasol]]
| |
| *[[Spark]]
| |
| *[[Stone]]
| |
| *[[Sword]]
| |
| {{col-end}}
| |
| |}
| |
| | |
| ==Stage 4==
| |
| [[File:Yogurt Yard NinDL Stage 4.jpg|thumb|right|250px|Kirby whips a [[Waddle Dee]] using [[Beam]] in Stage 4 (Nightmare in Dream Land).]] | |
| Section 1: The stage begins in a grassy cave which extends to the right. Star Blocks litter this path, but a local [[Flamer]] may help clear the way if it's willing to lend Kirby its [[Burning]] ability. From there, the path opens to a large spike pit, past which a Poppy Bro. Jr. lies in ambush. From there, it's a trek past many more spiked chambers, including a split hall with another on the bottom path. Using Burning might make it easier to move past these pits, one of which contains a 1Up. From there, past a [[Sparky]] and one more spike pit is the door to the next section.
| |
| | |
| Section 2: The door leads to an open arena consisting of a floor and three soft platform decks. The [[Meta-Knights]] ambush Kirby here, and must be defeated to open the door to the next section.
| |
| | |
| Section 3: The door leads to an open canyon area where a Bubbles can be seen bounding around. The path continues to the right, past pits, platforms and waterfalls. Various aquatic creatures can be seen guarding some of the platforms, in addition to the usual fare. After a particularly long pit sparsed with Waddle Dees and Doos, a ladder leads up to a grotto containing a water current channel. The door to the next section can be found inside this current.
| |
| | |
| (A secret door can be found in one of the waterfall pits in Section 3. This leads to an underground chamber containing Sparkies and a few collectibles. Two doors are found here. The lower one leads to a room with a Big Switch in it. Pressing this switch unlocks the Arena in the Yogurt Yard hub. The upper door leads into Section 5.)
| |
| | |
| Section 4: The door leads to a cavern shaft which Kirby immediately falls down. This leads to a wide underwater channel with a current toward the left. Spikes adorn the ceiling and floor pretty much everywhere, though an Energy Drink can be found on a soft platform in the water. Past a couple of [[Gordo]]s, the door to the next section can be reached.
| |
| | |
| Section 5: The door leads to a long drop with a waterfall. Bounders/Gips occupy walls on both sides of the pit as Kirby must descend past them. After a lengthy fall past many enemies, the stage exit can be found at the bottom just off the pool.
| |
| | |
| ===Enemies, Mid-Bosses, and Abilities===
| |
| {| style="border: 3px solid #E47575; {{round}};background: #F69D99" cellspacing="2"
| |
| ! width="267px" | '''Regular Enemies'''
| |
| ! width="133px" | '''Mid-Bosses'''
| |
| |- bgcolor="E47575"
| |
| | | | | |
| {{col-begin}}
| |
| {{col-break|width=50%}}
| |
| *[[Blade Knight]]
| |
| *[[Blipper]]
| |
| *[[Bounder]]/[[Gip]]
| |
| *[[Bubbles]]
| |
| *[[Poppy Bros. Jr.]]
| |
| *[[Squishy]]
| |
| {{col-break|width=50%}}
| |
| *[[Flamer]]
| |
| *[[Glunk]]
| |
| *[[Gordo]]
| |
| *[[Sparky]]
| |
| *[[Waddle Dee]]
| |
| *[[Waddle Doo]]
| |
| {{col-end}}
| |
| |
| |
| {{col-begin}}
| |
| *[[Meta-Knights]]
| |
| {{col-end}}
| |
| |- | | |- |
| ! colspan="2" width="404px"| '''Abilities'''
| | |{{center|[[File:KA Yogurt Yard Stage 5 screenshot 06.png|100px]]<br>'''[[Yogurt Yard - Stage 5|Stage 5]]'''}} |
| |- bgcolor="#E47575"
| | |[[Fire Lion]] |
| | colspan="2" |
| | |{{Y}} |
| {{col-begin}}
| |
| {{col-break|width=50%}} | |
| *[[Burning]]
| |
| *[[Spark]]
| |
| *[[Sword]]
| |
| {{col-break|width=50%}}
| |
| *[[Ball]]
| |
| *[[Beam]]
| |
| {{col-end}}
| |
| |}
| |
| | |
| ==Stage 5==
| |
| [[File:Yogurt Yard NinDL Stage 5.jpg|thumb|right|250px|Kirby observes the castle he is about to enter in Stage 5 (Nightmare in Dream Land).]] | |
| Section 1: The stage begins in a forest area, as the path continues to the right up a log stairway. Shotzos adorn the stairway, always making things difficult, as Waddle Dees jump down from some platforms above. From there, the path breaks up into disconnected sections above a bottomless pit. Just above this pit is a door that leads to a side chamber with a Fuse [[Cannon]] inside. If Kirby can use the abilities presented to him properly and fire out of the cannon, he will reach a separate chamber with a Big Switch. Pressing it opens a Sub-Game in the Yogurt Yard hub. From there, the path continues back in the main section to the right, past more broken platforms, [[Parasol Waddle Dee]]s and [[Sir Kibble]]s until the door to the next section can be found at the bottom-right. A Maxim Tomato resides under the platform the door is on. Getting it is simply a matter of squeezing through a hole in the floor.
| |
| | |
| Section 2: The door leads to another part of the forest walkway, though a [[Warp Star]] is available immediately to the right. Jumping on it will take Kirby through a previously unseen part of the walkway, then off into a separate area, landing at the foot of a strange-looking castle. The door to the next section leads into the front tower.
| |
| | |
| Section 3: The door leads into a castle hall, where a couple of enemies try to attack Kirby. The path continues to the right past a thin hallway, and dumps Kirby into a room where he must fight [[Fire Lion]]. Defeating and swallowing it yields the [[Burning]] ability. A doorway can then be found on the other side of the hall. This leads back into Section 2, outside the castle, now on the other side. The door to the next section is just to the right from here, in a small gatehouse.
| |
| | |
| Section 4: The door leads back into the forest area, with a path leading to the right past a Laser Ball and other enemies, occupying floating logs. From there, a Flamer guards the stage exit.
| |
| | |
| ===Enemies, Mid-Bosses, and Abilities===
| |
| {| style="border: 3px solid #E47575; {{round}};background: #F69D99" cellspacing="2"
| |
| ! width="267px" | '''Regular Enemies'''
| |
| ! width="133px" | '''Mid-Bosses'''
| |
| |- bgcolor="E47575"
| |
| |
| |
| {{col-begin}}
| |
| {{col-break|width=50%}}
| |
| *[[Laser Ball]]
| |
| *[[Parasol (enemy)|Parasol]]
| |
| *[[Poppy Bros. Jr.]]
| |
| *[[Sir Kibble]]
| |
| *[[Starman]]
| |
| *[[Waddle Dee]]
| |
| {{col-break|width=50%}}
| |
| *[[Bounder]]/[[Gip]]
| |
| *[[Bronto Burt]]
| |
| *[[Flamer]]
| |
| *[[Hot Head]]
| |
| *[[Shotzo]]
| |
| *[[Sword Knight]]
| |
| {{col-end}} | |
| | | | | |
| {{col-begin}}
| |
| *[[Fire Lion]]
| |
| {{col-end}}
| |
| |- | | |- |
| ! colspan="2" width="404px"| '''Abilities'''
| | |{{center|[[File:KNiDL Yogurt Yard Stage 6.png|100px]]<br>'''[[Yogurt Yard - Stage 6|Stage 6]]'''}} |
| |- bgcolor="#E47575"
| | |{{N}} |
| | colspan="2" |
| | |{{Y}} |
| {{col-begin}}
| |
| {{col-break|width=50%}}
| |
| *[[Cutter]]
| |
| *[[Hi-Jump]]
| |
| *[[Laser]]
| |
| *[[Sword]]
| |
| {{col-break|width=50%}}
| |
| *[[Burning]]
| |
| *[[Fire]]
| |
| *[[Parasol (ability)|Parasol]]
| |
| {{col-end}} | |
| |} | |
| | |
| ==Stage 6==
| |
| [[File:Yogurt Yard NinDL Stage 6.jpg|thumb|right|250px|Kirby eats a [[Waddle Dee]] in Stage 6 (Nightmare in Dream Land).]] | |
| Section 1: The stage begins in a grotto underneath a grassy hillside. Above, a few tracks can be seen, one of which has a Wheelie riding on it. The path continues to the right, past several more tracks and Wheelies. One of the tracks has a Maxim Tomato on it. Kirby will need to be careful as he rides along the path, as it eventually slopes down into a bottomless pit. The door to the next section can be found at the end of the last suspended track.
| |
| | |
| Section 2: The door leads to a narrow cavern, with a bridge leading to a [[Bomb Block]] barrier to the right. If Kirby still has the [[Wheel]] ability, he can use it to ride through the Bomb Block and outpace its line, which would otherwise have dropped Rockies on him from above. From there, the cave opens up to a clearing, guarded by a Blade Knight. The door to the next section can be found across a wide pit further right.
| |
| | |
| Section 3: The door leads to a grassy walkway over a body of water. The path slopes down to the right as Waddle Dees appear to ambush Kirby. From there, the path gives way to a bottomless pool with a couple Blippers in it. A doorway appears on an outcropping in the middle of the pond, though venturing further right yields the stage exit proper. In the first doorway is an underwater chamber containing a metal block barricaded room leading to a Big Switch. The only real way to get through is to have brought the [[Hammer]] ability into the stage from elsewhere to bust it open. Activating the Big Switch opens up the Level Select door in the Yogurt Yard hub.
| |
| | |
| ===Enemies, Mid-Bosses, and Abilities===
| |
| {| style="border: 3px solid #E47575; {{round}};background: #F69D99" cellspacing="2"
| |
| ! width="267px" | '''Regular Enemies'''
| |
| ! width="133px" | '''Mid-Bosses'''
| |
| |- bgcolor="E47575"
| |
| | | | | |
| {{col-begin}}
| |
| {{col-break|width=50%}}
| |
| *[[Blade Knight]]
| |
| *[[Rocky]]
| |
| *[[Waddle Dee]]
| |
| {{col-break|width=50%}}
| |
| *[[Blipper]]
| |
| *[[Wheelie]]
| |
| {{col-end}}
| |
| |
| |
| {{col-begin}}
| |
| *None.
| |
| {{col-end}}
| |
| |- | | |- |
| ! colspan="2" width="404px"| '''Abilities'''
| | |{{center|[[File:KA Yogurt Yard Stage 7 screenshot 02.png|100px]]<br>'''[[Yogurt Yard - Stage 7|Stage 7]]'''}} |
| |- bgcolor="#E47575"
| | |{{N}} |
| | colspan="2" |
| | |{{N}} |
| {{col-begin}}
| | |Kirby fights the level boss, Heavy Mole. |
| {{col-break|width=50%}} | |
| *[[Sword]]
| |
| *[[Wheel]]
| |
| {{col-break|width=50%}} | |
| *[[Stone]]
| |
| {{col-end}} | |
| |} | | |} |
|
| |
|
| ==Boss: Heavy Mole== | | ==Gallery== |
| [[File:Yogurt Yard NinDL Boss.jpg|thumb|right|250px|Kirby chases after [[Heavy Mole]] (Nightmare in Dream Land).]]
| | <gallery> |
| The fight begins immediately after Kirby enters the boss door, as Kirby faces off against [[Heavy Mole]] inside a cavern. As the fight progresses, Heavy Mole digs through the walls ahead and Kirby must give chase. Kirby has to be careful not to fall behind, as he will be crushed by the scrolling screen, or he could fall through the bottom of the screen if it is exposed. In the mean-time, Heavy Mole will fire missiles at Kirby, which he can inhale and spit back, or swallow to varying effect. Should Kirby decide to swallow, he ought to avoid swallowing the red missiles, as they will put him to sleep. The yellow missiles, on the other hand, will grant the [[Hammer]] ability, which will allow Kirby to dig through the cave on his own should he need to.
| | KA Yogurt Yard level hub.png|Map of the level hub for Yogurt Yard in ''Kirby's Adventure'' |
| | KNiDL Yogurt Yard level hub.png|Map of the level hub for Yogurt Yard in ''Kirby: Nightmare in Dream Land'' |
| | KA Yogurt Yard level hub screenshot.png|A portion of the Yogurt Yard level hub |
| | TLODL Artwork 4.png|Artwork used for The Landscape of Dreamland merchandise series |
| | Kirby Cafe Yogurt yard drink.jpg|The "Yogurt yard drink" [[Kirby Café]] drink |
| | </gallery> |
|
| |
|
| Upon defeat, Heavy Mole explodes, and Kirby is then transported to a separate cavern room where he collects the [[Star Rod]] piece.
| | ==Names in other languages== |
| | | {{Names |
| {{NinDL}}
| | |ja=YOGURT YARD<br>ヨーグルトヤード |
| | |jaR=Yōguruto Yādo |
| | |jaM=Yogurt Yard |
| | |fr=Jardin du Raisin (''[[Kirby's Adventure]]'')<br>Cour Yaourt (''[[Kirby: Nightmare in Dream Land]]'') |
| | |frM=Grape Garden <small>(Not to be confused with the [[Grape Garden|previous level]])</small><br>Yogurt Yard |
| | |de=Götterspeisental (''[[Kirby's Adventure]]'')<br>Kekskaverne (''[[Kirby: Nightmare in Dream Land]]'') |
| | |deM=Jelly Valley<br>Cookie Cavern |
| | |it=Monte Yogurt |
| | |itM=Yogurt Mountain |
| | |es=Pradera del Yogur |
| | |esM=Yogurt Prairie |
| | }} |
|
| |
|
| [[Category:Dream Land locations]]
| | {{clear}} |
| [[Category:Levels in Kirby's Adventure]]
| | {{Navbox-KA/KNiDL}} |
| [[Category:Levels in Kirby: Nightmare in Dream Land]] | | [[Category:Popstar locations]] |