Yogurt Yard - Stage 4: Difference between revisions
Pinkyoshifan (talk | contribs) m (Text replacement - "(<tab name=".*)'(.*">)" to "$1’$2") |
|||
| (11 intermediate revisions by 6 users not shown) | |||
| Line 1: | Line 1: | ||
{{Infobox-KAStage | {{Infobox-KAStage | ||
|image=[[File:Yogurt Yard | |image=[[File:KNiDL Yogurt Yard Stage 4.png]] | ||
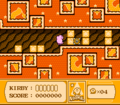
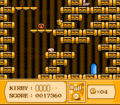
|caption=Kirby whips a [[Waddle Dee]] using [[Beam]]. (''Kirby: Nightmare in Dream Land'') | |caption=Kirby whips a [[Waddle Dee]] using [[Beam]]. (''Kirby: Nightmare in Dream Land'') | ||
|level=[[Yogurt Yard]] | |level=[[Yogurt Yard]] | ||
|midboss=[[Meta-Knights]] | |midboss=[[Meta-Knights]] | ||
|switch={{Y}} | |switch={{Y}} | ||
|theme music= | |||
<tabs> | |||
<tab name="Kirby’s Adventure"> | |||
[[File:KA Yogurt Yard clip.mp3]] | |||
</tab> | |||
<tab name="Kirby: Nightmare in Dream Land"> | |||
[[File:KNiDL Yogurt Yard Sample.oga]] | |||
</tab> | |||
</tabs> | |||
|theme title="[[Mountain Stage]]" | |||
|description=Clips of the music that plays in Yogurt Yard - Stage 4 | |||
|previousstage=[[Yogurt Yard - Stage 3]] | |previousstage=[[Yogurt Yard - Stage 3]] | ||
|nextstage=[[Yogurt Yard - Stage 5]] | |nextstage=[[Yogurt Yard - Stage 5]] | ||
| Line 12: | Line 22: | ||
== Overview == | == Overview == | ||
This stage consists of five main | This stage consists of five main rooms. The first takes place in a long tunnel lined with spikes. Kirby can traverse this more easily using [[Burning]]. | ||
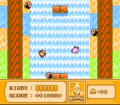
In the | In the second room, the [[Meta-Knights]] ambush Kirby on decks. | ||
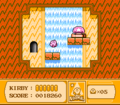
The | The third room is an outside affair, as Kirby must make his way past tall cliffs and waterfalls. A secret passageway can be found along the way which leads to a separate series of rooms, one of which contains a [[Big Switch]] (taking this secret route also skips the fourth room). | ||
Kirby is taken to a long and winding underground river full of spikes and [[Gordo]]s. He will need to swim through carefully. | In the fourth room, Kirby is taken to a long and winding underground river full of spikes and [[Gordo]]s. He will need to swim through carefully. | ||
In the last | In the last room, Kirby must fall down a long waterfall past many enemies. Here, he can make good use of his [[Dive Attack]] to get safely to the stage exit. | ||
==Enemies and Mid-Bosses== | ==Enemies and Mid-Bosses== | ||
| Line 27: | Line 37: | ||
<tab name="Enemies"> | <tab name="Enemies"> | ||
{| class="wikitable" | {| class="wikitable" | ||
!Sprite ('' | !Sprite (''KA''/''KNiDL'') | ||
!Name | !Name | ||
!style="border-style: solid; border-width: 1px 3px 1px 1px"|Copy Ability | !style="border-style: solid; border-width: 1px 3px 1px 1px"|Copy Ability | ||
!Sprite ('' | !Sprite (''KA''/''KNiDL'') | ||
!Name | !Name | ||
!Copy Ability | !Copy Ability | ||
|- | |- | ||
|align=center|[[File:KA Blade Knight sprite.png]] [[File: | |align=center|[[File:KA Blade Knight sprite.png]] [[File:KNiDL Blade Knight sprite.png]] | ||
|[[Blade Knight]] | |[[Blade Knight]] | ||
|style="border-style: solid; border-width: 1px 3px 1px 1px"|[[Sword]] | |style="border-style: solid; border-width: 1px 3px 1px 1px"|[[Sword]] | ||
|align=center|[[File:KA Gordo sprite.png]] [[File: | |align=center|[[File:KA Gordo sprite.png]] [[File:KNiDL Gordo sprite.png]] | ||
|[[Gordo]] | |[[Gordo]] | ||
|N/A | |N/A | ||
|- | |- | ||
|align=center|[[File:KA Blipper sprite.png]] [[File: | |align=center|[[File:KA Blipper sprite.png]] [[File:KNiDL Blipper sprite.png]] | ||
|[[Blipper]] | |[[Blipper]] | ||
|style="border-style: solid; border-width: 1px 3px 1px 1px"|None | |style="border-style: solid; border-width: 1px 3px 1px 1px"|None | ||
|align=center|[[File:KA Poppy Bros Jr sprite.png]] [[File: | |align=center|[[File:KA Poppy Bros Jr sprite.png]] [[File:KNiDL Poppy Bros Jr sprite.png]] | ||
|[[Poppy Bros. Jr.]] | |[[Poppy Bros. Jr.]] | ||
|None | |None | ||
|- | |- | ||
|align=center|[[File:KA Bounder sprite.png]] [[File: | |align=center|[[File:KA Bounder sprite.png]] [[File:KNiDL Gip sprite.png]] | ||
|[[Bounder]]/[[Gip]] | |[[Bounder]]/[[Gip]] | ||
|style="border-style: solid; border-width: 1px 3px 1px 1px"|None | |style="border-style: solid; border-width: 1px 3px 1px 1px"|None | ||
|align=center|[[File:KA Sparky sprite.png]] [[File: | |align=center|[[File:KA Sparky sprite.png]] [[File:KNiDL Sparky sprite.png]] | ||
|[[Sparky]] | |[[Sparky]] | ||
|[[Spark]] | |[[Spark]] | ||
|- | |- | ||
|align=center|[[File:KA Bubbles sprite.png]] [[File: | |align=center|[[File:KA Bubbles sprite.png]] [[File:KNiDL Bubbles sprite.png]] | ||
|[[Bubbles]] | |[[Bubbles]] | ||
|style="border-style: solid; border-width: 1px 3px 1px 1px"|[[Ball]] | |style="border-style: solid; border-width: 1px 3px 1px 1px"|[[Ball]] | ||
|align=center|[[File:KA Squishy sprite.png]] [[File: | |align=center|[[File:KA Squishy sprite.png]] [[File:KNiDL Squishy sprite.png]] | ||
|[[Squishy]] | |[[Squishy]] | ||
|None | |None | ||
|- | |- | ||
|align=center|[[File:KA Flamer sprite.png]] [[File: | |align=center|[[File:KA Flamer sprite.png]] [[File:KNiDL Flamer sprite.png]] | ||
|[[Flamer]] | |[[Flamer]] | ||
|style="border-style: solid; border-width: 1px 3px 1px 1px"|[[Burning|FireBall/Burning]] | |style="border-style: solid; border-width: 1px 3px 1px 1px"|[[Burning|FireBall/Burning]] | ||
| Line 69: | Line 79: | ||
|None | |None | ||
|- | |- | ||
|align=center|[[File:KA Glunk sprite.png]] [[File: | |align=center|[[File:KA Glunk sprite.png]] [[File:KNiDL Glunk sprite.png]] | ||
|[[Glunk]] | |[[Glunk]] | ||
|style="border-style: solid; border-width: 1px 3px 1px 1px"|None | |style="border-style: solid; border-width: 1px 3px 1px 1px"|None | ||
|align=center|[[File:KA Waddle Doo sprite.png]] [[File: | |align=center|[[File:KA Waddle Doo sprite.png]] [[File:KNiDL Waddle Doo sprite.png]] | ||
|[[Waddle Doo]] | |[[Waddle Doo]] | ||
|[[Beam]] | |[[Beam]] | ||
| Line 79: | Line 89: | ||
<tab name="Mid-Bosses"> | <tab name="Mid-Bosses"> | ||
{| class="wikitable" width=25% | {| class="wikitable" width=25% | ||
!Sprite ('' | !Sprite (''KA''/''KNiDL'') | ||
!Name | !Name | ||
!Copy Ability | !Copy Ability | ||
|- | |- | ||
|align=center|[[File:KA Axe Knight sprite.png]] [[File:Axe Knight | |align=center|[[File:KA Axe Knight sprite.png]] [[File:KNiDL Axe Knight sprite.png]]<br>[[File:KA Trident Knight sprite.png]] [[File:KNiDL Trident Knight sprite.png]] | ||
|[[Meta-Knights]] ([[Axe Knight]] and [[Trident Knight]]) | |[[Meta-Knights]] ([[Axe Knight]] and [[Trident Knight]]) | ||
|None | |None | ||
| Line 93: | Line 103: | ||
==Gallery== | ==Gallery== | ||
<gallery> | <gallery> | ||
KA Yogurt Yard Stage 4 screenshot 01.png|Kirby nabs a Flamer from behind some Star Blocks. | |||
KA Yogurt Yard Stage 4 screenshot 02.png|Kirby shoots across a spiky hall using FireBall. | |||
KA Yogurt Yard Stage 4 screenshot 03.png|Kirby tackles the Axe Knights on the decks. | |||
KA Yogurt Yard Stage 4 screenshot 04.png|Kirby bounces along the waterfall zone using Ball. | |||
KA Yogurt Yard Stage 4 screenshot 05.png|Kirby inches toward the Big Switch in the room ahead in a hidden cave. | |||
KA Yogurt Yard Stage 4 screenshot 06.png|Kirby leaps toward the Big Switch. | |||
KA Yogurt Yard Stage 4 screenshot 07.png|Kirby falls down the final waterfall. | |||
</gallery> | </gallery> | ||
| Line 100: | Line 115: | ||
{{Navbox-KA/KNiDL}} | {{Navbox-KA/KNiDL}} | ||
Latest revision as of 12:39, 21 April 2024
| ||||||||||||
| ||||||||||||
| ||||||||||||
|
| ||||||||||||

Yogurt Yard - Stage 4 is the fourth stage of Yogurt Yard, the fifth level of Kirby's Adventure and its remake, Kirby: Nightmare in Dream Land.
Overview[edit]
This stage consists of five main rooms. The first takes place in a long tunnel lined with spikes. Kirby can traverse this more easily using Burning.
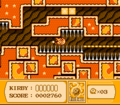
In the second room, the Meta-Knights ambush Kirby on decks.
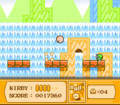
The third room is an outside affair, as Kirby must make his way past tall cliffs and waterfalls. A secret passageway can be found along the way which leads to a separate series of rooms, one of which contains a Big Switch (taking this secret route also skips the fourth room).
In the fourth room, Kirby is taken to a long and winding underground river full of spikes and Gordos. He will need to swim through carefully.
In the last room, Kirby must fall down a long waterfall past many enemies. Here, he can make good use of his Dive Attack to get safely to the stage exit.
Enemies and Mid-Bosses[edit]
|
Gallery[edit]
Kirby nabs a Flamer from behind some Star Blocks.
Kirby shoots across a spiky hall using FireBall.
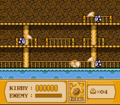
Kirby tackles the Axe Knights on the decks.
Kirby bounces along the waterfall zone using Ball.
Kirby inches toward the Big Switch in the room ahead in a hidden cave.
Kirby leaps toward the Big Switch.
Kirby falls down the final waterfall.


