Please remember that WiKirby contains spoilers, which you read at your own risk! See our general disclaimer for details.

Mustard Mountain - Boss

From WiKirby, your independent source of Kirby knowledge.
Revision as of 12:51, 26 January 2024 by Gigi (talk | contribs) (Kracko is also the only boss that appeared in AM and DL. And also the only boss that appeared in AM and KSS. Oh and also the only boss that appeared in AM and DL2! But really, Kracko is the only returning boss in AM, but that can be mentioned in Kracko's page instead)
(diff) ← Older revision | Latest revision (diff) | Newer revision → (diff)
Jump to navigationJump to search
Mustard Mountain - Boss
K&TAM Kracko.png
Kirby and Green Kirby engage Kracko while Red Kirby catches up in the Boss room.
Details
Host area Mustard Mountain
Linked from Room 14
Links to Rainbow Route - Central Circle
Treasure Chest(s) No
Boss Kracko
Theme music

Clip of "Boss Battle Theme" from Kirby & The Amazing Mirror

 This box: view  talk  edit 

Mustard Mountain - Boss is a room in Mustard Mountain, the fourth area of Kirby & The Amazing Mirror.

Links[edit]

This room is reachable from Room 14. Once Kracko is defeated, Kirby returns to Rainbow Route - Central Circle after completing his dance.

Overview[edit]

Main article: Kracko

The layout of the room begins with Kirby at the base of a series of irregular floating steps which lead upward. From there, Kirby steps onto a flat walkway which he cannot jump back down from. Once here, Kracko appears from up in the sky, transforming immediately from his junior form.

Kracko has a number of different attacks, most of which are recycled from Kirby: Nightmare in Dream Land. These attacks are as follows:

  • Kracko conjures an enemy to attack Kirby. This could be a Waddle Doo, a Flamer, or a Twister.
  • Kracko swoops the stage.
  • Kracko zaps the platform with lightning as he travels horizontally across it.
  • Kracko shoots a beam whip around himself.
  • Kracko releases a small rainstorm in a target location.

Once Kracko is defeated, Kirby and his buddies may collect the next Mirror Shard in peace and then return to Rainbow Route.


Mustard Mountain Area Map
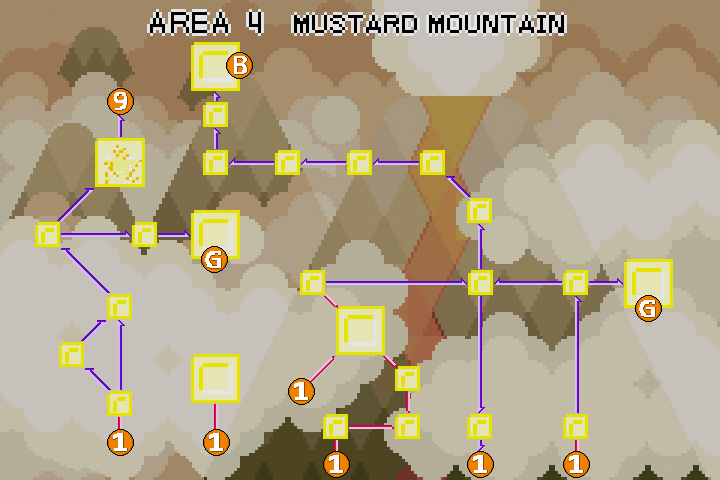
Mustard Mountain - HubMustard Mountain - Room 1Mustard Mountain - Room 2Mustard Mountain - Room 3Mustard Mountain - Room 4Mustard Mountain - Room 5Mustard Mountain - Room 6Mustard Mountain - Room 7Mustard Mountain - Room 8Mustard Mountain - Room 9Mustard Mountain - Room 10Mustard Mountain - Room 11Mustard Mountain - Room 12Mustard Mountain - Room 13Mustard Mountain - Room 14Mustard Mountain - Room 15Mustard Mountain - Room 16Mustard Mountain - Room 17Mustard Mountain - Room 18Mustard Mountain - Room 19Mustard Mountain - ChestMustard Mountain - WarpMustard Mountain - Goal 1Mustard Mountain - Goal 2Rainbow Route - Room 34Rainbow Route - Room 34Rainbow Route - Hub 4Rainbow Route - Room 36Rainbow Route - Room 40Rainbow Route - Room 41Candy Constellation - Room 6Mustard Mountain - BossMustard Mountain Map.jpg
You are here
Click on any room