Olive Ocean: Difference between revisions
m (Text replacement - "Kirby & the Amazing Mirror" to "Kirby & The Amazing Mirror") |
|||
| (36 intermediate revisions by 11 users not shown) | |||
| Line 1: | Line 1: | ||
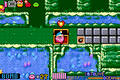
'''Olive Ocean''' is a water based area of the [[Mirror World]] in ''[[Kirby & The Amazing Mirror]]''. [[Kirby]] must navigate the treacherous waters to obtain the [[Mirror Shard]] from [[Gobbler]]. Olive Ocean is one of the | {{Infobox-K&tAMLevel | ||
|image= [[File:KaTAM Olive Ocean Room 19.png]] | |||
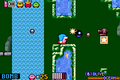
|caption= Kirby faces all of the sub-aquatic elements in '''Olive Ocean'''. | |||
|level= 6 | |||
|rooms= 29 | |||
|goal= 2 | |||
|connect= [[Moonlight Mansion]] <br> [[Cabbage Cavern]] | |||
|mid-boss= [[Bonkers]] <br> [[Boxy]] <br> [[Mr. Frosty]] | |||
|boss= [[Gobbler]] | |||
|theme music=[[File:KaTAM Deep Sea Area.mp3]] | |||
|theme title="[[Deep Sea Area]]" | |||
|description=Clip of the "Deep Sea Area" theme from ''[[Kirby & The Amazing Mirror]]'' | |||
|previous= [[Carrot Castle]] | |||
|next=[[Peppermint Palace]] | |||
}} | |||
{{Distinguish|the area in [[Kirby & The Amazing Mirror]]|[[Onion Ocean]]}} | |||
'''Olive Ocean''' is a [[Water (environment)|water]]-based area of the [[Mirror World]] in ''[[Kirby & The Amazing Mirror]]''. [[Kirby]] must navigate the treacherous waters to obtain the [[Mirror Shard]] from [[Gobbler]]. Olive Ocean is one of the more isolated areas in the Mirror World, and only has portals connecting it to [[Moonlight Mansion]] and [[Cabbage Cavern]]. | |||
The upper portions of the map consist of a brief surface level path that ends with a portal to a [[Goal Game]]. The rest of the journey through the area takes place below the surface. The majority of which is swimming, but an underground cavern system provides more | The upper portions of the map consist of a brief surface level path that ends with a portal to a [[Goal Game]]. The rest of the journey through the area takes place below the surface. The majority of which is swimming, but an underground cavern system provides more variety to the terrain. The area steps up the difficulty with its swimming theme, as [[Copy Abilities]] are difficult to maintain throughout all of the currents forcing contact with spikes, Gordos, hordes of Blippers, and the occasional open pit. | ||
==Treasure== | ==Treasure== | ||
As with each area, a map specific to the area can be found. Other treasures for the Collection Room include a [[Vitality | As with each area, a map specific to the area can be found. Other treasures for the Collection Room include a [[Vitality]], which increases the life meter of Kirby. The [[Spray Paint|Ocean Spray Paint]], which colors Kirby blue, and a [[Jukebox|Sound File]] can also be found. | ||
====Enemies, Bosses, and Abilities in Olive Ocean==== | ====Enemies, Bosses, and Abilities in Olive Ocean==== | ||
{| | {| width=60% | ||
!width=" | |<tabs> | ||
!width=" | <tab name="Enemies"> | ||
{| class="wikitable" | |||
!Image | |||
!Name | |||
!style="border-style: solid; border-width: 1px 3px 1px 1px"|Copy Ability | |||
!Image | |||
!Name | |||
!style="border-style: solid; border-width: 1px 3px 1px 1px"|Copy Ability | |||
!Image | |||
!Name | |||
!style="border-style: solid; border-width: 1px 3px 1px 1px"|Copy Ability | |||
!Image | |||
!Name | |||
!style="border-style: solid; border-width: 1px 3px 1px 1px"|Copy Ability | |||
!Image | |||
!Name | |||
!Copy Ability | |||
|- | |- | ||
| | |align=center|[[File:KaTAM Batty.png]] | ||
|[[Batty]] | |||
|style="border-style: solid; border-width: 1px 3px 1px 1px" align=center|None | |||
|align=center|[[File:KatAMFoley.png]] | |||
|[[Foley]] | |||
|style="border-style: solid; border-width: 1px 3px 1px 1px" align=center|[[Bomb]] | |||
|align=center|[[File:KatAMJack.png]] | |||
|[[Jack]] | |||
|style="border-style: solid; border-width: 1px 3px 1px 1px" align=center|None | |||
|align=center|[[File:KatAMPrank.png]] | |||
|[[Prank]] | |||
|style="border-style: solid; border-width: 1px 3px 1px 1px" align=center|None | |||
|align=center|[[File:KatAM Snooter.png]] | |||
|[[Snooter]] | |||
|align=center|None | |||
|- | |||
|align=center|[[File:KNiDL Blipper sprite.png]] | |||
|[[Blipper]] | |||
|style="border-style: solid; border-width: 1px 3px 1px 1px" align=center|None | |||
|align=center|[[File:KatAMGiantRocky.png]] | |||
|[[Giant Rocky]] | |||
|style="border-style: solid; border-width: 1px 3px 1px 1px" align=center|[[Stone]] | |||
|align=center|[[File:KaTAM Leap.png]] | |||
|[[Leap]] | |||
|style="border-style: solid; border-width: 1px 3px 1px 1px" align=center|None | |||
|align=center|[[File:KNiDL Rocky sprite.png]] | |||
|[[Rocky]] | |||
|style="border-style: solid; border-width: 1px 3px 1px 1px" align=center|[[Stone]] | |||
|align=center|[[File:KNiDL Sparky sprite.png]] | |||
|[[Sparky]] | |||
|align=center|[[Spark]] | |||
|- | |||
|align=center|[[File:KNiDL Bomber sprite.png]] | |||
|[[Bomber]] | |||
|style="border-style: solid; border-width: 1px 3px 1px 1px" align=center|[[Crash]] | |||
|align=center|[[File:KNiDL Glunk sprite.png]] | |||
|[[Glunk]] | |||
|style="border-style: solid; border-width: 1px 3px 1px 1px" align=center|None | |||
|align=center|[[File:KatAMMetalGuardian.png]] | |||
|[[Metal Guardian]] | |||
|style="border-style: solid; border-width: 1px 3px 1px 1px" align=center|[[Laser]] | |||
|align=center|[[File:KatAMRolyPoly.png]] | |||
|[[Roly-Poly]] | |||
|style="border-style: solid; border-width: 1px 3px 1px 1px" align=center|None | |||
|align=center|[[File:KNiDL Sword Knight sprite.png]] | |||
| | |[[Sword Knight]] | ||
|align=center|[[Sword]] | |||
< | |- | ||
|align=center|[[File:KNiDL Bronto Burt sprite.png]] | |||
|[[Bronto Burt]] | |||
|style="border-style: solid; border-width: 1px 3px 1px 1px" align=center|None | |||
|align=center|[[File:KatAMGolemGray.png]] | |||
|[[Golem]] | |||
|style="border-style: solid; border-width: 1px 3px 1px 1px" align=center|[[Stone]] or [[Fighter]] | |||
|align=center|[[File:KatAMMinny.png]] | |||
|[[Minny]] | |||
|style="border-style: solid; border-width: 1px 3px 1px 1px" align=center|[[Mini]] | |||
|align=center|[[File:KNiDL Scarfy sprite.png]] | |||
|[[Scarfy]] | |||
|style="border-style: solid; border-width: 1px 3px 1px 1px" align=center|N/A | |||
|align=center|[[File:KNiDL UFO enemy sprite.png]] | |||
|[[UFO (enemy)|UFO]] | |||
|align=center|[[UFO]] | |||
|- | |||
|align=center|[[File:KatAMChip.png]] | |||
|[[Chip]] | |||
|style="border-style: solid; border-width: 1px 3px 1px 1px" align=center|None | |||
|align=center|[[File:KNiDL Gordo sprite.png]] | |||
|[[Gordo]] | |||
|style="border-style: solid; border-width: 1px 3px 1px 1px" align=center|N/A | |||
|align=center|[[File:KatAMMirra.png]] | |||
|[[Mirra]] | |||
|style="border-style: solid; border-width: 1px 3px 1px 1px" align=center|N/A | |||
|align=center|[[File:KatAMShooty.png]] | |||
|[[Shooty]] | |||
|style="border-style: solid; border-width: 1px 3px 1px 1px" align=center|None | |||
|align=center|[[File:KNiDL Waddle Dee sprite.png]] | |||
|[[Waddle Dee]] | |||
|align=center|None | |||
|- | |||
|align=center|[[File:KaTAM Cookin.png]] | |||
|[[Cookin]] | |||
|style="border-style: solid; border-width: 1px 3px 1px 1px" align=center|[[Cook]] | |||
|align=center|[[File:KatAMHaley.png]] | |||
|[[Haley]] | |||
|style="border-style: solid; border-width: 1px 3px 1px 1px" align=center|None | |||
|align=center|[[File:KNiDL Parasol enemy sprite.png]] | |||
|[[Parasol (enemy)|Parasol]] | |||
|style="border-style: solid; border-width: 1px 3px 1px 1px" align=center|[[Parasol]] | |||
|align=center|[[File:KNiDL Shotzo sprite.png]] | |||
|[[Shotzo]] | |||
|style="border-style: solid; border-width: 1px 3px 1px 1px" align=center|N/A | |||
|align=center|[[File:KNiDL Waddle Doo sprite.png]] | |||
|[[Waddle Doo]] | |||
|align=center|[[Beam]] | |||
|- | |||
|align=center|[[File:KaTAM Droppy.png]] | |||
|[[Droppy]] | |||
|style="border-style: solid; border-width: 1px 3px 1px 1px" align=center|None (default) | |||
|align=center|[[File:KatAMHeavyKnight.png]] | |||
|[[Heavy Knight]] | |||
|style="border-style: solid; border-width: 1px 3px 1px 1px" align=center|[[Sword]] | |||
|align=center|[[File:KNiDL Pengi sprite.png]] | |||
|[[Pengy]] | |||
|style="border-style: solid; border-width: 1px 3px 1px 1px" align=center|[[Ice]] | |||
|align=center|[[File:KNiDL Sir Kibble sprite.png]] | |||
|[[Sir Kibble]] | |||
|style="border-style: solid; border-width: 1px 3px 1px 1px" align=center|[[Cutter]] | |||
|align=center|[[File:KNiDL Wheelie sprite.png]] | |||
|[[Wheelie]] | |||
|align=center|[[Wheel]] | |||
|- | |||
|align=center|[[File:KNiDL Flamer sprite.png]] | |||
|[[Flamer]] | |||
|style="border-style: solid; border-width: 1px 3px 1px 1px" align=center|[[Burning]] | |||
|align=center|[[File:KNiDL Hot Head sprite.png]] | |||
|[[Hot Head]] | |||
|style="border-style: solid; border-width: 1px 3px 1px 1px" align=center|[[Fire]] | |||
!colspan=9| | |||
|} | |||
</tab> | |||
<tab name="Mid-Bosses"> | |||
{| class="wikitable" | |||
!Sprite | |||
!Name | |||
!Copy Ability | |||
|- | |||
|align=center|[[File:KNiDL Bonkers sprite.png]] | |||
|[[Bonkers]] | |||
|[[Hammer]] | |||
|- | |||
|align=center|[[File:KatAMBoxy.png]] | |||
|[[Boxy]] | |||
|[[Magic]] | |||
|- | |||
|align=center|[[File:KNiDL Mr Frosty sprite.png]] | |||
|[[Mr. Frosty]] | |||
|[[Ice]] | |||
|} | |} | ||
</tab> | |||
{| | <tab name="Boss"> | ||
! | {| class="wikitable" | ||
!Sprite | |||
!Name | |||
!Copy Ability | |||
|- | |- | ||
| | |align=center|[[File:KatAMGobbler.png]] | ||
|[[Gobbler]] | |||
|[[Sword]] (shark minions) | |||
|} | |||
</tab> | |||
</tabs> | |||
|} | |} | ||
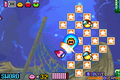
==Map== | ==Map== | ||
{{ | {{Navmap-KaTAM-OO}} | ||
Olive Ocean consists primarily of two areas, one significantly larger than the other. The smaller area to the upper left is a coastline area, while the rest of the map is mostly underwater, consisting of numerous tunnels and swimming challenges. Overall, there are 23 normal rooms, one Hub, two Chest rooms (one of which has the area map), two Goal rooms, and a Boss encounter with [[Gobbler]]. | Olive Ocean consists primarily of two areas, one significantly larger than the other. The smaller area to the upper left is a coastline area, while the rest of the map is mostly underwater, consisting of numerous tunnels and swimming challenges. Overall, there are 23 normal rooms, one Hub, two Chest rooms (one of which has the area map), two Goal rooms, and a Boss encounter with [[Gobbler]]. | ||
There are few areas that connect to Olive Ocean, with only one initially accessible from the outside, that being the entrance to the upper-left from [[Cabbage Cavern]]. Aside from the Hub connection that can be made, the only other entrance is via the gate to [[Moonlight Mansion]] on the upper right, though that also needs to be opened on the Olive Ocean side. | There are few areas that connect to Olive Ocean, with only one initially accessible from the outside, that being the entrance to the upper-left from [[Cabbage Cavern]]. Aside from the Hub connection that can be made, the only other entrance is via the gate to [[Moonlight Mansion]] on the upper right, though that also needs to be opened on the Olive Ocean side. | ||
Olive Ocean has two Goal rooms. Completing the Goal Game in each room will take Kirby and any friends with him back to the [[Rainbow Route - | Olive Ocean has two Goal rooms. Completing the Goal Game in each room will take Kirby and any friends with him back to the [[Rainbow Route - Central Circle|Central Circle]] in [[Rainbow Route]]. | ||
For a full synopsis of what's in each room, click on any room on the map to head to the corresponding page. | For a full synopsis of what's in each room, click on any room on the map to head to the corresponding page. | ||
==Gallery== | |||
<gallery> | |||
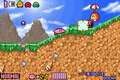
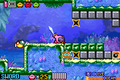
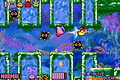
[[ | KaTAM Olive Ocean Room 4.png|Traversing the coastline | ||
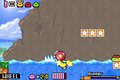
[[ | KaTAM Olive Ocean Goal 1.png|Riding on the water | ||
[[ | KaTAM Olive Ocean Room 7.png|Slipping through the caves | ||
KaTAM Olive Ocean Room 8.png|Passing chasms | |||
KaTAM Olive Ocean Room 10.png|Busting through underwater barricades | |||
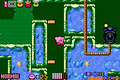
KaTAM Olive Ocean Room 11.png|Sliding past [[Gordo]]-filled tunnels | |||
KaTAM Olive Ocean Room 17.png|Sinking as a [[Stone]] | |||
KaTAM Olive Ocean Room 22.png|Swimming in deep open waters | |||
KaTAM Olive Ocean Chest 1.png|Obtaining a [[Vitality]] | |||
KaTAM Gobbler Boss.png|Battle with [[Gobbler]] | |||
</gallery> | |||
==Names in other languages== | |||
{{Names | |||
|ja=オリーブオーシャン | |||
|jaR=Orību Ōshan | |||
|jaM=Olive Ocean | |||
|de=Oliven-ozean | |||
|deM=Olive Ocean | |||
|es=Mar del Olivo | |||
|esM=Olive Sea | |||
|fr=Ocean Olive | |||
|frM=Olive Ocean | |||
|it=Oceano Oliva | |||
|itM=Olive Ocean | |||
}} | |||
{{Navmap-KaTAM|coord1=135|coord2=192}} | |||
{{Navbox-KaTAM}} | |||
Latest revision as of 14:45, 26 April 2024
| ||||||||||||||||||
| ||||||||||||||||||
| ||||||||||||||||||
|
| ||||||||||||||||||

- This article is about the area in Kirby & The Amazing Mirror, and should not be confused with Onion Ocean.
Olive Ocean is a water-based area of the Mirror World in Kirby & The Amazing Mirror. Kirby must navigate the treacherous waters to obtain the Mirror Shard from Gobbler. Olive Ocean is one of the more isolated areas in the Mirror World, and only has portals connecting it to Moonlight Mansion and Cabbage Cavern.
The upper portions of the map consist of a brief surface level path that ends with a portal to a Goal Game. The rest of the journey through the area takes place below the surface. The majority of which is swimming, but an underground cavern system provides more variety to the terrain. The area steps up the difficulty with its swimming theme, as Copy Abilities are difficult to maintain throughout all of the currents forcing contact with spikes, Gordos, hordes of Blippers, and the occasional open pit.
Treasure[edit]
As with each area, a map specific to the area can be found. Other treasures for the Collection Room include a Vitality, which increases the life meter of Kirby. The Ocean Spray Paint, which colors Kirby blue, and a Sound File can also be found.
Enemies, Bosses, and Abilities in Olive Ocean[edit]
| |||||||||||||||||||||||||||||||||||||||||||||||||||||||||||||||||||||||||||||||||||||||||||||||||||||||||||||||||||||||||||||||||||||||

Map[edit]
| Olive Ocean Area Map | |
|---|---|
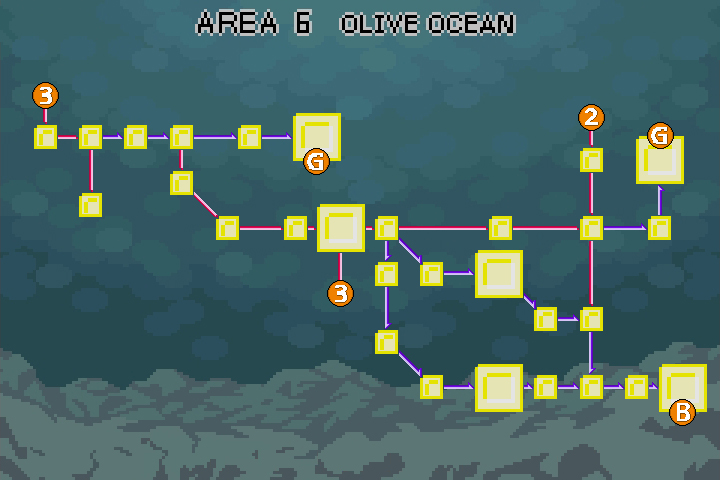 | |
Olive Ocean consists primarily of two areas, one significantly larger than the other. The smaller area to the upper left is a coastline area, while the rest of the map is mostly underwater, consisting of numerous tunnels and swimming challenges. Overall, there are 23 normal rooms, one Hub, two Chest rooms (one of which has the area map), two Goal rooms, and a Boss encounter with Gobbler.
There are few areas that connect to Olive Ocean, with only one initially accessible from the outside, that being the entrance to the upper-left from Cabbage Cavern. Aside from the Hub connection that can be made, the only other entrance is via the gate to Moonlight Mansion on the upper right, though that also needs to be opened on the Olive Ocean side.
Olive Ocean has two Goal rooms. Completing the Goal Game in each room will take Kirby and any friends with him back to the Central Circle in Rainbow Route.
For a full synopsis of what's in each room, click on any room on the map to head to the corresponding page.
Gallery[edit]
Traversing the coastline
Riding on the water
Slipping through the caves
Passing chasms
Busting through underwater barricades
Sliding past Gordo-filled tunnels

Sinking as a Stone
Swimming in deep open waters
Obtaining a Vitality
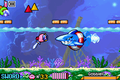
Battle with Gobbler


Names in other languages[edit]
| Language | Name | Meaning |
|---|---|---|
| Japanese | オリーブオーシャン Orību Ōshan |
Olive Ocean |
| French | Ocean Olive | Olive Ocean |
| German | Oliven-ozean | Olive Ocean |
| Italian | Oceano Oliva | Olive Ocean |
| Spanish | Mar del Olivo | Olive Sea |
| Regions in the Mirror World | |
|---|---|
 | |
| |||||||||||||||||||||||||||||