Please remember that WiKirby contains spoilers, which you read at your own risk! See our general disclaimer for details.
Candy Constellation - Chest 3: Difference between revisions
From WiKirby, your independent source of Kirby knowledge.
Jump to navigationJump to search
m (Text replacement - "{{K&tAM}}" to "{{Navbox-K&TAM}}") |
m (Text replacement - "\|theme title=\[\[(.*)\]\]" to "|theme title="$1"") |
||
| (13 intermediate revisions by 5 users not shown) | |||
| Line 1: | Line 1: | ||
[[File:Candy Constellation Chest 3. | {{Infobox-K&TAMRoom | ||
|image= [[File:KaTAM Candy Constellation Chest 3.png]] | |||
|caption=[[Kirby]] grabs the [[Map (item)|map]] in '''Chest 3'''. | |||
|area=[[Candy Constellation]] | |||
|from=[[Candy Constellation - Room 13|Room 13]] | |||
|to=[[Candy Constellation - Goal 2|Goal 2]] | |||
|chest={{Y}} ([[Map (item)|Area Map]]) | |||
|theme music=[[File:KatAM Space Area.mp3]] | |||
|theme title="[[Space Area]]" | |||
|description=Clip of the "Space Area" theme from ''[[Kirby & The Amazing Mirror]]'' | |||
}} | |||
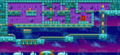
'''Candy Constellation - Chest 3''' is a room in [[Candy Constellation]], the ninth area of ''[[Kirby & The Amazing Mirror]]''. | '''Candy Constellation - Chest 3''' is a room in [[Candy Constellation]], the ninth area of ''[[Kirby & The Amazing Mirror]]''. | ||
| Line 6: | Line 15: | ||
This room is one-way, leading to [[Candy Constellation - Goal 2]]. | This room is one-way, leading to [[Candy Constellation - Goal 2]]. | ||
== | ==Overview== | ||
This room consists of a switch gate puzzle, with a path below that will let Kirby skip it. To solve this puzzle, Kirby will need to be swift and hearty of breath. Succeeding at this will allow Kirby to access the | This room consists of a [[switch]] [[gate]] puzzle, with a path below that will let Kirby skip it. To solve this puzzle, Kirby will need to be swift and [[Air Bullet|hearty of breath]], or he could get some friends to help out. Succeeding at this will allow Kirby to access the [[Treasure Chest]] holding the [[Map (item)|Area Map]] for Candy Constellation. | ||
There are no enemies in this room. | There are no enemies in this room. | ||
==Gallery== | |||
<gallery> | |||
KaTAM 9-C3 Map.png|Composite map of the room | |||
</gallery> | |||
{{clear}} | |||
{{ | {{Navmap-KaTAM-CanC|coord1=284|coord2=413}} | ||
{{Navbox- | {{Navbox-KaTAM}} | ||
[[Category:Rooms in Candy Constellation]] | [[Category:Rooms in Candy Constellation]] | ||
Latest revision as of 19:13, 19 January 2024
| ||||||||||||||
| ||||||||||||||
|
| ||||||||||||||

Candy Constellation - Chest 3 is a room in Candy Constellation, the ninth area of Kirby & The Amazing Mirror.
Links[edit]
This room is one-way, leading to Candy Constellation - Goal 2.
Overview[edit]
This room consists of a switch gate puzzle, with a path below that will let Kirby skip it. To solve this puzzle, Kirby will need to be swift and hearty of breath, or he could get some friends to help out. Succeeding at this will allow Kirby to access the Treasure Chest holding the Area Map for Candy Constellation.
There are no enemies in this room.
Gallery[edit]
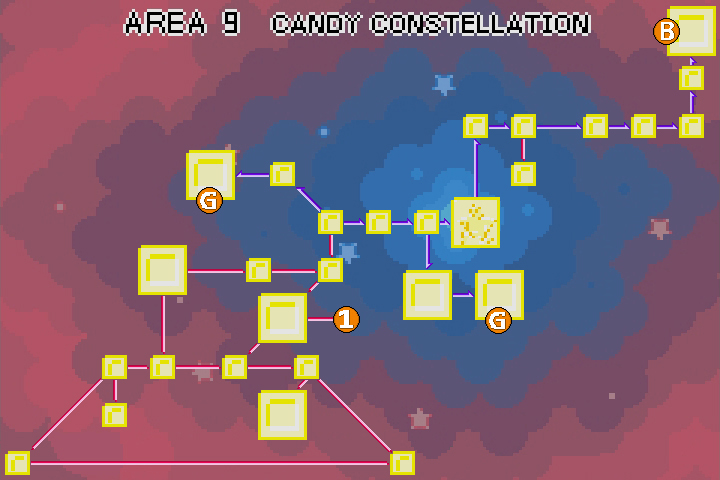
Composite map of the room

| Candy Constellation Area Map | |
|---|---|
 | |
| |||||||||||||||||||||||||||||