Please remember that WiKirby contains spoilers, which you read at your own risk! See our general disclaimer for details.
Radish Ruins - Room 7: Difference between revisions
From WiKirby, your independent source of Kirby knowledge.
Jump to navigationJump to search
m (Reverted edits by 141.101.107.208 (talk) to last revision by Fubaka) Tag: Rollback |
m (Text replacement - "\|theme title=\[\[(.*)\]\]" to "|theme title="$1"") |
||
| (12 intermediate revisions by 7 users not shown) | |||
| Line 1: | Line 1: | ||
[[File:Radish Ruins Room 7. | {{Infobox-K&TAMRoom | ||
|image= [[File:KaTAM Radish Ruins Room 7.png]] | |||
|caption=[[Kirby]] bumps his head in '''Room 7'''. | |||
|area=[[Radish Ruins]] | |||
|from=[[Radish Ruins - Room 4|Room 4]]<br>[[Radish Ruins - Room 9|Room 9]] | |||
|to=[[Radish Ruins - Room 4|Room 4]]<br>[[Radish Ruins - Room 8|Room 8]] | |||
|chest={{Y}} ([[Energy Drink]]) | |||
|mid-boss=[[Bonkers]] | |||
|theme music=[[File:KaTAM Ruins Area.mp3]] | |||
|theme title="[[Ruins Area]]" | |||
|description=Clip of the "Ruins Area" theme from ''[[Kirby & The Amazing Mirror]]'' | |||
}} | |||
'''Radish Ruins - Room 7''' is a room in [[Radish Ruins]], the eighth area of ''[[Kirby & The Amazing Mirror]]''. | '''Radish Ruins - Room 7''' is a room in [[Radish Ruins]], the eighth area of ''[[Kirby & The Amazing Mirror]]''. | ||
==Links== | ==Links== | ||
This room links to [[Radish Ruins - Room 4]] below, and [[Radish Ruins - Room 8]] to the right. | This room links to [[Radish Ruins - Room 4]] below, [[Radish Ruins - Room 9]] above, and [[Radish Ruins - Room 8]] to the right. | ||
==Description== | ==Description== | ||
This room is split into two separate areas. Entering from Room 4, Kirby finds himself in a | This room is split into two separate areas. Entering from Room 4, Kirby finds himself in a room with a [[Treasure Chest]] containing an [[Energy Drink]]. The [[Mid-Boss]] [[Bonkers]] is visible in the room above, but can't do anything about Kirby when he's in this room. | ||
Entering from Room 9, Kirby will actually have to engage Bonkers, and get the [[Hammer]] ability upon defeating him. The door out from there is just to the right down a hall. | Entering from Room 9, Kirby will actually have to engage Bonkers, and get the [[Hammer]] ability upon defeating him. The door out from there is just to the right down a hall. | ||
== | ==Mid-Boss== | ||
{| | {| class="wikitable" | ||
! | !Sprite | ||
! | !Name | ||
!Copy Ability | |||
|- | |- | ||
|align=center|[[File:KNiDL Bonkers sprite.png]] | |||
| | |[[Bonkers]] | ||
| | |[[Hammer]] | ||
|} | |} | ||
==Gallery== | |||
<gallery> | |||
KaTAM 8-7 Map.png|Composite map of the room.]] | |||
</gallery> | |||
{{ | {{Navmap-KaTAM-RRu|coord1=251|coord2=515}} | ||
{{Navbox- | {{Navbox-KaTAM}} | ||
[[Category:Rooms in Radish Ruins]] | [[Category:Rooms in Radish Ruins]] | ||
Latest revision as of 20:30, 19 January 2024
| ||||||||||||||||
| ||||||||||||||||
|
| ||||||||||||||||

Radish Ruins - Room 7 is a room in Radish Ruins, the eighth area of Kirby & The Amazing Mirror.
Links[edit]
This room links to Radish Ruins - Room 4 below, Radish Ruins - Room 9 above, and Radish Ruins - Room 8 to the right.
Description[edit]
This room is split into two separate areas. Entering from Room 4, Kirby finds himself in a room with a Treasure Chest containing an Energy Drink. The Mid-Boss Bonkers is visible in the room above, but can't do anything about Kirby when he's in this room.
Entering from Room 9, Kirby will actually have to engage Bonkers, and get the Hammer ability upon defeating him. The door out from there is just to the right down a hall.
Mid-Boss[edit]
| Sprite | Name | Copy Ability |
|---|---|---|
| Bonkers | Hammer |
Gallery[edit]
![Composite map of the room.]]](https://cdn.wikirby.com/thumb/c/cb/KaTAM_8-7_Map.png/120px-KaTAM_8-7_Map.png)
Composite map of the room.]]
![Composite map of the room.]]](/wiki/File:KaTAM_8-7_Map.png)
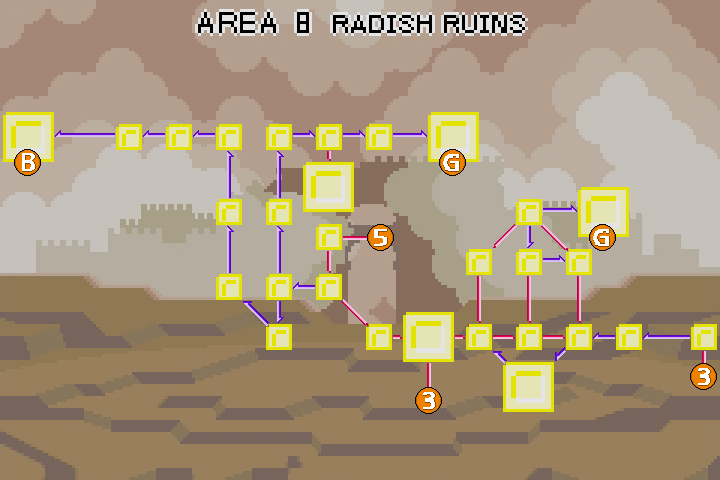
| Radish Ruins Area Map | |
|---|---|
 | |
| |||||||||||||||||||||||||||||