Dimension Mirror (level): Difference between revisions
Pinkyoshifan (talk | contribs) m (Pinkyoshifan moved page User:Pinkyoshifan/Sandbox/The Mirror (level) to Dimension Mirror (level) without leaving a redirect) |
mNo edit summary |
||
| (8 intermediate revisions by 5 users not shown) | |||
| Line 1: | Line 1: | ||
{{Infobox-K&tAMLevel | |||
|title= | |title=Dimension Mirror | ||
|image= [[File:KatAM Intro7.png]] | |image= [[File:KatAM Intro7.png]] | ||
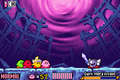
|caption= The Kirbys battle [[Dark Mind]] in ''' | |caption= The Kirbys battle [[Dark Mind]] in the '''Dimension Mirror'''. | ||
|level=10 | |level=10 | ||
|rooms=9 | |rooms=9 | ||
| Line 10: | Line 10: | ||
|theme music=[[File:KaTAM Start Stage theme clip.mp3]] | |theme music=[[File:KaTAM Start Stage theme clip.mp3]] | ||
|theme title="[[Start Stage]]" | |theme title="[[Start Stage]]" | ||
|description=Clip of | |description=Clip of "Start Stage", which plays in the rooms between the Dark Mind battles. | ||
|previous=[[Candy Constellation]] | |previous=[[Candy Constellation]] | ||
}} | }} | ||
The '''Dimension Mirror'''{{ForeignTitle}} is the tenth and final level in ''[[Kirby & The Amazing Mirror]]''. It is unlocked when Kirby collects all of the Mirror Shards from defeating the [[Boss]]es in each level of the game. When all the shards have been collected, the [[Dimension Mirror]] is restored, allowing the four Kirbys to face Dark Meta Knight and vanquish [[Dark Mind]]. | The '''Dimension Mirror'''{{ForeignTitle}} is the tenth and final level in ''[[Kirby & The Amazing Mirror]]''. It is unlocked when Kirby collects all of the Mirror Shards from defeating the [[Boss]]es in each level of the game. When all the shards have been collected, the [[Dimension Mirror]] is restored, allowing the four Kirbys to face [[Dark Meta Knight]] and vanquish [[Dark Mind]]. | ||
==Overview== | ==Overview== | ||
| Line 24: | Line 24: | ||
===Areas=== | ===Areas=== | ||
The Mirror has nine areas inside, gone through in order: | The Mirror has nine areas inside, gone through in order: | ||
*The aforementioned room resembling Rainbow Route where Dark Meta Knight is fought. | *The aforementioned room resembling a dilapidated [[Rainbow Route - Central Circle|Central Circle]], where Dark Meta Knight is fought. | ||
*A flat area with the first Dark Mind fight. | *A flat area with the first Dark Mind fight. | ||
*A room resembling [[Radish Ruins]] with a switch puzzle. | *A room resembling [[Radish Ruins]] with a switch puzzle. | ||
| Line 77: | Line 77: | ||
|[[Tornado]] | |[[Tornado]] | ||
|} | |} | ||
==Gallery== | |||
<gallery> | |||
KaTAM Dark Meta Knight Battle.png|Dark Meta Knight after revealing his identity | |||
K&TAM Dark Mind Battle Form 2.png|Dark Mind's second form | |||
K&TAM Dark Mind Battle Form 3.png|Dark Mind's third and final form | |||
</gallery> | |||
==Names in other languages== | ==Names in other languages== | ||
{{Names | {{Names | ||
|ja=ディメンションミラー<ref>Name given in various ''Kirby & The Amazing Mirror'' Japanese | |ja=ディメンションミラー<ref>Name given in various ''Kirby & The Amazing Mirror'' Japanese guidebooks</ref> | ||
|jaR=Dimenshon Mirā | |jaR=Dimenshon Mirā | ||
|jaM=Dimension Mirror | |jaM=Dimension Mirror | ||
| Line 90: | Line 97: | ||
{{clear}} | {{clear}} | ||
{{Navbox-KaTAM}} | {{Navbox-KaTAM}} | ||
[[Category:Levels in Kirby & The Amazing Mirror]] | [[Category:Levels in Kirby & The Amazing Mirror]] [[Category:Final levels]] | ||
Latest revision as of 18:54, 23 February 2024
| ||||||||||||||||
| ||||||||||||||||
| ||||||||||||||||
|
| ||||||||||||||||

The Dimension Mirror[Japanese title] is the tenth and final level in Kirby & The Amazing Mirror. It is unlocked when Kirby collects all of the Mirror Shards from defeating the Bosses in each level of the game. When all the shards have been collected, the Dimension Mirror is restored, allowing the four Kirbys to face Dark Meta Knight and vanquish Dark Mind.
Overview[edit]
The realm inside the Dimension Mirror is split up into nine areas. At the end of each platforming area is a mirror-shaped portal that teleports the Kirbys to the next area. The first area is where Dark Meta Knight makes his final appearance in the game. The area has circular purple clouds looming above everything which stretch across the entire length of the sky. There also seem to be the ruins of a coliseum in the background, which is similar to the intact coliseum of the Central Circle in Rainbow Route.
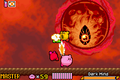
After defeating Dark Meta Knight, the Kirbys are sucked into an eerie portal, and Meta Knight tosses his sword in after them. In the next area, Kirby is prompted to pick up the sword, after which Dark Mind appears for a fight. Dark Mind must be battled four times in slightly varying environments. In between each battle is a room which contains a series of puzzles to solve, as well as enemies and items to utilize. The prompt to grab the sword will appear at the start of each phase if Kirby loses the sword in a previous room. After the fourth defeat, Dark Mind assumes his true form for one more much longer fight. As this fight begins, Shadow Kirby appears to give Kirby back Master if he lost it earlier.
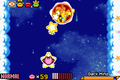
Once Dark Mind is defeated in his true form, Kirby takes off after him on his Warp Star and has one last showdown against him, which transitions to the game's credits. Once these end, Dark Mind is finally defeated, and the game is complete.
Areas[edit]
The Mirror has nine areas inside, gone through in order:
- The aforementioned room resembling a dilapidated Central Circle, where Dark Meta Knight is fought.
- A flat area with the first Dark Mind fight.
- A room resembling Radish Ruins with a switch puzzle.
- A flat room with two thin floors on the sides with the second Dark Mind fight.
- A room resembling Cabbage Cavern with four one-way water streams leading to various items. From left to right: a Maxim Tomato, an empty path, a Cherry, and a 1-Up.
- A flat room with two water pools on the sides with the third Dark Mind fight.
- A room resembling Peppermint Palace with several obstacles.
- A flat room with an icy floor with the fourth Dark Mind fight.
- A plain flat room with the fifth Dark Mind fight.
Enemies[edit]
The following enemies appear in the intermediate chambers between each Dark Mind battle:
| Sprite | Name | Copy Ability |
|---|---|---|
| Bronto Burt | None | |
| Flamer | Burning | |
| Glunk | None | |
| Gordo | N/A | |
| Scarfy | N/A | |
| Sir Kibble | Cutter | |
| Sparky | Spark | |
| Sword Knight | Sword | |
| Twister | Tornado |
Gallery[edit]
Dark Meta Knight after revealing his identity
Dark Mind's second form
Dark Mind's third and final form


Names in other languages[edit]
| Language | Name | Meaning |
|---|---|---|
| Japanese | ディメンションミラー[1] Dimenshon Mirā |
Dimension Mirror |
References
- ↑ Name given in various Kirby & The Amazing Mirror Japanese guidebooks
| |||||||||||||||||||||||||||||