Mustard Mountain - Room 12: Difference between revisions
m (Text replacement - "{{AMMM2NavMap" to "{{Navmap-KaTAM-MuM") |
m (Text replacement - "\|theme title=\[\[(.*)\]\]" to "|theme title="$1"") |
||
| (9 intermediate revisions by 6 users not shown) | |||
| Line 1: | Line 1: | ||
{{Infobox-K&TAMRoom | {{Infobox-K&TAMRoom | ||
|image= [[File:Mustard Mountain Room 12.png]] | |image= [[File:KaTAM Mustard Mountain Room 12.png]] | ||
|caption=[[Kirby]] and his [[Shadow Kirby|soot-ish counterpart]] cross paths once more in '''Room 12'''. | |caption=[[Kirby]] and his [[Shadow Kirby|soot-ish counterpart]] cross paths once more in '''Room 12'''. | ||
|area=[[Mustard Mountain]] | |area=[[Mustard Mountain]] | ||
| Line 6: | Line 6: | ||
|to=[[Mustard Mountain - Room 13|Room 13]] | |to=[[Mustard Mountain - Room 13|Room 13]] | ||
|chest={{N}} | |chest={{N}} | ||
|theme music=[[File:KatAM Flame-Lava Area.mp3]] | |||
|theme title="[[Flame/Lava Area]]" | |||
|description=Clip of the "Flame/Lava Area" theme from ''[[Kirby & The Amazing Mirror]]'' | |||
}} | }} | ||
'''Mustard Mountain - Room 12''' is a room in [[Mustard Mountain]], the fourth area of ''[[Kirby & The Amazing Mirror]]''. | '''Mustard Mountain - Room 12''' is a room in [[Mustard Mountain]], the fourth area of ''[[Kirby & The Amazing Mirror]]''. | ||
| Line 13: | Line 16: | ||
==Overview== | ==Overview== | ||
This room consists of a long snaking tunnel through fire and lava. Along the way, the ''clearly'' nefarious [[Shadow Kirby]] appears from behind a lavafall to stare down our hero. Defeating him yields a gift of some kind, assuming Kirby didn't [[Inhale]] him. However, if Kirby takes too long, Shadow Kirby will breathe fire on him, and get away. To the left from here is the door to Room 13. However, up above, another | This room consists of a long snaking tunnel through fire and lava. Along the way, the ''clearly'' nefarious [[Shadow Kirby]] appears from behind a lavafall to stare down our hero. Defeating him yields a gift of some kind, assuming Kirby didn't [[Inhale]] him. However, if Kirby takes too long, Shadow Kirby will breathe fire on him, and get away. To the left from here is the door to Room 13. However, up above, another Heave-Ho Block can be moved to clog a volcano, assuming Kirby's friends are smart enough to help him move it. A secret door lies beyond this pillar leading to a different portion of the same destination. | ||
==Enemies== | ==Enemies== | ||
| Line 25: | Line 28: | ||
|None | |None | ||
|- | |- | ||
|align=center|[[File: | |align=center|[[File:KNiDL Flamer sprite.png]] | ||
|[[Flamer]] | |[[Flamer]] | ||
|[[Burning]] | |[[Burning]] | ||
| Line 35: | Line 38: | ||
|align=center|[[File:KatAMShadowKirby.png]] | |align=center|[[File:KatAMShadowKirby.png]] | ||
|[[Shadow Kirby]] | |[[Shadow Kirby]] | ||
| | |[[Fire]] | ||
|} | |} | ||
==Gallery== | ==Gallery== | ||
<gallery> | <gallery> | ||
KaTAM 4-12 Map.png|Composite map of the room | |||
</gallery> | </gallery> | ||
Latest revision as of 19:42, 19 January 2024
| ||||||||||||||
| ||||||||||||||
|
| ||||||||||||||

Mustard Mountain - Room 12 is a room in Mustard Mountain, the fourth area of Kirby & The Amazing Mirror.
Links[edit]
This room is one way, leading into Mustard Mountain - Room 13.
Overview[edit]
This room consists of a long snaking tunnel through fire and lava. Along the way, the clearly nefarious Shadow Kirby appears from behind a lavafall to stare down our hero. Defeating him yields a gift of some kind, assuming Kirby didn't Inhale him. However, if Kirby takes too long, Shadow Kirby will breathe fire on him, and get away. To the left from here is the door to Room 13. However, up above, another Heave-Ho Block can be moved to clog a volcano, assuming Kirby's friends are smart enough to help him move it. A secret door lies beyond this pillar leading to a different portion of the same destination.
Enemies[edit]
| Sprite | Name | Copy Ability |
|---|---|---|
| Chip | None | |
| Flamer | Burning | |
| Roly-Poly | None | |
| Shadow Kirby | Fire |
Gallery[edit]
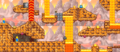
Composite map of the room

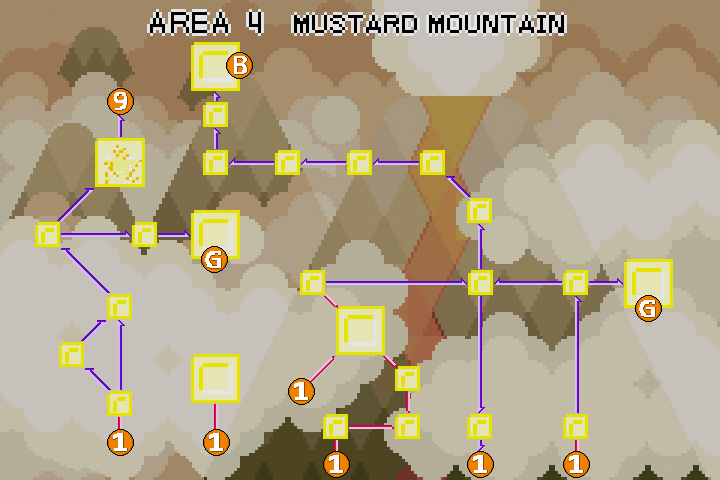
| Mustard Mountain Area Map | |
|---|---|
 | |
| |||||||||||||||||||||||||||||