Please remember that WiKirby contains spoilers, which you read at your own risk! See our general disclaimer for details.
Candy Constellation - Room 11: Difference between revisions
From WiKirby, your independent source of Kirby knowledge.
Jump to navigationJump to search
(music) |
m (Text replacement - "\|theme title=\[\[(.*)\]\]" to "|theme title="$1"") |
||
| Line 7: | Line 7: | ||
|chest={{N}} | |chest={{N}} | ||
|theme music=[[File:KatAM Space Area.mp3]] | |theme music=[[File:KatAM Space Area.mp3]] | ||
|theme title=[[Space Area]] | |theme title="[[Space Area]]" | ||
|description=Clip of the "Space Area" theme from ''[[Kirby & The Amazing Mirror]]'' | |description=Clip of the "Space Area" theme from ''[[Kirby & The Amazing Mirror]]'' | ||
}} | }} | ||
Latest revision as of 19:12, 19 January 2024
| ||||||||||||||
| ||||||||||||||
|
| ||||||||||||||

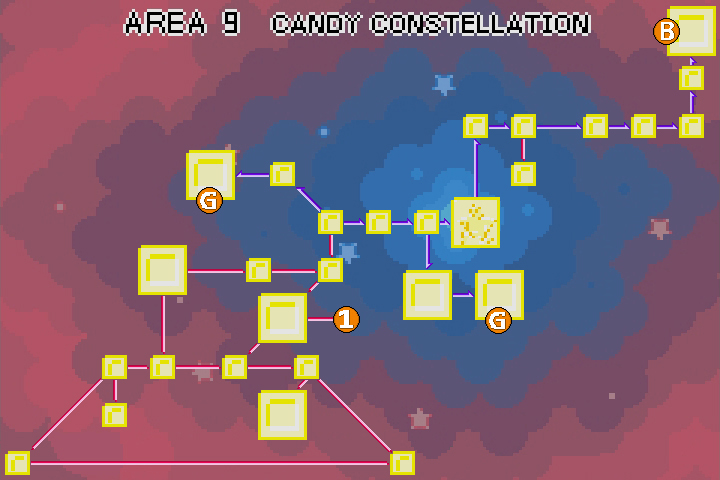
Candy Constellation - Room 11 is a room in Candy Constellation, the ninth area of Kirby & The Amazing Mirror.
Links[edit]
This room is one-way, leading into Candy Constellation - Goal 1.
Overview[edit]
This room is a winding passage past many barriers. Along the way, a side-passage can be accessed past a metal barrier to get a 1-Up, though careful navigation past spikes is necessary as well. Another 1-Up can be found at the lower-left edge of the area. but collecting it will cause two Heavy Knights to appear. A Bomb Block can be broken below to dunk these two intruders. The door to the first Goal room can be found to the upper-left from there.
Enemies[edit]
| Sprite | Name | Copy Ability |
|---|---|---|
| Big Waddle Dee | None | |
| Flamer | Burning | |
| Heavy Knight | Sword | |
| Sparky | Spark | |
| Waddle Dee | None |
Gallery[edit]
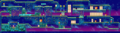
Composite map of the room
| Candy Constellation Area Map | |
|---|---|
 | |
| |||||||||||||||||||||||||||||