Rift Ruin
| ||||||||||||
| ||||||||||||
| ||||||||||||
|
| ||||||||||||

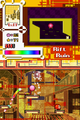
Rift Ruin is the first stage of Iello Adventure in [[Kirby: Canvas Curse|Template:KCC KPP]]. Kirby travels through these yellow ruins presumably in search of Drawcia after being cursed to a ball form. Rift Ruin is the first stage in Kirby: Canvas Curse with more than three areas. The giant orange switch controlling all of the orange Action Blocks of other areas, can be found in this stage. The ruins also introduce the totally dark rooms and the short-lived lanterns. The entire stage remains consistent with its yellow brick walls, floors, and temple or dungeon like hazards, hidden doors, and has extensive use of contact-activated objects.
Rift Ruin appears again as courses in the Rainbow Run mode. Area 5 appears as the Time Trial challenge and Area 3 as the Line Trial challenge. Despite having five areas, only three medals are allotted for the level. However, the Big Orange Switch allows Kirby to access medals and areas in other levels.
Stage overview
| Area / map | Description | Medal guide |
|---|---|---|
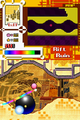
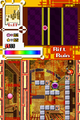
 Area 1 |
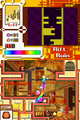
Kirby begins the area near brick-lined hills and valleys. In two of the valleys, large Boulders will fall from the ceiling and roll towards Kirby. Even the Waddle Dees in the room will be hurt by the boulders. The stage zigzags as it ascends to higher ground, and a few automatically launching cannons can be used. The other large boulder - made of stone - can be shattered with the stylus, or just avoided. The stone boulder will otherwise shatter after hitting the ground instead of rolling around as a new danger. The exit door is hidden by a foreground panel. One of the foreground panels near the exit door contains some unknown health replenishment. The object can't be seen. | The medal in this area can be found high up in the upper-left corner, in the first big room encountered. |
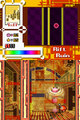
 Area 2 |
This area, though small is entirely dark. The only visible objects are the springs and lanterns. Two Waddle Dees can be seen in the darkness as well. The lantern in the top left hallway will light the entire room for a short period of time. Since the layout of the area is covered in darkness, the map on the top screen is a better indicator of orientation. | N/A |
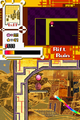
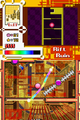
 Area 3 |
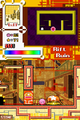
A contact activated canon fires Kirby up the tall shaft on the left side of the room. In order to progress further through Rift Ruins, Kirby will need to tap the Bomb Blocks and drop the canon from the right side of the room. Kirby can not ascend using Rainbow Lines because of a large barrier restricting ink use. Two spear-wielding Waddle Dees can be left on the blocks and safely passed completely. The canon will fire Kirby through the metal blocks in the ceiling. | This medal is situated in the right shaft, supported by a Bomb Block barrier. To obtain it, the player can use the stylus to remove each Bomb Block that would prevent the medal from falling into the bottom portion of the area, where Kirby can collect it. |
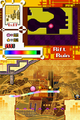
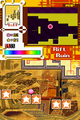
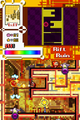
 Area 4 |
Kirby enters this area from the floor in the regular game mode. In the Time Trial version of Rainbow Run he begins through a portal. The area begins with a zigzagging climb to higher and higher levels while avoiding large spinning spike arms. The arms can be toggled on and off by tapping them with the stylus. After the checkpoint, contact-activated fans will lift Kirby through the following shafts. Flame Shotzos are nested on ledges along the shafts and Kirby will need to use Rainbow Lines to block the flames. The Flame Shotzos can not be destroyed. The last ability possible to gain in this area is Crash. | N/A |
 Area 5 |
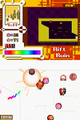
This area is another very small, single room. Several Bouncies, Waddle Dees, and a Waddle Doo are in the room. The exit can be found just to the right from here. | The last medal can be found in this room, inside a small ceiling-bound container with a switch inside that will break the barrier when flipped. To hit this switch, Kirby can use the Crash or Beam abilities, though if using the former, he should made sure the switch is on the screen when he does it. |
 Secret Area |
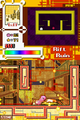
A disguised doorway can be accessed in the uppermost shaft in Area 4. The door is behind a vent, but the map screen will indicate the exact location. Kirby will need to have obtained the Stone ability before entering this room in order to pound the stake to break the blocks above the Big Switch and, after pressing it, unlock all orange Action Blocks in the game. | N/A |
Enemies and Copy Abilities
| Sprite | Name | Copy Ability | Sprite | Name | Copy Ability |
|---|---|---|---|---|---|
| Bomber | Crash | Rocky | Stone | ||
| Bouncy | None | Spear Waddle Dee | None | ||
| Flame Shotzo | N/A | Waddle Dee | None | ||
| Fluff Waddle Dee | None | Waddle Doo | Beam | ||
| Pacto | N/A | ||||
Gallery
Kirby does not want to start his exploration by getting crushed.
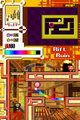
The stone door opens to an ancient realm.

Kirby strategically dips underwater to avoid any incoming spears.
Racing up to the first Medal

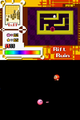
Kirby gets done in by a Pacto, having ambushed him at just the wrong moment.
Kirby advances by means of a large star block walkway.
Kirby is left running blind in this room until he can find a lantern.
Hitting the lantern shows Kirby the path forward in this room.
Kirby rockets upward in order to see what lays ahead for him on the right.
Kirby arcs up toward the no-draw zone.
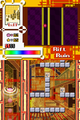
Using the magical paintbrush to bring the cannon down for Kirby to use
Kirby launches upwards using the recovered cannon.
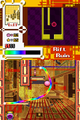
Kirby aims up and over the spiky bar.
Kirby misjudges his timing and gets charred by a Flame Shotzo.
Kirby prepares to pass another Flame Shotzo further up the path.
Kirby comes across the secret Big Orange Switch.
Upon hitting this switch, all orange Action Blocks in the game are removed.
Crash Kirby disposes of all the obstacles in his way...
...thus clearing out the barrier that was keeping him from the medal.


