Course 6 - Hole 3: Difference between revisions
mNo edit summary |
mNo edit summary |
||
| (7 intermediate revisions by 2 users not shown) | |||
| Line 1: | Line 1: | ||
{{Infobox-KDCHole | {{Infobox-KDCHole | ||
|image= | |image= | ||
| Line 19: | Line 18: | ||
== Summary == | == Summary == | ||
The board of Hole 3 consists of two nearly identical bar-shaped platforms parallel to each-other, which are joined together at the top by a wide and even slope, creating a horseshoe-like shape to the board. [[Kirby]] starts on the far end of the lower bar. In order to reach the connecting slope, he will first need to cross a [[Spike|Danger Zone]] field with a [[Kabu]] residing in the middle. Further up, two more neutral enemies can be found in a small bumper-lined space. From here, Kirby can make the attempt to launch across the big slope connector, but he should plan his shot carefully, as it is easy to miscalculate here and end up going [[Bottomless pit|OB]]. If Kirby reaches the other bar safely, he can find two more enemies to clean up; a [[Squishy]] in the bumper area, and then one more Kabu in the other danger zone pit past a small sand bunker. [[Whispy Woods]] can be found at the end of this upper bar, but Kirby should not have to go over there at all. | The board of Hole 3 consists of two nearly identical bar-shaped platforms parallel to each-other, which are joined together at the top by a wide and even slope, creating a horseshoe-like shape to the board. [[Kirby]] starts on the far end of the lower bar. In order to reach the connecting slope, he will first need to cross a [[Spike|Danger Zone]] field with a [[Kabu]] residing in the middle. Further up, two more neutral enemies can be found in a small [[bumper]]-lined space. From here, Kirby can make the attempt to launch across the big slope connector, but he should plan his shot carefully, as it is easy to miscalculate here and end up going [[Bottomless pit|OB]]. If Kirby reaches the other bar safely, he can find two more enemies to clean up; a [[Squishy]] in the bumper area, and then one more Kabu in the other danger zone pit past a small sand bunker. [[Whispy Woods]] can be found at the end of this upper bar, but Kirby should not have to go over there at all. | ||
=== Extra Game === | === Extra Game === | ||
In the Extra Game, Kirby starts on the upper bar near the base of the connecting slope, in front of the sand bunker. There are no more enemies to contend with on this upper bar, so Kirby will want to head across the slope right away. Near the top of the slope is now a [[Togezo]]. On the lower bar, two [[Rocky]]s can be found in the bumper area, and a [[Waddle Dee]] can be found at Kirby's starting point in the main game. The Kabu in the danger zone field has been removed. | In the Extra Game, Kirby starts on the upper bar near the base of the connecting slope, in front of the sand bunker. There are no more enemies of concern to contend with on this upper bar, so Kirby will want to head across the slope right away. Near the top of the slope is now a [[Togezo]]. On the lower bar, two [[Rocky]]s can be found in the bumper area, and a [[Waddle Dee]] can be found at Kirby's starting point in the main game. The Kabu in the danger zone field has been removed. | ||
== Enemies == | == Enemies == | ||
| Line 61: | Line 60: | ||
!Number | !Number | ||
!Ability | !Ability | ||
|- | |||
|{{center|[[File:KDCGordo.png]]}} | |||
|[[Gordo]] | |||
|1 | |||
|N/A | |||
|- | |- | ||
|{{center|[[File:KDCRocky.png]]}} | |{{center|[[File:KDCRocky.png]]}} | ||
| Line 92: | Line 96: | ||
|- | |- | ||
|{{center|[[File:KDC Bumper sprite.png]]}} | |{{center|[[File:KDC Bumper sprite.png]]}} | ||
|Bumper | |[[Bumper]] | ||
|- | |- | ||
|{{center|[[File:KDC Bunker sprite.png]]}} | |{{center|[[File:KDC Bunker sprite.png]]}} | ||
| Line 103: | Line 107: | ||
{{clear}} | {{clear}} | ||
{{Navbox- | == Gallery == | ||
<gallery> | |||
KDC Course 6 Hole 3 screenshot 01.png|Hopping over the first spike pit | |||
KDC Course 6 Hole 3 screenshot 02.png|Pondering the best move across the wide ramp | |||
</gallery> | |||
{{Navbox-KDC}} | |||
[[Category:Course 6 holes]] | [[Category:Course 6 holes]] | ||
Latest revision as of 13:50, 21 September 2022
| ||||||||||
| ||||||||||
|
| ||||||||||


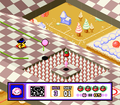
Course 6 - Hole 3 is the third hole of Course 6 in Kirby's Dream Course. This hole features a horseshoe-shaped board, using the big sloping area in the middle to transfer between the bars.
Summary[edit]
The board of Hole 3 consists of two nearly identical bar-shaped platforms parallel to each-other, which are joined together at the top by a wide and even slope, creating a horseshoe-like shape to the board. Kirby starts on the far end of the lower bar. In order to reach the connecting slope, he will first need to cross a Danger Zone field with a Kabu residing in the middle. Further up, two more neutral enemies can be found in a small bumper-lined space. From here, Kirby can make the attempt to launch across the big slope connector, but he should plan his shot carefully, as it is easy to miscalculate here and end up going OB. If Kirby reaches the other bar safely, he can find two more enemies to clean up; a Squishy in the bumper area, and then one more Kabu in the other danger zone pit past a small sand bunker. Whispy Woods can be found at the end of this upper bar, but Kirby should not have to go over there at all.
Extra Game[edit]
In the Extra Game, Kirby starts on the upper bar near the base of the connecting slope, in front of the sand bunker. There are no more enemies of concern to contend with on this upper bar, so Kirby will want to head across the slope right away. Near the top of the slope is now a Togezo. On the lower bar, two Rockys can be found in the bumper area, and a Waddle Dee can be found at Kirby's starting point in the main game. The Kabu in the danger zone field has been removed.
Enemies[edit]
|
Obstacles[edit]
| Sprite | Obstacle |
|---|---|
| Bumper | |
| Bunker | |
| Danger Zone |
Gallery[edit]
Hopping over the first spike pit

Pondering the best move across the wide ramp

