Course 1 - Hole 5
| ||||||||||
| ||||||||||
|
| ||||||||||


Course 1 - Hole 5 is the fifth hole of Course 1 in Kirby's Dream Course. This hole features a long skinny board with a small wall and hilly terrain.
Summary[edit]
This hole features a long rectangular board split into two halves by a short wall and containing steep slopes on both sides which form basins. There are a few bumper walls in various places that can be used to prevent Kirby from going OB. Kirby starts in the lowest point on the lower half of this board. To the right of him is a Starman who can grant the Hi-Jump Copy Ability, as well as a Kick Panel point back toward the middle. Past the short wall is a Gordo on patrol, then two Kabu in the basin on the other side. Getting a hole-in-one on this course is simple enough if Kirby starts by aiming straight for the Starman, then using Hi-Jump to leap over the Gordo after he is redirected toward the other side.
Extra Game[edit]
In the Extra Game, Kirby starts on the other side of the board, with the Starman now behind him toward the upper edge and the Kabu removed. The lower end of the board now contains two Squishys, thus creating a similar but oppositely-oriented situation as the main game version.
Enemies[edit]
Obstacles[edit]
| Sprite | Obstacle |
|---|---|
| Bumper | |
| Kick Panel |
Gallery[edit]
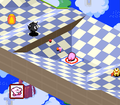
Surveying the course to prepare the first shot
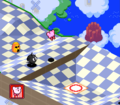
Leaping over Gordo using Hi-Jump

