Course 5 - Hole 3
| ||||||||||
| ||||||||||
|
| ||||||||||


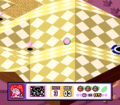
Course 5 - Hole 3 is the third hole of Course 5 in Kirby's Dream Course. The board here is long, hilly, and pocked with sand bunkers.
Summary[edit]
This hole consists of a long rectangular board with very little in the way of flat terrain, much of which is covered over by sand bunkers. Kirby starts on the upper-left end of the board, and can proceed down to the right across these bunkers, interspersed between many slopes. There are four neutral enemies to be collided with as Kirby reaches the bumpy terrain on the other side. It is easy to fall OB in this region if Kirby is not careful.
Extra Game[edit]
In the Extra Game, Kirby starts a little further down the slope on the left, and his old position is now taken by a Starman. Other enemies have been moved around or replaced, with Kabu now being found on the first bridge across the bunkers, and two Mr. P. Umpkins found on the other ones. Broomhatter is gone, and Squishy has been replaced with Twister.
Enemies[edit]
Obstacles[edit]
| Sprite | Obstacle |
|---|---|
| Bunker |
Gallery[edit]

Moving across the bunker-laden path
Making the last shot over some tricky terrain

