From WiKirby, your independent source of Kirby knowledge.
Gordo Course - Hole 2 is the second hole of Gordo Course in Kirby's Dream Course. It takes place in a small space lined with enemies along the edges and Air Curtains in the middle.
Summary[edit]
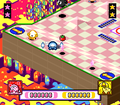
Hole 2 takes place on a very small rectangular board lined with a bumper fence. A few small slopes line the two shorter sides of the board, and four smaller dimples pop out of the otherwise flat floor around the middle. Kirby and Keeby start in the dead center of the board, surrounded by four Air Curtains. All of the enemies can be found along the edges of the board, with Kick Panels taking up the corners. Among the enemies are two Transformers on opposite sides of the board adjacent to the Gordos.
In the Extra Game, the starting position is moved down to the lower-right edge of the board. There are now four Gordos along the sloped edges, and a single Transformer in the middle of the board.
Enemies[edit]
Obstacles[edit]
Gallery[edit]
Freeze Kirby slides by the edge.
| Kirby's Dream Course |
|---|
| | Characters | | | | Single-Player Courses and Holes | | | | Two-Player Courses and Holes | | | | Copy Abilities | | | | Enemies | | | | Course Obstacles | | | | Extra | |
|