From WiKirby, your independent source of Kirby knowledge.
| Course 4 - Hole 2
|
|
|
| Details
|
| Course
|
Course 4
|
| Copy Abilities
|
Main Game
None
Extra Game
Hi-Jump
|
|
|
|
|
|
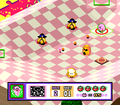
Course 4 - Hole 2 is the second hole of Course 4 in Kirby's Dream Course. It takes place in a bowl-like board filled with enemies and Turntables which are initially turned off.
Summary[edit]
Hole 2's board is a wide tub-shaped board with a wide basin in the middle. Along the edges, four Whispy Woods and squares of bumpers can be found. Kirby starts within the basin near the upper edge of it, along with five neutral enemies scattered throughout the bowl. Also within the bowl is a switch that, when pressed, will activate three Turntables inside the area.
In the Extra Game, the enemies within the bowl are all replaced and shifted around somewhat, now consisting of four Squishys and two Starmen. Kirby now starts in the lower portion of the bowl.
Enemies[edit]
Obstacles[edit]
Gallery[edit]
Taking note of the surrounding enemies
| Kirby's Dream Course |
|---|
| | Characters | | | | Single-Player Courses and Holes | | | | Two-Player Courses and Holes | | | | Copy Abilities | | | | Enemies | | | | Course Obstacles | | | | Extra | |
|