Please remember that WiKirby contains spoilers, which you read at your own risk! See our general disclaimer for details.
Candy Constellation - Room 5: Difference between revisions
From WiKirby, your independent source of Kirby knowledge.
Jump to navigationJump to search
m (Text replacement - "{{Navbox-K&TAM}}" to "{{Navbox-KaTAM}}") |
m (Text replacement - "{{AMCC3NavMap" to "{{Navmap-KaTAM-CanC") |
||
| Line 47: | Line 47: | ||
</gallery> | </gallery> | ||
{{ | {{Navmap-KaTAM-CanC|coord1=452|coord2=389}} | ||
{{Navbox-KaTAM}} | {{Navbox-KaTAM}} | ||
[[Category:Rooms in Candy Constellation]] | [[Category:Rooms in Candy Constellation]] | ||
Revision as of 20:04, 12 February 2021
| ||||||||||||||
|
| ||||||||||||||
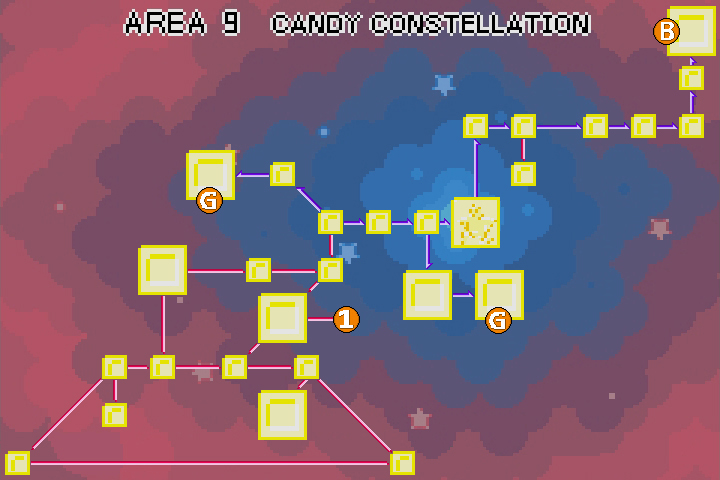
Candy Constellation - Room 5 is a room in Candy Constellation, the ninth area of Kirby & The Amazing Mirror.
Links
This room links to Candy Constellation - Room 4 to the right, and Candy Constellation - Room 6 to the left.
Overview
This room is a series of suspended blocks of water intermingled with other walls and platforms. Falling out of the bottom of the water cubes may cause Kirby to fall out of bounds, so caution is recommended.
Enemies
| Sprite | Name | Copy Ability |
|---|---|---|
| File:KNiD E Blipper.png | Blipper | None |
| File:KNiD E Flamer.png | Flamer | Burning |
| File:KNiD E Glunk.png | Glunk | None |
| File:KNiD E SirKibble.png | Sir Kibble | Cutter |
| File:KNiD E SwordKnight.png | Sword Knight | Sword |
Gallery
- KTAM 9-5 Map.png
Composite map of the room
| Candy Constellation Area Map | |
|---|---|
 | |
| |||||||||||||||||||||||||||||