Course 1 - Hole 4: Difference between revisions
(Created page with "{{image|screenshots}} {{Infobox-KDCHole |image= 300px |caption= Composite map of '''Course 1 - Hole 4''' from ''Kirby's Dream Course''...") |
mNo edit summary |
||
| (7 intermediate revisions by 2 users not shown) | |||
| Line 1: | Line 1: | ||
{{Infobox-KDCHole | {{Infobox-KDCHole | ||
|image= [[File:KDC Course 1 Hole 4 map.png|300px]] | |image= | ||
|caption= Composite | <tabs> | ||
<tab name="Main Game"> | |||
[[File:KDC Course 1 Hole 4 map.png|300px]] | |||
</tab> | |||
<tab name="Extra Game"> | |||
[[File:KDC Course 1 Hole 4 extra map.png|300px]] | |||
</tab> | |||
</tabs> | |||
|caption= Composite maps of '''Course 1 - Hole 4''' from ''[[Kirby's Dream Course]]''. | |||
|course= [[Course 1]] | |course= [[Course 1]] | ||
|ability= [[Burning|Fireball]] | |ability= '''Main Game'''<br>None<br>'''Extra Game'''<br>[[Burning|Fireball]]<br>[[Hi-Jump]] | ||
|previous= [[Course 1 - Hole 3]] | |previous= [[Course 1 - Hole 3]] | ||
|next= [[Course 1 - Hole 5]] | |next= [[Course 1 - Hole 5]] | ||
| Line 11: | Line 18: | ||
== Summary == | == Summary == | ||
This hole takes place in a flat setting contained by walls of | This hole takes place in a flat setting contained by walls of [[bumper]]s. This interior space is split in two by a line of [[Spike|Danger Zones]] and a single [[Whispy Woods]]. In line with Whispy Woods traveling down the board are four [[Kabu]] who serve as [[Kirby]]'s targets. Kirby begins the board on the lower end of the upper side of the danger zone divide. He can cross it either by bouncing over or using the [[Warp Panel]] on the other end of his side, but if using the second option, he should be careful not to go too fast, as the output Warp Panel points toward a [[Gordo]]. Getting a hole-in-one on this course is probably not possible without the use of [[Copy Ability|Copy Abilities]] from another hole. | ||
=== Extra Game === | === Extra Game === | ||
| Line 89: | Line 96: | ||
|- | |- | ||
|{{center|[[File:KDC Bumper sprite.png]]}} | |{{center|[[File:KDC Bumper sprite.png]]}} | ||
|Bumper | |[[Bumper]] | ||
|- | |- | ||
|{{center|[[File:KDC Danger Zone sprite.png]]}} | |{{center|[[File:KDC Danger Zone sprite.png]]}} | ||
| Line 97: | Line 104: | ||
|[[Warp Panel]] | |[[Warp Panel]] | ||
|} | |} | ||
== Gallery == | |||
<gallery> | |||
KDC Course 1 Hole 4 screenshot 01.png|Heading toward the Warp Panel | |||
KDC Course 1 Hole 4 screenshot 02.png|Emerging on the other side, not too quickly now | |||
</gallery> | |||
{{clear}} | {{clear}} | ||
{{Navbox- | {{Navbox-KDC}} | ||
[[Category:Course 1 holes]] | [[Category:Course 1 holes]] | ||
Latest revision as of 21:14, 21 September 2022
| ||||||||||
| ||||||||||
|
| ||||||||||


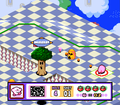
Course 1 - Hole 4 is the fourth hole of Course 1 in Kirby's Dream Course. This hole features a board split in two by a field of Danger Zones and a set of Warp Panels which can be used to cross it.
Summary[edit]
This hole takes place in a flat setting contained by walls of bumpers. This interior space is split in two by a line of Danger Zones and a single Whispy Woods. In line with Whispy Woods traveling down the board are four Kabu who serve as Kirby's targets. Kirby begins the board on the lower end of the upper side of the danger zone divide. He can cross it either by bouncing over or using the Warp Panel on the other end of his side, but if using the second option, he should be careful not to go too fast, as the output Warp Panel points toward a Gordo. Getting a hole-in-one on this course is probably not possible without the use of Copy Abilities from another hole.
Extra Game[edit]
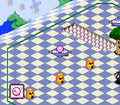
The Extra Game places Kirby's starting position on the other side of the danger zone barrier and almost completely changes the enemies and their locations. Included are Starman and Flamer, who can provide the Hi-Jump and Fireball abilities respectively. Finding an optimal path through this hole that does not end up hitting the danger zones or Gordos can be tricky.
Enemies[edit]
|
Obstacles[edit]
| Sprite | Obstacle |
|---|---|
| Bumper | |
| Danger Zone | |
| Warp Panel |
Gallery[edit]
Heading toward the Warp Panel
Emerging on the other side, not too quickly now

