Course 6 - Hole 4: Difference between revisions
(Created page with "{{image|screenshots}} {{Infobox-KDCHole |image= 300px |caption= Composite map of '''Course 6 - Hole 4''' from ''Kirby's Dream Course''...") |
mNo edit summary |
||
| (6 intermediate revisions by 2 users not shown) | |||
| Line 1: | Line 1: | ||
{{Infobox-KDCHole | {{Infobox-KDCHole | ||
|image= [[File:KDC Course 6 Hole 4 map.png|300px]] | |image= | ||
|caption= Composite | <tabs> | ||
<tab name="Main Game"> | |||
[[File:KDC Course 6 Hole 4 map.png|300px]] | |||
</tab> | |||
<tab name="Extra Game"> | |||
[[File:KDC Course 6 Hole 4 extra map.png|300px]] | |||
</tab> | |||
</tabs> | |||
|caption= Composite maps of '''Course 6 - Hole 4''' from ''[[Kirby's Dream Course]]''. | |||
|course= [[Course 6]] | |course= [[Course 6]] | ||
|ability= '''Main Game'''<br>None<br>'''Extra Game'''<br>[[Hi-Jump]]<br>[[UFO]] | |ability= '''Main Game'''<br>None<br>'''Extra Game'''<br>[[Hi-Jump]]<br>[[UFO]] | ||
| Line 95: | Line 102: | ||
|[[Turntable]] | |[[Turntable]] | ||
|- | |- | ||
|{{center|[[File:KDC Turntable | |{{center|[[File:KDC Turntable Stop Switch sprite.png]]}} | ||
|[[Turntable]] stop switch | |[[Turntable]] stop switch | ||
|} | |} | ||
== Gallery == | |||
<gallery> | |||
KDC Course 6 Hole 4 screenshot 01.png|Planning the perfect shot | |||
KDC Course 6 Hole 4 screenshot 02.png|Executing the perfect shot | |||
</gallery> | |||
{{clear}} | {{clear}} | ||
{{Navbox- | {{Navbox-KDC}} | ||
[[Category:Course 6 holes]] | [[Category:Course 6 holes]] | ||
Latest revision as of 12:47, 21 September 2022
| ||||||||||
| ||||||||||
|
| ||||||||||


Course 6 - Hole 4 is the fourth hole of Course 6 in Kirby's Dream Course. It features a small compact board lined with numerous obstacles.
Summary[edit]
This board is fairly small and rectangular. In the left and rightmost corners are basins filled with sand bunkers which are difficult to escape. Kirby starts in the uppermost corner, and can follow a curving line of neutral enemies through the middle of the board, passing through Danger Zones and potentially deactivating some Turntables in the process by flipping the switch in the center. From there, a Kick Panel can be used to reach the remaining enemies down in a small basin in the lowermost corner.
Extra Game[edit]
In the Extra Game, Kirby starts further down to the right from his original starting position. In place of the original enemy line-up, two Broomhatters form a straight line up toward Kirby's original start position. In the basin down at the bottom, a Starman and UFO can now be found.
Enemies[edit]
|
Obstacles[edit]
| Sprite | Obstacle |
|---|---|
| Bunker | |
| Danger Zone | |
| Kick Panel | |
| Turntable | |
| Turntable stop switch |
Gallery[edit]
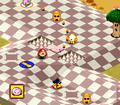
Planning the perfect shot
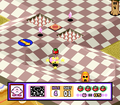
Executing the perfect shot

