Cloudy Park - Stage 6 (Kirby's Dream Land 3): Difference between revisions
Trig Jegman (talk | contribs) mNo edit summary |
m (Text replacement - "\|theme title=\[\[(.*)\]\]" to "|theme title="$1"") |
||
| (16 intermediate revisions by 9 users not shown) | |||
| Line 1: | Line 1: | ||
{{ | {{DISPLAYTITLE: Cloudy Park - Stage 6 (''Kirby's Dream Land 3'')}}{{Infobox-KDL3Stage | ||
{{Infobox-KDL3Stage | |||
|title=Cloudy Park - Stage 6 | |title=Cloudy Park - Stage 6 | ||
|image=[[File:Cloudy Park | |image=[[File:KDL3 Cloudy Park Stage 6 Heart Star.png]] | ||
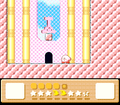
|caption= | |caption=Obtaining the [[Heart Star]] at the end of '''Cloudy Park - Stage 6'''. | ||
|level=[[Cloudy Park (Kirby's Dream Land 3)|Cloudy Park]] | |level=[[Cloudy Park (Kirby's Dream Land 3)|Cloudy Park]] | ||
|stage=6 | |stage=6 | ||
| Line 9: | Line 8: | ||
|midboss={{N}} | |midboss={{N}} | ||
|heart=[[File:KDL3 Heart Star Character 18 Sprite.png]] | |heart=[[File:KDL3 Heart Star Character 18 Sprite.png]] | ||
|theme music=[[File:KD3 Grass Land 2.mp3]] | |||
|theme title="[[Grass Land (2)]]" | |||
|description=Clip of the music that plays in Cloudy Park - Stage 6 | |||
|previous=[[Cloudy Park - Stage 5 (Kirby's Dream Land 3)|Stage 5]] | |previous=[[Cloudy Park - Stage 5 (Kirby's Dream Land 3)|Stage 5]] | ||
|next=[[Cloudy Park - Stage 7 (Kirby's Dream Land 3)|Stage 7]] (boss fight) | |next=[[Cloudy Park - Stage 7 (Kirby's Dream Land 3)|Stage 7]] (boss fight) | ||
| Line 16: | Line 18: | ||
==Overview== | ==Overview== | ||
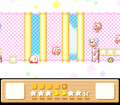
The stage begins inside a brightly- | The stage begins inside a brightly-colored cloud palace. On the walls are a bunch of drawings of various enemies. Apart from a few [[Star Block]]s, there are no obstacles in this room. | ||
In the following small room, [[Kirby]] will need to rely on a [[Madoo]] to clear the way forward. | In the following small room, [[Kirby]] will need to rely on a [[Madoo]] to clear the way forward. | ||
| Line 34: | Line 36: | ||
The next area is a tower ascending up past several different types of [[Bukiset]]. Behind each one is a barricade that Kirby can break using the ability he got from the Bukiset guarding it. This leads to several goodies. | The next area is a tower ascending up past several different types of [[Bukiset]]. Behind each one is a barricade that Kirby can break using the ability he got from the Bukiset guarding it. This leads to several goodies. | ||
The door leads to a room identical to Room 2. | The door leads to a room identical to Room 2. Madoo will help Kirby get to the door. | ||
In the last hall, Kirby will see the same drawings he saw in the first one. This time, however, they will come to life and attack him. They can be defeated like normal enemies. The stage exit is at the end of the hall. | In the last hall, Kirby will see the same drawings he saw in the first one. This time, however, they will come to life and attack him. They can be defeated like normal enemies. The stage exit is at the end of the hall. | ||
| Line 40: | Line 42: | ||
In the last room, the goblet-shaped creature can be found again. If Kirby satisfied it, it will give him a Heart Star. | In the last room, the goblet-shaped creature can be found again. If Kirby satisfied it, it will give him a Heart Star. | ||
{{clear}} | |||
==Enemies and | ===Heart Star guide=== | ||
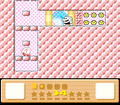
[[File:KDL3 Cloudy Park Stage 6 screenshot 07.png|thumb|Kirby's hint for this Star Block formation is not as clear as it was the last time.]] | |||
In a side-chamber from the hall full of Mopoo, a blocky goblet-shaped creature can be found. It is standing on its head. In the room adjacent is a 5x5 array of Star Blocks. Kirby has to shape this arrangement by removing select blocks from the grouping, but Kirby has to make sure the shape is the right way up. This done correctly, the creature, now right side up, will give Kirby a [[Heart Star]] at the end of the stage. | |||
==Enemies and Animal Friends== | |||
{| width=50% | {| width=50% | ||
|<tabs> | |<tabs> | ||
| Line 55: | Line 60: | ||
!Copy Ability | !Copy Ability | ||
|- | |- | ||
|align=center|[[File: | |align=center|[[File:KDL3 Bouncy Drawing Sprite.png]] | ||
|[[Bouncy]] drawing | |[[Bouncy]] drawing | ||
|style="border-style: solid; border-width: 1px 3px 1px 1px"|None | |style="border-style: solid; border-width: 1px 3px 1px 1px"|None | ||
|align=center|[[File: | |align=center|[[File:KDL3 Mopoo Sprite.png]] | ||
|[[Mopoo]] | |[[Mopoo]] | ||
|None | |None | ||
|- | |- | ||
|align=center|[[File: | |align=center|[[File:KDL3 Bronto Burt Drawing Sprite.png]] | ||
|[[Bronto Burt]] drawing | |[[Bronto Burt]] drawing | ||
|style="border-style: solid; border-width: 1px 3px 1px 1px"|None | |style="border-style: solid; border-width: 1px 3px 1px 1px"|None | ||
|align=center|[[File: | |align=center|[[File:KDL3 Propeller sprite.png]] | ||
|[[Propeller]] | |[[Propeller]] | ||
|None | |None | ||
|- | |- | ||
|align=center|[[File: | |align=center|[[File:KDL3 Bukiset sprite.png]] | ||
|[[Bukiset]] | |[[Bukiset]] | ||
|style="border-style: solid; border-width: 1px 3px 1px 1px"|[[Burning|Burn]], [[Cleaning|Clean]], [[Ice]], [[Needle]], [[Spark]] | |style="border-style: solid; border-width: 1px 3px 1px 1px"|[[Burning|Burn]], [[Cleaning|Clean]], [[Ice]], [[Needle]], [[Spark]] | ||
|align=center|[[File: | |align=center|[[File:KDL3 Shotzo Sprite.png]] | ||
|[[Shotzo]] | |[[Shotzo]] | ||
|N/A | |N/A | ||
|- | |- | ||
|align=center|[[File: | |align=center|[[File:KDL3 Como sprite.png]] | ||
|[[Como]] | |[[Como]] | ||
|style="border-style: solid; border-width: 1px 3px 1px 1px"|None | |style="border-style: solid; border-width: 1px 3px 1px 1px"|None | ||
|align=center|[[File: | |align=center|[[File:KDL3 Tick Sprite.png]] | ||
|[[Tick]] | |[[Tick]] | ||
|[[Needle]] | |[[Needle]] | ||
|- | |- | ||
|align=center|[[File: | |align=center|[[File:KDL3 Madoo sprite.png]] | ||
|[[Madoo]] | |[[Madoo]] | ||
|style="border-style: solid; border-width: 1px 3px 1px 1px"|None | |style="border-style: solid; border-width: 1px 3px 1px 1px"|None | ||
|align=center|[[File: | |align=center|[[File:KDL3 Waddle Dee Drawing Sprite.png]] | ||
|[[Waddle Dee]] drawing | |[[Waddle Dee]] drawing | ||
|None | |None | ||
| Line 96: | Line 101: | ||
!Name | !Name | ||
|- | |- | ||
|align=center|[[File: | |align=center|[[File:KDL3 Coo Sprite.png]] | ||
|[[Coo]] | |[[Coo]] | ||
|- | |- | ||
|align=center|[[File: | |align=center|[[File:KDL3 Nago Sprite.png]] | ||
|[[Nago]] | |[[Nago]] | ||
|- | |- | ||
|align=center|[[File: | |align=center|[[File:KDL3 Rick Sprite.png]] | ||
|[[Rick]] | |[[Rick]] | ||
|} | |} | ||
| Line 111: | Line 116: | ||
==Trivia== | ==Trivia== | ||
*The goblet-shaped client is a reference to the Easy Picross B-7 level "Wine Glass" (Japanese version, replaced by "Silk Hat" elsewhere) from ''[[mariowiki:Mario's Picross|Mario's Picross]]''. | *The goblet-shaped client is a reference to the Easy Picross B-7 level "Wine Glass" (Japanese version, replaced by "Silk Hat" elsewhere) from ''[[mariowiki:Mario's Picross|Mario's Picross]]''. | ||
== Gallery == | |||
<gallery> | |||
KDL3 Cloudy Park Stage 6 screenshot 01.png|Spotting illustrations of common enemies on the walls in the first room | |||
KDL3 Cloudy Park Stage 6 screenshot 02.png|A [[Madoo]] inadvertently helps Kirby out in this room | |||
KDL3 Cloudy Park Stage 6 screenshot 03.png|Moving past Shotzos in the halls | |||
KDL3 Cloudy Park Stage 6 screenshot 04.png|Spotting potential companions in the other chambers | |||
KDL3 Cloudy Park Stage 6 screenshot 05.png|Moving past one of the side doors in the hall leading to a hint to the Star Block puzzle | |||
KDL3 Cloudy Park Stage 6 screenshot 06.png|An up-side-down guest offers a clue to the Star Block puzzle | |||
KDL3 Cloudy Park Stage 6 screenshot 08.png|Running into Comos in the hall | |||
KDL3 Cloudy Park Stage 6 screenshot 09.png|Moving past Bukisets guarding blocks corresponding to their abilities | |||
KDL3 Cloudy Park Stage 6 screenshot 10.png|Reaching the end of the stage, as the drawings come to life and attack Kirby | |||
</gallery> | |||
{{clear}} | {{clear}} | ||
{{Navbox- | {{Navbox-KDL3}} | ||
Latest revision as of 19:13, 19 January 2024
| ||||||||||||||||
| ||||||||||||||||
| ||||||||||||||||
|
| ||||||||||||||||

- This article is about the stage in Kirby's Dream Land 3. For the stage in Kirby's Dream Land 2, see Cloudy Park - Stage 6 (Kirby's Dream Land 2).
Cloudy Park - Stage 6 is the sixth stage of Cloudy Park in Kirby's Dream Land 3.
Overview[edit]
The stage begins inside a brightly-colored cloud palace. On the walls are a bunch of drawings of various enemies. Apart from a few Star Blocks, there are no obstacles in this room.
In the following small room, Kirby will need to rely on a Madoo to clear the way forward.
Down this winding hall, Kirby will have to deal with Shotzos and a thumping block.
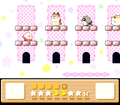
Kirby then finds himself in one of 5 separate chambers. The next three contain his friends - Nago, Coo and Rick. The last one has a doorway leading to the next area. To get to these other chambers, Kirby will need to access a larger room which contains a Madoo.
The following hallway is barred by Star Blocks. Behind each barricade, one more Propeller can be found than the previous section of the hall.
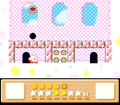
The next hallway is patrolled by Mopoo. Along the way, some side chambers can be found. One of them has a strange pink creature in the shape of a goblet, though this creature appears to be upside-down. The other room has a 5x5 array of Star Blocks.
The next hallway is lined with Como.
The following room consists of five separate chambers, like before, but most of them are filled with hostile things. Unlike the previous example, the doorways in the Madoo room do not align with where they lead. To reach the next area, Kirby will need to take the second door from the right.
The next area is a tower ascending up past several different types of Bukiset. Behind each one is a barricade that Kirby can break using the ability he got from the Bukiset guarding it. This leads to several goodies.
The door leads to a room identical to Room 2. Madoo will help Kirby get to the door.
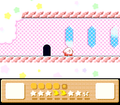
In the last hall, Kirby will see the same drawings he saw in the first one. This time, however, they will come to life and attack him. They can be defeated like normal enemies. The stage exit is at the end of the hall.
In the last room, the goblet-shaped creature can be found again. If Kirby satisfied it, it will give him a Heart Star.
Heart Star guide[edit]

In a side-chamber from the hall full of Mopoo, a blocky goblet-shaped creature can be found. It is standing on its head. In the room adjacent is a 5x5 array of Star Blocks. Kirby has to shape this arrangement by removing select blocks from the grouping, but Kirby has to make sure the shape is the right way up. This done correctly, the creature, now right side up, will give Kirby a Heart Star at the end of the stage.
Enemies and Animal Friends[edit]
Trivia[edit]
- The goblet-shaped client is a reference to the Easy Picross B-7 level "Wine Glass" (Japanese version, replaced by "Silk Hat" elsewhere) from Mario's Picross.
Gallery[edit]
Spotting illustrations of common enemies on the walls in the first room
A Madoo inadvertently helps Kirby out in this room

Moving past Shotzos in the halls
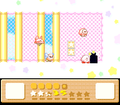
Spotting potential companions in the other chambers
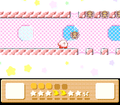
Moving past one of the side doors in the hall leading to a hint to the Star Block puzzle
An up-side-down guest offers a clue to the Star Block puzzle
Running into Comos in the hall
Moving past Bukisets guarding blocks corresponding to their abilities
Reaching the end of the stage, as the drawings come to life and attack Kirby


