Sand Canyon - Stage 6: Difference between revisions
m (Text replacement - "\|theme title=\[\[(.*)\]\]" to "|theme title="$1"") |
|||
| (15 intermediate revisions by 8 users not shown) | |||
| Line 1: | Line 1: | ||
{{Infobox-KDL3Stage | {{Infobox-KDL3Stage | ||
|image=[[File:Sand Canyon | |image=[[File:KDL3 Sand Canyon Stage 6 Heart Star.png]] | ||
|caption= | |caption=Obtaining the [[Heart Star]] at the end of '''Sand Canyon - Stage 6'''. | ||
|level=[[Sand Canyon]] | |level=[[Sand Canyon]] | ||
|stage=6 | |stage=6 | ||
|animal=All [[Animal Friend]]s | |animal=All [[Animal Friend]]s | ||
|midboss={{N}} | |midboss={{N}} | ||
|heart=[[File: | |heart=[[File:KDL3 ROB Sprite.png]] [[File:KDL3 Hector Sprite.png]] | ||
|theme music=[[File:KD3 Sand Canyon 3.mp3]] | |||
|theme title="[[Desert Stage]]" | |||
|description=Clip of the theme that plays in Sand Canyon - Stage 6 | |||
|previous=[[Sand Canyon - Stage 5|Stage 5]] | |previous=[[Sand Canyon - Stage 5|Stage 5]] | ||
|next=[[Sand Canyon - Stage 7|Stage 7]] (boss fight) | |next=[[Sand Canyon - Stage 7|Stage 7]] (boss fight) | ||
| Line 17: | Line 20: | ||
From there, Kirby finds a plain desert area. In front of him is a massive black pyramid, which he will enter. | From there, Kirby finds a plain desert area. In front of him is a massive black pyramid, which he will enter. | ||
The door leads into the pyramid, to a strange-looking interior place. Kirby must dodge boulders here while avoiding falling into the [[ | The door leads into the pyramid, to a strange-looking interior place. Kirby must dodge boulders here while avoiding falling into the [[bottomless pit]] below. | ||
Kirby then finds a hub-like area filled with water. There are eight different directions to go, with a [[Zebon]] in the middle. | Kirby then finds a hub-like area filled with water. There are eight different directions to go, with a [[Zebon]] in the middle. | ||
| Line 32: | Line 35: | ||
In the final room, Professor Hector is waiting. If Kirby collected all the pieces of R.O.B., the professor will give him a Heart Star. | In the final room, Professor Hector is waiting. If Kirby collected all the pieces of R.O.B., the professor will give him a Heart Star. | ||
=== | {{clear}} | ||
R.O.B. has been disassembled, and his pieces scattered all over the interior of the pyramid. In order to get the Heart Star from Professor Hector, Kirby will need to collect each piece before reaching the end of the stage. The pieces can be found in side-chambers, accessible from the main hub with the [[Zebon]] in it. | |||
*The bottom-left chamber has R.O.B.'s right arm. To get it, Kirby will need to grab [[Coo]] and the [[Stone]] ability. Careful maneuvering is needed in the first room to avoid falling into the [[ | ===Heart Star guide=== | ||
*The top-left chamber has R.O.B.'s base. To get it, Kirby has to follow the correct path through a series of doors. To | R.O.B. has been disassembled, and his pieces scattered all over the interior of the pyramid. In order to get the [[Heart Star]] from Professor Hector, Kirby will need to collect each piece before reaching the end of the stage. The pieces can be found in side-chambers, accessible from the main hub with the [[Zebon]] in it. | ||
*The bottom-left chamber has R.O.B.'s right arm. To get it, Kirby will need to grab [[Coo]] and the [[Stone]] ability. Careful maneuvering is needed in the first room to avoid falling into the [[bottomless pit]] below. | |||
**This can also be done if Kirby walks through the gap on the left and [[Gooey]] (controlled by a second player) has Coo and [[Space Jump]]s to Kirby. | |||
*The top-left chamber has R.O.B.'s base. To get it, Kirby has to follow the correct path through a series of doors (specifically, middle, left, right, left, and middle doors, in that order). To make the correct doors visible, [[Kine]] and the [[Spark]] ability can be used. | |||
*The top chamber has R.O.B.'s head. To get it, Kirby has to climb an auto-scrolling tower. Once at the top, Kirby can grab the head, but he does have to climb back down again, which may be more difficult. | *The top chamber has R.O.B.'s head. To get it, Kirby has to climb an auto-scrolling tower. Once at the top, Kirby can grab the head, but he does have to climb back down again, which may be more difficult. | ||
*The top-right chamber has R.O.B.'s torso. To get it, Kirby has to go through the doors on either the left or the right, with the middle one always taking him back down. Along the way, he can use the various Copy Abilities to ascend the tower. | *The top-right chamber has R.O.B.'s torso. To get it, Kirby has to go through the doors on either the left or the right, with the middle one always taking him back down. Along the way, he can use the various Copy Abilities to ascend the tower. | ||
| Line 42: | Line 48: | ||
Once all the pieces are collected, Kirby just needs to reach the end of the stage. | Once all the pieces are collected, Kirby just needs to reach the end of the stage. | ||
<gallery> | |||
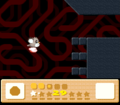
KDL3 Sand Canyon Stage 6 screenshot 10.png|Where there's a will, there's a way. | |||
KDL3 Sand Canyon Stage 6 screenshot 11.png|Kirby and Coo will need to make use of the Stone ability and some clever block clearing to get through here. | |||
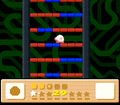
KDL3 Sand Canyon Stage 6 screenshot 13.png|R.O.B.'s torso can be found after passing through several elemental barricades. | |||
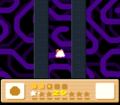
KDL3 Sand Canyon Stage 6 screenshot 16.png|The head can be found atop the pyramid. No ability or animal friend is needed to reach it. | |||
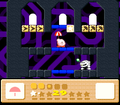
KDL3 Sand Canyon Stage 6 screenshot 18.png|Spark + Kine is helpful in determining the correct path to R.O.B.'s base. | |||
</gallery> | |||
==Enemies and animal friends== | ==Enemies and animal friends== | ||
| Line 55: | Line 69: | ||
!Copy Ability | !Copy Ability | ||
|- | |- | ||
|align=center|[[File: | |align=center|[[File:KDL3 Smooth Boulder Sprite.png]] | ||
|[[Boulder]] | |[[Boulder]] | ||
|style="border-style: solid; border-width: 1px 3px 1px 1px"|N/A | |style="border-style: solid; border-width: 1px 3px 1px 1px"|N/A | ||
|align=center|[[File: | |align=center|[[File:KDL3 Peloo Sprite.png]] | ||
|[[Peloo]] | |[[Peloo]] | ||
|N/A | |N/A | ||
|- | |- | ||
|align=center|[[File: | |align=center|[[File:KDL3 Bukiset sprite.png]] | ||
|[[Bukiset]] | |[[Bukiset]] | ||
|style="border-style: solid; border-width: 1px 3px 1px 1px"|[[Burning|Burn]], [[Cleaning|Clean]], [[Cutter]], [[Ice]], [[Needle]], [[Parasol]], [[Spark]], [[Stone]] | |style="border-style: solid; border-width: 1px 3px 1px 1px"|[[Burning|Burn]], [[Cleaning|Clean]], [[Cutter]], [[Ice]], [[Needle]], [[Parasol]], [[Spark]], [[Stone]] | ||
|align=center|[[File: | |align=center|[[File:KDL3 Pteran Sprite.png]] | ||
|[[Pteran]] | |[[Pteran]] | ||
|None | |None | ||
|- | |- | ||
|align=center|[[File: | |align=center|[[File:KDL3 Cappy Sprite.png]] | ||
|[[Cappy]] | |[[Cappy]] | ||
|style="border-style: solid; border-width: 1px 3px 1px 1px"|None | |style="border-style: solid; border-width: 1px 3px 1px 1px"|None | ||
|align=center|[[File: | |align=center|[[File:KDL3 Shotzo Sprite.png]] | ||
|[[Shotzo]] | |[[Shotzo]] | ||
|N/A | |N/A | ||
|- | |- | ||
|align=center|[[File: | |align=center|[[File:KDL3 Doka Sprite.png]] | ||
|[[Doka]] | |[[Doka]] | ||
|style="border-style: solid; border-width: 1px 3px 1px 1px"|None | |style="border-style: solid; border-width: 1px 3px 1px 1px"|None | ||
|align=center|[[File: | |align=center|[[File:KDL3 Sparky Sprite.png]] | ||
|[[Sparky]] | |[[Sparky]] | ||
|[[Spark]] | |[[Spark]] | ||
|- | |- | ||
|align=center|[[File: | |align=center|[[File:KDL3 Nidoo sprite.png]] | ||
|[[Nidoo]] | |[[Nidoo]] | ||
|style="border-style: solid; border-width: 1px 3px 1px 1px"|None | |style="border-style: solid; border-width: 1px 3px 1px 1px"|None | ||
|align=center|[[File: | |align=center|[[File:KDL3 Zebon Sprite.png]] | ||
|[[Zebon]] | |[[Zebon]] | ||
|N/A | |N/A | ||
| Line 96: | Line 110: | ||
!Name | !Name | ||
|- | |- | ||
|align=center|[[File: | |align=center|[[File:KDL3 ChuChu Sprite.png]] | ||
|[[ChuChu]] | |[[ChuChu]] | ||
|- | |- | ||
|align=center|[[File: | |align=center|[[File:KDL3 Coo Sprite.png]] | ||
|[[Coo]] | |[[Coo]] | ||
|- | |- | ||
|align=center|[[File: | |align=center|[[File:KDL3 Kine Sprite.png]] | ||
|[[Kine]] | |[[Kine]] | ||
|- | |- | ||
|align=center|[[File: | |align=center|[[File:KDL3 Nago Sprite.png]] | ||
|[[Nago]] | |[[Nago]] | ||
|- | |- | ||
|align=center|[[File: | |align=center|[[File:KDL3 Pitch Sprite.png]] | ||
|[[Pitch]] | |[[Pitch]] | ||
|- | |- | ||
|align=center|[[File: | |align=center|[[File:KDL3 Rick Sprite.png]] | ||
|[[Rick]] | |[[Rick]] | ||
|} | |} | ||
| Line 117: | Line 131: | ||
</tabs> | </tabs> | ||
|} | |} | ||
== Gallery == | |||
<gallery> | |||
KDL3 Sand Canyon Stage 6 screenshot 01.png|Kirby uses Ice to clear the way toward the pyramid. | |||
KDL3 Sand Canyon Stage 6 screenshot 02.png|Reaching a door just ahead of the pyramid | |||
KDL3 Sand Canyon Stage 6 screenshot 03.png|Entering the pyramid | |||
KDL3 Sand Canyon Stage 6 screenshot 04.png|Dodging boulders falling between thin pillars | |||
KDL3 Sand Canyon Stage 6 screenshot 05.png|Swimming toward the Zebon in the heart of the pyramid | |||
KDL3 Sand Canyon Stage 6 screenshot 06.png|Passing by Bukisets which provide all of the base abilities | |||
KDL3 Sand Canyon Stage 6 screenshot 07.png|Grabbing one of the Energy Drinks beneath the door to a room full of Kirby's friends | |||
KDL3 Sand Canyon Stage 6 screenshot 08.png|Picking out Coo to help collect the pieces | |||
KDL3 Sand Canyon Stage 6 screenshot 09.png|Flying toward the piece in the lower-right area of the pyramid | |||
KDL3 Sand Canyon Stage 6 screenshot 12.png|Climbing the rooms in the upper-right area | |||
KDL3 Sand Canyon Stage 6 screenshot 14.png|Plummeting down after collecting one of the pieces | |||
KDL3 Sand Canyon Stage 6 screenshot 15.png|Climbing the auto-scrolling shaft in the topmost portion of the pyramid | |||
KDL3 Sand Canyon Stage 6 screenshot 17.png|Using Spark + Kine to determine the correct door to enter on the upper-left path | |||
KDL3 Sand Canyon Stage 6 screenshot 19.png|Exiting the pyramid by taking the route to the right | |||
KDL3 Sand Canyon Stage 6 screenshot 20.png|Heading back out, in an area mirroring the initial entrance | |||
KDL3 Sand Canyon Stage 6 screenshot 21.png|Moving past Shotzos in the final area of the stage | |||
KDL3 Sand Canyon Stage 6 screenshot 22.png|Reaching the stage exit after much toil | |||
</gallery> | |||
{{clear}} | {{clear}} | ||
{{Navbox- | {{Navbox-KDL3}} | ||
Latest revision as of 20:31, 19 January 2024
| ||||||||||||||||
| ||||||||||||||||
| ||||||||||||||||
|
| ||||||||||||||||

Sand Canyon - Stage 6 is the sixth stage of Sand Canyon in Kirby's Dream Land 3.
Overview[edit]
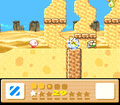
The stage begins out in the desert, as Kirby must progress to the right past loads of enemies.
From there, Kirby finds a plain desert area. In front of him is a massive black pyramid, which he will enter.
The door leads into the pyramid, to a strange-looking interior place. Kirby must dodge boulders here while avoiding falling into the bottomless pit below.
Kirby then finds a hub-like area filled with water. There are eight different directions to go, with a Zebon in the middle.
- The bottom door leads to a room where a bunch of Bukisets can be found, wielding different abilities. All eight abilities can be obtained from these guys. Another door leads to a split chamber where two more doors await on the left and right, along with some Energy Drinks. Through these doors, all six of Kirby's Animal Friends are waiting.
- The rightmost door leads to the next area.
- All other doors lead to various rooms containing challenges that require specific animal friends and copy abilities to tackle. Each one leads to a collectable item.
After taking the door forward, there is a gauntlet of various hazards that Kirby has to contend with.
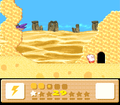
The next door leads back out of the pyramid, and into the desert.
The following desert walkway features a long and grueling run past Shotzos to reach the stage exit.
In the final room, Professor Hector is waiting. If Kirby collected all the pieces of R.O.B., the professor will give him a Heart Star.
Heart Star guide[edit]
R.O.B. has been disassembled, and his pieces scattered all over the interior of the pyramid. In order to get the Heart Star from Professor Hector, Kirby will need to collect each piece before reaching the end of the stage. The pieces can be found in side-chambers, accessible from the main hub with the Zebon in it.
- The bottom-left chamber has R.O.B.'s right arm. To get it, Kirby will need to grab Coo and the Stone ability. Careful maneuvering is needed in the first room to avoid falling into the bottomless pit below.
- This can also be done if Kirby walks through the gap on the left and Gooey (controlled by a second player) has Coo and Space Jumps to Kirby.
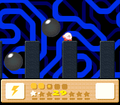
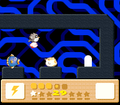
- The top-left chamber has R.O.B.'s base. To get it, Kirby has to follow the correct path through a series of doors (specifically, middle, left, right, left, and middle doors, in that order). To make the correct doors visible, Kine and the Spark ability can be used.
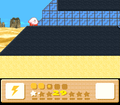
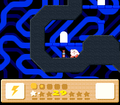
- The top chamber has R.O.B.'s head. To get it, Kirby has to climb an auto-scrolling tower. Once at the top, Kirby can grab the head, but he does have to climb back down again, which may be more difficult.
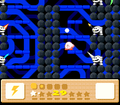
- The top-right chamber has R.O.B.'s torso. To get it, Kirby has to go through the doors on either the left or the right, with the middle one always taking him back down. Along the way, he can use the various Copy Abilities to ascend the tower.
- The bottom-right chamber has R.O.B.'s left arm. To get it, Kirby will need Kine, but will also need to get him over there. The best way to do this is to use the Parasol ability to float over.
- Alternately, this piece can be gotten with Coo, but patience and a fast thumb is needed.
Once all the pieces are collected, Kirby just needs to reach the end of the stage.

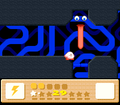
Where there's a will, there's a way.
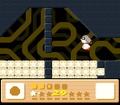
Kirby and Coo will need to make use of the Stone ability and some clever block clearing to get through here.
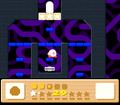
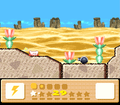
R.O.B.'s torso can be found after passing through several elemental barricades.
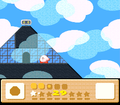
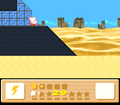
The head can be found atop the pyramid. No ability or animal friend is needed to reach it.
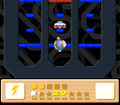
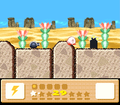
Spark + Kine is helpful in determining the correct path to R.O.B.'s base.


Enemies and animal friends[edit]
Gallery[edit]
Kirby uses Ice to clear the way toward the pyramid.
Reaching a door just ahead of the pyramid
Entering the pyramid
Dodging boulders falling between thin pillars
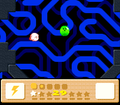
Swimming toward the Zebon in the heart of the pyramid
Passing by Bukisets which provide all of the base abilities
Grabbing one of the Energy Drinks beneath the door to a room full of Kirby's friends
Picking out Coo to help collect the pieces
Flying toward the piece in the lower-right area of the pyramid
Climbing the rooms in the upper-right area
Plummeting down after collecting one of the pieces
Climbing the auto-scrolling shaft in the topmost portion of the pyramid

Using Spark + Kine to determine the correct door to enter on the upper-left path
Exiting the pyramid by taking the route to the right
Heading back out, in an area mirroring the initial entrance
Moving past Shotzos in the final area of the stage
Reaching the stage exit after much toil


