Factory Tour: Difference between revisions
ShadowKirby (talk | contribs) m (Btw this is another formatting inconsistency. Br? ----? Tabs?) |
|||
| (24 intermediate revisions by 8 users not shown) | |||
| Line 1: | Line 1: | ||
{{Infobox-K64Stage | {{Infobox-K64Stage | ||
|image=[[File:Shiver Star 4. | |image=[[File:K64 Shiver Star Stage 4 screenshot 08.png|300px]] | ||
|caption=Kirby studies the factory. | |caption=[[Kirby]] studies the factory. | ||
|level=[[Shiver Star]] | |level=[[Shiver Star]] | ||
|stage=4 | |stage=4 | ||
|midboss=Big [[Burnis]] | |midboss=Big [[Burnis]] | ||
|friend=[[King Dedede]] | |friend=[[King Dedede]] | ||
|theme music=[[File:K64 Shiver Star theme.mp3]]<br>[[File:K64 Studying the Factory Sample.mp3]] | |||
|theme title="[[Shiver Star (theme)|Shiver Star]]"<br>"[[Studying the Factory]]" | |||
|description=Clips of the stage music for Factory Tour. | |||
|previous=[[Shiver Star - Stage 3|Stage 3]] | |previous=[[Shiver Star - Stage 3|Stage 3]] | ||
|next=[[ | |next=[[Shiver Star - Stage 5|Stage 5]] (boss fight) | ||
}} | }} | ||
''' | {{about|the stage in [[Kirby 64: The Crystal Shards]]|the [[Battle Stage]] in the [[Kirby Fighters (series)|Kirby Fighters games]]|[[Factory Tour (Battle Stage)]]}} | ||
'''Factory Tour'''<ref>''"We resurrected the hammer machines from the Factory Tour stage of Kirby 64: The Crystal Shards, and turned them into the Squeaky Hammer Machines in Kirby Fighters. I thought that the designer was just going to enhance the appearance of the ones from the Nintendo 64 version, so when I saw that they now opened their mouths and let out a belch of steam as they attacked, I was really surprised! I'd say they are even more "striking" than the ones in the N64 game."'' <small>--[[Tadashi Kamitake]], in a [[Miiverse]] post regarding [[Kirby Fighters]] ([https://web.archive.org/web/20170730215526/https://miiverse.nintendo.net/posts/AYMHAAACAAADVHjK8Se8gQ archived link to post])</small></ref> is the fourth stage of [[Shiver Star]] in ''[[Kirby 64: The Crystal Shards]]''. This stage takes place inside a factory complex with lots of conveyor belts and hazardous machinery. | |||
==Overview== | ==Overview== | ||
| Line 20: | Line 24: | ||
With Kirby back on his own, he'll have to traverse another series of conveyors, in front of some very odd tubes containing various animal subjects. | With Kirby back on his own, he'll have to traverse another series of conveyors, in front of some very odd tubes containing various animal subjects. | ||
The following room is a magma chamber with a giant [[Burnis]] to fight. When it is defeated, a | The following room is a magma chamber with a giant [[Burnis]] to fight. When it is defeated, a Crystal Shard appears inside a cage, which Kirby can break open using [[Spark-Cutter]]. | ||
The next room consists of a long trot across [[Crusher|crushing]] areas. Kirby will have to be nimble to not get flattened in this hall. | The next room consists of a long trot across [[Crusher|crushing]] areas. Kirby will have to be nimble to not get flattened in this hall. | ||
| Line 26: | Line 30: | ||
The last room is a series of hallways stacked atop each-other. Kirby will have to ascend them whilst avoiding bulldozing robots. The stage exit at the top is guarded by two [[Zoos]]. | The last room is a series of hallways stacked atop each-other. Kirby will have to ascend them whilst avoiding bulldozing robots. The stage exit at the top is guarded by two [[Zoos]]. | ||
===[[Crystal Shard]] | ===Crystal Shard guide=== | ||
{| class="wikitable mw-collapsible mw-collapsed" border=1 cellpadding=2 | |||
!colspan=5|Crystal Shard locations in Factory Tour | |||
|- | |||
|{{Center|[[File:K64 Shiver Star Stage 4 Crystal Shard 1.png|150px]]<br>'''Shard 1'''}} | |||
|The first [[Crystal Shard]] can be obtained in the first factory area. Kirby needs to use the [[Stone-Needle]] ability to break a series of boxes, allowing him to climb up a ladder to get it. | |||
|- | |||
|{{Center|[[File:K64 Shiver Star Stage 4 Crystal Shard 2.png|150px]]<br>'''Shard 2'''}} | |||
|The second shard can be found in a cage in the room where the Mid-Boss [[Burnis]] is fought. To break this cage, Kirby has to use the [[Spark-Cutter]] ability. | |||
|- | |||
|{{Center|[[File:K64 Shiver Star Stage 4 Crystal Shard 3.png|150px]]<br>'''Shard 3'''}} | |||
|The third shard can be found down at the end of one of the halls with the bulldozers. Kirby will have to be quick to get it and not get [[Crusher|crushed]]. | |||
|} | |||
==Enemies, mid-bosses and abilities== | ==Enemies, mid-bosses and abilities== | ||
| Line 80: | Line 93: | ||
|style="border-style: solid; border-width: 1px 3px 1px 1px" align=center|[[Image:K64 Burning Sprite.png|link=Burning]] | |style="border-style: solid; border-width: 1px 3px 1px 1px" align=center|[[Image:K64 Burning Sprite.png|link=Burning]] | ||
|align=center|[[Image:K64 Sir Kibble Sprite.png]] | |align=center|[[Image:K64 Sir Kibble Sprite.png]] | ||
|[[Sir Kibble]] | |[[Sir Kibble|Sirkibble]] | ||
|align=center|[[Image:K64 Cutter Sprite.png|link=Cutter]] | |align=center|[[Image:K64 Cutter Sprite.png|link=Cutter]] | ||
|- | |- | ||
| Line 121: | Line 134: | ||
==Music== | ==Music== | ||
{{main|Studying the Factory}} | {{main|Studying the Factory}} | ||
The musical piece used for the majority of this stage has become a reoccurring staple track in the [[Kirby (series)|''Kirby'' series]]. It appears unaltered in [[Kirby Fighters]] and ''[[Kirby Fighters | The musical piece used for the majority of this stage has become a reoccurring staple track in the [[Kirby (series)|''Kirby'' series]]. It appears unaltered in [[Kirby Fighters]], ''[[Kirby Fighters Deluxe]]'' and ''[[Kirby Fighters 2]]'', and has had rearrangements in ''[[Kirby: Canvas Curse]]'', ''[[Kirby Super Star Ultra]]'', ''[[Kirby and the Rainbow Curse]]'', ''[[Kirby: Planet Robobot]]'', and ''[[Kirby Fighters 2]]''. | ||
== Trivia == | |||
*This stage is the only one in ''Kirby 64: The Crystal Shards'' which has its own distinct name. | |||
== Gallery == | |||
<gallery> | |||
K64 Shiver Star Stage 4 screenshot 01.png|Finding a hatch opening leading into the complex | |||
K64 Shiver Star Stage 4 screenshot 02.png|Climbing down the first ladder | |||
K64 Shiver Star Stage 4 screenshot 03.png|Avoiding the [[Rockn]] that fire in this one and only location in the game | |||
K64 Shiver Star Stage 4 screenshot 04.png|Finding time between Shotzo fire to clear out the way to a Crystal Shard | |||
K64 PowerCombo.png|Kirby creating a Power Combo | |||
K64 Shiver Star Stage 4 screenshot 05.png|King Dedede steps in to pound down some shutters. | |||
K64 Shiver Star Stage 4 screenshot 06.png|Waiting between strikes from the [[Squeaky Hammer Machine]] | |||
K64 Shiver Star Stage 4 screenshot 07.png|Moving through a long conveyor portion | |||
K64 Shiver Star Stage 4 screenshot 09.png|Spotting strange creatures in tanks in the background | |||
K64 Shiver Star Stage 4 screenshot 10.png|Nearing the end of this area | |||
K64 Shiver Star Stage 4 screenshot 11.png|Battle with Big [[Burnis]] | |||
K64 Shiver Star Stage 4 screenshot 12.png|Approaching one of the most dangerous areas of the factory | |||
K64 Shiver Star Stage 4 screenshot 13.png|Moving through the last of the crushers | |||
K64 Shiver Star Stage 4 screenshot 14.png|Entering the final room, where [[Plugg]] waltzes in | |||
K64 Shiver Star Stage 4 screenshot 15.png|Running from a bulldozing robot | |||
K64 Shiver Star Stage 4 screenshot 16.png|Reaching the end of the factory tour | |||
</gallery> | |||
{{clear}} | {{clear}} | ||
{{ref}} | |||
{{ | {{Navbox-K64}} | ||
Revision as of 19:23, 19 January 2024
| ||||||||||||||
| ||||||||||||||
| ||||||||||||||
|
| ||||||||||||||

- This article is about the stage in Kirby 64: The Crystal Shards. For the Battle Stage in the Kirby Fighters games, see Factory Tour (Battle Stage).
Factory Tour[1] is the fourth stage of Shiver Star in Kirby 64: The Crystal Shards. This stage takes place inside a factory complex with lots of conveyor belts and hazardous machinery.
Overview
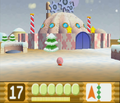
The stage begins in the snow, outside a large manhole with a factory in the background. Kirby can move on by entering the manhole.
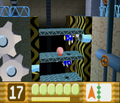
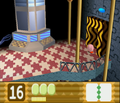
The next area is a winding hallway, which starts from the top with a ladder section, and leads downward, past lots of dangerous obstacles. A conveyor belt leads to the next area.
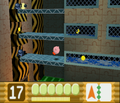
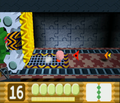
The following long conveyor section is played by King Dedede. He'll have to bust the metal doors open while avoiding being smashed by much larger hammers.
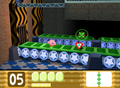
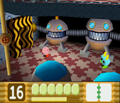
With Kirby back on his own, he'll have to traverse another series of conveyors, in front of some very odd tubes containing various animal subjects.
The following room is a magma chamber with a giant Burnis to fight. When it is defeated, a Crystal Shard appears inside a cage, which Kirby can break open using Spark-Cutter.
The next room consists of a long trot across crushing areas. Kirby will have to be nimble to not get flattened in this hall.
The last room is a series of hallways stacked atop each-other. Kirby will have to ascend them whilst avoiding bulldozing robots. The stage exit at the top is guarded by two Zoos.
Crystal Shard guide
| Crystal Shard locations in Factory Tour | ||||
|---|---|---|---|---|
 Shard 1 |
The first Crystal Shard can be obtained in the first factory area. Kirby needs to use the Stone-Needle ability to break a series of boxes, allowing him to climb up a ladder to get it. | |||
 Shard 2 |
The second shard can be found in a cage in the room where the Mid-Boss Burnis is fought. To break this cage, Kirby has to use the Spark-Cutter ability. | |||
 Shard 3 |
The third shard can be found down at the end of one of the halls with the bulldozers. Kirby will have to be quick to get it and not get crushed. | |||
Enemies, mid-bosses and abilities
| Image | Name | Copy Ability | Image | Name | Copy Ability | Image | Name | Copy Ability |
|---|---|---|---|---|---|---|---|---|
| Bobo | Gordo | N/A | Sawyer | |||||
| Bouncy | None | Hack | Scarfy | N/A | ||||
| Bronto Burt | None | I³ | N/A | Shotzo | N/A | |||
| Burnis | Magoo | Sirkibble | ||||||
| Cairn | Mahall | None | Spark-i | |||||
| Fishbone | Plugg | Turbite | ||||||
| Flora | None | Rockn | Zoos | |||||
| Mid-Bosses | ||||||||
| Big Burnis | ||||||||
Music
- Main article: Studying the Factory
The musical piece used for the majority of this stage has become a reoccurring staple track in the Kirby series. It appears unaltered in Kirby Fighters, Kirby Fighters Deluxe and Kirby Fighters 2, and has had rearrangements in Kirby: Canvas Curse, Kirby Super Star Ultra, Kirby and the Rainbow Curse, Kirby: Planet Robobot, and Kirby Fighters 2.
Trivia
- This stage is the only one in Kirby 64: The Crystal Shards which has its own distinct name.
Gallery
Finding a hatch opening leading into the complex

Climbing down the first ladder
Avoiding the Rockn that fire in this one and only location in the game
Finding time between Shotzo fire to clear out the way to a Crystal Shard
Kirby creating a Power Combo
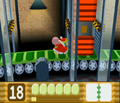
King Dedede steps in to pound down some shutters.
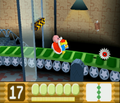
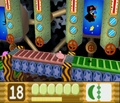
Waiting between strikes from the Squeaky Hammer Machine
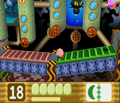
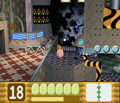
Moving through a long conveyor portion
Spotting strange creatures in tanks in the background
Nearing the end of this area
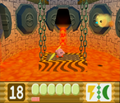
Battle with Big Burnis
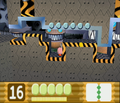
Approaching one of the most dangerous areas of the factory
Moving through the last of the crushers
Entering the final room, where Plugg waltzes in
Running from a bulldozing robot
Reaching the end of the factory tour


References
- ↑ "We resurrected the hammer machines from the Factory Tour stage of Kirby 64: The Crystal Shards, and turned them into the Squeaky Hammer Machines in Kirby Fighters. I thought that the designer was just going to enhance the appearance of the ones from the Nintendo 64 version, so when I saw that they now opened their mouths and let out a belch of steam as they attacked, I was really surprised! I'd say they are even more "striking" than the ones in the N64 game." --Tadashi Kamitake, in a Miiverse post regarding Kirby Fighters (archived link to post)