Rock Star - Stage 2: Difference between revisions
m (Text replacement - "{{Kirby64}}" to "{{Navbox-K64}}") |
m (Text replacement - "\|theme title=\[\[(.*)\]\]" to "|theme title="$1"") |
||
| (9 intermediate revisions by 3 users not shown) | |||
| Line 1: | Line 1: | ||
{{Infobox-K64Stage | {{Infobox-K64Stage | ||
|image=[[File: | |image=[[File:K64 Rock Star Stage 2 screenshot 11.png|300px]] | ||
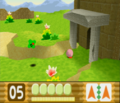
|caption=King Dedede | |caption=[[King Dedede]] gives [[Kirby]] a lift and takes the lead in the ruins | ||
|level=[[Rock Star]] | |level=[[Rock Star]] | ||
|stage=2 | |stage=2 | ||
|midboss={{N}} | |midboss={{N}} | ||
|friend=[[King Dedede]] | |friend=[[King Dedede]] | ||
|theme music=[[File:K64 Ruins Theme Cut.oga]] | |||
|theme title="[[Ruins]]" | |||
|description=Clip of the theme music in Rock Star - Stage 2. | |||
|previous=[[Rock Star - Stage 1|Stage 1]] | |previous=[[Rock Star - Stage 1|Stage 1]] | ||
|next=[[Rock Star - Stage 3|Stage 3]] | |next=[[Rock Star - Stage 3|Stage 3]] | ||
| Line 22: | Line 25: | ||
The next area has Kirby traipsing an exterior wall, lined will all sorts of defenses, including [[Shotzo]]s firing from the background. | The next area has Kirby traipsing an exterior wall, lined will all sorts of defenses, including [[Shotzo]]s firing from the background. | ||
In the next room, [[King Dedede]] joins the fray, and Kirby will jump onto his back. From here on to the end of the stage, | In the next room, [[King Dedede]] joins the fray, and Kirby will jump onto his back. From here on to the end of the stage, the player will control Dedede. He can't fly like Kirby, but his hammer is a potent weapon, and can be used to bust down walls. Dedede will have to navigate this labyrinthine area in order to find the stage exit at the top-right. | ||
===[[Crystal Shard]] | ===Crystal Shard guide=== | ||
{| class="wikitable mw-collapsible mw-collapsed" border=1 cellpadding=2 | |||
!colspan=5|Crystal Shard locations in Rock Star - Stage 2 | |||
|- | |||
!Image | |||
!How to reach | |||
|- | |||
|{{Center|[[File:K64 Rock Star Stage 2 Crystal Shard 1.png|150px]]<br>'''Shard 1'''}} | |||
|The first [[Crystal Shard]] can be found at the base of some ruins in the second area. Kirby will have to cause part of the floor to crumble to reach it. | |||
|- | |||
|{{Center|[[File:K64 Rock Star Stage 2 Crystal Shard 2.png|150px]]<br>'''Shard 2'''}} | |||
|The second shard can be found within the first interior room of the ruins, underneath some platforms. It hangs over a [[bottomless pit]]. | |||
|- | |||
|{{Center|[[File:K64 Rock Star Stage 2 Crystal Shard 3.png|150px]]<br>'''Shard 3'''}} | |||
|The third shard can be found in the labyrinth, where King Dedede gets to play. It is located behind a breakable wall in the upper-left. | |||
|} | |||
==Enemies, mid-bosses and abilities== | ==Enemies, mid-bosses and abilities== | ||
| Line 112: | Line 127: | ||
|- | |- | ||
|} | |} | ||
== Gallery == | |||
<gallery> | |||
K64 Rock Star Stage 2 screenshot 01.png|Kirby is met by the [[Hack]] guarding the pillars | |||
K64 Rock Star Stage 2 screenshot 02.png|Kirby traverses pillars that fall in his vicinity | |||
K64 Rock Star Stage 2 screenshot 03.png|Kirby spots the [[Rocky]] that is looking to drop on him | |||
K64 Rock Star Stage 2 screenshot 04.png|Kirby falls through a fragile floor in the ruins | |||
K64 Rock Star Stage 2 screenshot 05.png|Kirby makes his way to a more substantial structure | |||
K64 Rock Star Stage 2 screenshot 06.png|Kirby dodges the [[Noo]]s' fire | |||
K64 Rock Star Stage 2 screenshot 07.png|Kirby should not linger here for long | |||
K64 Rock Star Stage 2 screenshot 08.png|Moving past the last rising platform | |||
K64 Rock Star Stage 2 screenshot 09.png|Traversing the battlements | |||
K64 Rock Star Stage 2 screenshot 10.png|King Dedede appears and offers Kirby a lift | |||
K64 Rock Star Stage 2 screenshot 12.png|King Dedede reaches the last doorway | |||
</gallery> | |||
{{clear}} | {{clear}} | ||
{{Navbox-K64}} | {{Navbox-K64}} | ||
Revision as of 20:30, 19 January 2024
| ||||||||||||||
| ||||||||||||||
| ||||||||||||||
|
| ||||||||||||||

Rock Star - Stage 2 is the second stage of Rock Star in Kirby 64: The Crystal Shards. This stage takes place in and around extensive stony ruins set in a desert oasis.
Overview
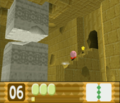
The stage begins out on a green pasture in the desert. Kirby will make his way past white columns which of course have enemies patrolling them. Kirby also happens to have the worst luck in Rock Star, as many of the pillars are primed to fall on him. The path continues for a ways, as Kirby deals with more varieties of foe, until the next area is accessible to the right.
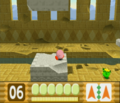
The next area is a large stacked ruin with crumbling floors. At the top, a 1-Up can be collected. The way forward can be found into a much more substantial ruin to the right.
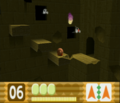
The following area is a dark room where Noo will appear from the walls to harass Kirby. There is no floor beneath the platforms here, so Kirby should move through here carefully.
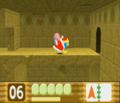
The next area is a large well-lit room with many pools of water inside. Along the way, there are some light tiles in the floor. Kirby should be careful not to linger on these, as they will rise quickly up into the air, and likely crush him on the ceiling.
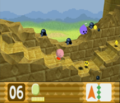
The next area has Kirby traipsing an exterior wall, lined will all sorts of defenses, including Shotzos firing from the background.
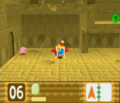
In the next room, King Dedede joins the fray, and Kirby will jump onto his back. From here on to the end of the stage, the player will control Dedede. He can't fly like Kirby, but his hammer is a potent weapon, and can be used to bust down walls. Dedede will have to navigate this labyrinthine area in order to find the stage exit at the top-right.
Crystal Shard guide
| Crystal Shard locations in Rock Star - Stage 2 | ||||
|---|---|---|---|---|
| Image | How to reach | |||
 Shard 1 |
The first Crystal Shard can be found at the base of some ruins in the second area. Kirby will have to cause part of the floor to crumble to reach it. | |||
 Shard 2 |
The second shard can be found within the first interior room of the ruins, underneath some platforms. It hangs over a bottomless pit. | |||
 Shard 3 |
The third shard can be found in the labyrinth, where King Dedede gets to play. It is located behind a breakable wall in the upper-left. | |||
Enemies, mid-bosses and abilities
| Image | Name | Copy Ability | Image | Name | Copy Ability | Image | Name | Copy Ability |
|---|---|---|---|---|---|---|---|---|
| Bobo | Hack | Pupa | N/A | |||||
| Bouncy | None | Kacti | Rocky | |||||
| Bronto Burt | None | Kapar | Sandman | None | ||||
| Flopper | None | Mumbies | N/A | Scarfy | N/A | |||
| Galbo | Noo | N/A | Shotzo | N/A | ||||
| Ghost Knight | Nruff | None | Sparky | |||||
| Glunk | None | Propeller | Turbite |
Gallery
Kirby is met by the Hack guarding the pillars
Kirby traverses pillars that fall in his vicinity
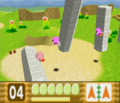
Kirby spots the Rocky that is looking to drop on him
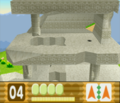
Kirby falls through a fragile floor in the ruins
Kirby makes his way to a more substantial structure
Kirby dodges the Noos' fire
Kirby should not linger here for long
Moving past the last rising platform
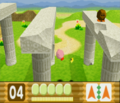
Traversing the battlements
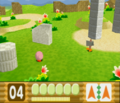
King Dedede appears and offers Kirby a lift
King Dedede reaches the last doorway


