Red Canyon - Stage 5: Difference between revisions
m (Text replacement - "void" to "bottomless pit") |
m (Text replacement - "{{Good}}↵" to "") |
||
| (21 intermediate revisions by 9 users not shown) | |||
| Line 1: | Line 1: | ||
{{Infobox-KDL2Stage | {{Infobox-KDL2Stage | ||
|image= [[File:Red Canyon 5-4.png]] | |image= [[File:KDL2 Red Canyon 5-4.png]] | ||
|caption= [[Kirby]] and [[Rick]] ascend the scrolling vertical rise. | |caption= [[Kirby]] and [[Rick]] ascend the scrolling vertical rise. | ||
|level= [[Red Canyon]] | |level= [[Red Canyon]] | ||
| Line 32: | Line 31: | ||
!Copy Ability | !Copy Ability | ||
|- | |- | ||
|align=center|[[File: | |align=center|[[File:KDL2 Blipper sprite.png]] | ||
|[[Blipper]] | |[[Blipper]] | ||
|style="border-style: solid; border-width: 1px 3px 1px 1px"|None | |style="border-style: solid; border-width: 1px 3px 1px 1px"|None | ||
|align=center|[[File: | |align=center|[[File:KDL2 Icicle sprite.png]] | ||
|[[Icicle]] | |[[Icicle]] | ||
|style="border-style: solid; border-width: 1px 3px 1px 1px"|None | |style="border-style: solid; border-width: 1px 3px 1px 1px"|None | ||
|align=center|[[File: | |align=center|[[File:KDL2 Sir Slippy sprite.png]] | ||
|[[Slippy|Sir Slippy]] | |[[Slippy|Sir Slippy]] | ||
|None | |None | ||
|- | |- | ||
|align=center|[[File: | |align=center|[[File:KDL2 Broom Hatter sprite.png]] | ||
|[[Broom Hatter]] | |[[Broom Hatter]] | ||
|style="border-style: solid; border-width: 1px 3px 1px 1px"|None | |style="border-style: solid; border-width: 1px 3px 1px 1px"|None | ||
|align=center|[[File: | |align=center|[[File:KDL2 Load Kibble sprite.png]] | ||
|[[Sir Kibble|Load Kibble]] | |[[Sir Kibble|Load Kibble]] | ||
|style="border-style: solid; border-width: 1px 3px 1px 1px"|[[Cutter]] | |style="border-style: solid; border-width: 1px 3px 1px 1px"|[[Cutter]] | ||
|align=center|[[File: | |align=center|[[File:KDL2 Sparky sprite.png]] | ||
|[[Sparky]] | |[[Sparky]] | ||
|[[Spark]] | |[[Spark]] | ||
|- | |- | ||
|align=center|[[File: | |align=center|[[File:KDL2 Cappy sprite.png]] | ||
|[[Cappy]] | |[[Cappy]] | ||
|style="border-style: solid; border-width: 1px 3px 1px 1px"|None | |style="border-style: solid; border-width: 1px 3px 1px 1px"|None | ||
|align=center|[[File: | |align=center|[[File:KDL2 Master Pengy sprite.png]] | ||
|[[Pengy|Master Pengy]] | |[[Pengy|Master Pengy]] | ||
|style="border-style: solid; border-width: 1px 3px 1px 1px"|[[Ice]] | |style="border-style: solid; border-width: 1px 3px 1px 1px"|[[Ice]] | ||
|align=center|[[File: | |align=center|[[File:KDL2 Spikey sprite.png]] | ||
|[[Spikey]] | |[[Spikey]] | ||
|[[Needle]] | |[[Needle]] | ||
|- | |- | ||
|align=center|[[File: | |align=center|[[File:KDL2 Floaty the Drifter sprite.png]] | ||
|[[Floaty the Drifter]] | |[[Floaty the Drifter]] | ||
|style="border-style: solid; border-width: 1px 3px 1px 1px"|[[Parasol]] | |style="border-style: solid; border-width: 1px 3px 1px 1px"|[[Parasol]] | ||
|align=center|[[File: | |align=center|[[File:KDL2 Propeller Bomb sprite.png]] | ||
|[[Propeller|Propeller Bomb]] | |[[Propeller|Propeller Bomb]] | ||
|style="border-style: solid; border-width: 1px 3px 1px 1px"|None | |style="border-style: solid; border-width: 1px 3px 1px 1px"|None | ||
|align=center|[[File: | |align=center|[[File:KDL2 Squishy sprite.png]] | ||
|[[Squishy]] | |[[Squishy]] | ||
|None | |None | ||
|- | |- | ||
|align=center|[[File: | |align=center|[[File:KDL2 Glunk sprite.png]] | ||
|[[Glunk]] | |[[Glunk]] | ||
|style="border-style: solid; border-width: 1px 3px 1px 1px"|None | |style="border-style: solid; border-width: 1px 3px 1px 1px"|None | ||
|align=center|[[File: | |align=center|[[File:KDL2 Rocky sprite.png]] | ||
|[[Rocky]] | |[[Rocky]] | ||
|style="border-style: solid; border-width: 1px 3px 1px 1px"|[[Stone]] | |style="border-style: solid; border-width: 1px 3px 1px 1px"|[[Stone]] | ||
|align=center|[[File: | |align=center|[[File:KDL2 Waddle Dee sprite.png]] | ||
|[[Waddle Dee]] | |[[Waddle Dee]] | ||
|None | |None | ||
|- | |- | ||
|align=center|[[File: | |align=center|[[File:KDL2 Gordo sprite.png]] | ||
|[[Gordo]] | |[[Gordo]] | ||
|style="border-style: solid; border-width: 1px 3px 1px 1px"|N/A | |style="border-style: solid; border-width: 1px 3px 1px 1px"|N/A | ||
|align=center|[[File: | |align=center|[[File:KDL2 Scarfy sprite.png]] | ||
|[[Scarfy]] | |[[Scarfy]] | ||
|style="border-style: solid; border-width: 1px 3px 1px 1px"|N/A | |style="border-style: solid; border-width: 1px 3px 1px 1px"|N/A | ||
| Line 92: | Line 91: | ||
==Trivia== | ==Trivia== | ||
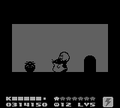
*At the end of the first room, the left door leads to a dark room that requires [[Kine#Combinations|Spark Kine]] to illuminate. When this room becomes bright, an image of a killer whale with the caption '''ORCA''' will show up. | {{Mature|Gallery}} | ||
*In the last room, the star blocks form a crude shape depicting a | *At the end of the first room, the left door leads to a dark room that requires [[Kine#Combinations|Spark Kine]] to illuminate. When this room becomes bright, an image of a killer whale, strikingly similar to [[Acro]], with the caption '''ORCA''' will show up. Said image is actually a hidden door, leading to a small room with some stars and enemies. | ||
*In the last room, the star blocks form a crude shape depicting a happy face, followed by what appear to be the breasts, navel, and groin of an adult woman, which cannot fit a single screen. It is unclear why this formation exists in the stage, and has never been officially acknowledged by [[HAL Laboratory]] or by [[Nintendo]], although it was shown in the ''Nintendo Official Guidebook'' for the game. | |||
<gallery> | |||
KDL2 Red Canyon Stage 5 Section 5.png|Full composite image of the room with the suggestive Star Block formation | |||
KDL2 Red Canyon Stage 5 Section 5 guidebook.jpg|A section from ''Nintendo Official Guidebook'' displaying the room | |||
</gallery> | |||
==Gallery== | ==Gallery== | ||
<gallery> | <gallery> | ||
Red Canyon 5-1.png|Passing beneath the Squishy line | KDL2 Red Canyon 5-1.png|Passing beneath the Squishy line | ||
Red Canyon 5-2.png|The dark ORCA room | KDL2 Red Canyon 5-2.png|The dark ORCA room | ||
Red Canyon 5-3.png|A secret island | KDL2 Orca Sign.png|The lit-up ORCA room | ||
Red Canyon 5-5.png|Ascending the crumbling trail | KDL2 Red Canyon 5-3.png|A secret island | ||
KDL2 Red Canyon 5-5.png|Ascending the crumbling trail | |||
Red Canyon 5-6.png|One more hurdle to pass | KDL2 Rainbow Drop location 5.png|Reaching the Rainbow Drop doorway | ||
Red Canyon 5-7.png|Falling past the formation | KDL2 Red Canyon 5-6.png|One more hurdle to pass | ||
Red Canyon 5-8.png|A pretty location for the stage exit to occupy | KDL2 Red Canyon 5-7.png|Falling past the formation | ||
KDL2 Red Canyon 5-8.png|A pretty location for the stage exit to occupy | |||
</gallery> | </gallery> | ||
{{clear}} | {{clear}} | ||
{{Navbox- | {{Navbox-KDL2}} | ||
Latest revision as of 02:20, 21 September 2022
| ||||||||||||||||
| ||||||||||||||||
|
| ||||||||||||||||

Red Canyon - Stage 5 is the fifth stage of Red Canyon in Kirby's Dream Land 2. The Rainbow Drop can be found in this stage.
Overview[edit]
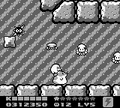
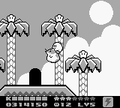
The stage begins in a rocky tunnel leading up and around past Sparkys and other miscreants, in and out of the water. Two doors can be found at the end of the path, right next to each-other. The left door leads to a dark room which contains a Blipper and a Maxim Tomato. This room has a hidden door which leads to an island area filled with Small Stars, which can be illuminated by Spark Kine.
The right door leads to a vertical tunnel which auto-scrolls upward. Kirby will have to be quick to not get caught by the bottomless pit at the bottom as the tunnel is eaten. Along the way, items can be collected, but enemies must also be avoided. At the top, there are two doors, one above the other. The upper door leads to a room containing a Rainbow Drop, which is blocked off by blocks that can only be destroyed with the Spark ability. Even at this, it might be tricky to deal with all the blocks without the help of Rick as well.
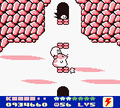
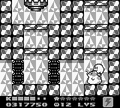
The lower door leads to an area with a long drop past Star Block formations and enemies. The stage exit can be found at the bottom, among rocky outcroppings.
Enemies[edit]
| Sprite | Name | Copy Ability | Sprite | Name | Copy Ability | Sprite | Name | Copy Ability |
|---|---|---|---|---|---|---|---|---|
| Blipper | None | Icicle | None | Sir Slippy | None | |||
| Broom Hatter | None | Load Kibble | Cutter | Sparky | Spark | |||
| Cappy | None | Master Pengy | Ice | Spikey | Needle | |||
| Floaty the Drifter | Parasol | Propeller Bomb | None | Squishy | None | |||
| Glunk | None | Rocky | Stone | Waddle Dee | None | |||
| Gordo | N/A | Scarfy | N/A | |||||
Trivia[edit]
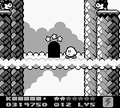
- At the end of the first room, the left door leads to a dark room that requires Spark Kine to illuminate. When this room becomes bright, an image of a killer whale, strikingly similar to Acro, with the caption ORCA will show up. Said image is actually a hidden door, leading to a small room with some stars and enemies.
- In the last room, the star blocks form a crude shape depicting a happy face, followed by what appear to be the breasts, navel, and groin of an adult woman, which cannot fit a single screen. It is unclear why this formation exists in the stage, and has never been officially acknowledged by HAL Laboratory or by Nintendo, although it was shown in the Nintendo Official Guidebook for the game.

Full composite image of the room with the suggestive Star Block formation
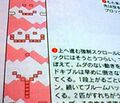
A section from Nintendo Official Guidebook displaying the room

Gallery[edit]
Passing beneath the Squishy line
The dark ORCA room
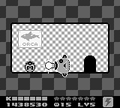
The lit-up ORCA room
A secret island
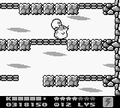
Ascending the crumbling trail
Reaching the Rainbow Drop doorway
One more hurdle to pass
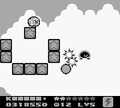
Falling past the formation
A pretty location for the stage exit to occupy


| |||||||||||||||||||||||