Cloudy Park - Stage 4 (Kirby's Dream Land 2): Difference between revisions
m (Text replacement - "{{Navbox-DL2}}" to "{{Navbox-KDL2}}") |
mNo edit summary |
||
| (7 intermediate revisions by 3 users not shown) | |||
| Line 1: | Line 1: | ||
{{DISPLAYTITLE: Cloudy Park - Stage 4 (''Kirby's Dream Land 2'')}}{{Infobox-KDL2Stage | |||
{{Infobox-KDL2Stage | |||
|title=Cloudy Park - Stage 4 | |title=Cloudy Park - Stage 4 | ||
|image=[[File: | |image=[[File:KDL2 Cloudy Park 4-4.png]] | ||
|caption=[[Kirby]] and [[Kine]] work their way up the diagonal tunnel full of [[Gordo]]s. | |caption=[[Kirby]] and [[Kine]] work their way up the diagonal tunnel full of [[Gordo]]s. | ||
|level=[[Cloudy Park (Kirby's Dream Land 2)|Cloudy Park]] | |level=[[Cloudy Park (Kirby's Dream Land 2)|Cloudy Park]] | ||
| Line 36: | Line 35: | ||
!Copy Ability | !Copy Ability | ||
|- | |- | ||
|align=center|[[File: | |align=center|[[File:KDL2 Elieel sprite.png]] | ||
|[[Elieel]] | |[[Elieel]] | ||
|style="border-style: solid; border-width: 1px 3px 1px 1px"|None | |style="border-style: solid; border-width: 1px 3px 1px 1px"|None | ||
|align=center|[[File: | |align=center|[[File:KDL2 Propeller Bomb sprite.png]] | ||
|[[Propeller|Propeller Bomb]] | |[[Propeller|Propeller Bomb]] | ||
|None | |None | ||
|- | |- | ||
|align=center|[[File: | |align=center|[[File:KDL2 Flamer sprite.png]] | ||
|[[Flamer]] | |[[Flamer]] | ||
|style="border-style: solid; border-width: 1px 3px 1px 1px"|[[Burning]] | |style="border-style: solid; border-width: 1px 3px 1px 1px"|[[Burning]] | ||
|align=center|[[File: | |align=center|[[File:KDL2 Rocky sprite.png]] | ||
|[[Rocky]] | |[[Rocky]] | ||
|[[Stone]] | |[[Stone]] | ||
|- | |- | ||
|align=center|[[File: | |align=center|[[File:KDL2 Gordo sprite.png]] | ||
|[[Gordo]] | |[[Gordo]] | ||
|style="border-style: solid; border-width: 1px 3px 1px 1px"|N/A | |style="border-style: solid; border-width: 1px 3px 1px 1px"|N/A | ||
|align=center|[[File: | |align=center|[[File:KDL2 Shotzo sprite.png]] | ||
|[[Shotzo]] | |[[Shotzo]] | ||
|N/A | |N/A | ||
|- | |- | ||
|align=center|[[File: | |align=center|[[File:KDL2 Kabu sprite.png]] | ||
|[[Kabu]] | |[[Kabu]] | ||
|style="border-style: solid; border-width: 1px 3px 1px 1px"|None | |style="border-style: solid; border-width: 1px 3px 1px 1px"|None | ||
|align=center|[[File: | |align=center|[[File:KDL2 Sir Slippy sprite.png]] | ||
|[[Slippy|Sir Slippy]] | |[[Slippy|Sir Slippy]] | ||
|None | |None | ||
|- | |- | ||
|align=center|[[File: | |align=center|[[File:KDL2 Load Kibble sprite.png]] | ||
|[[Sir Kibble|Load Kibble]] | |[[Sir Kibble|Load Kibble]] | ||
|style="border-style: solid; border-width: 1px 3px 1px 1px"|[[Cutter]] | |style="border-style: solid; border-width: 1px 3px 1px 1px"|[[Cutter]] | ||
|align=center|[[File: | |align=center|[[File:KDL2 Sparky sprite.png]] | ||
|[[Sparky]] | |[[Sparky]] | ||
|[[Spark]] | |[[Spark]] | ||
|- | |- | ||
|align=center|[[File: | |align=center|[[File:KDL2 Mumbies sprite.png]] | ||
|[[Mumbies]] | |[[Mumbies]] | ||
|style="border-style: solid; border-width: 1px 3px 1px 1px"|N/A | |style="border-style: solid; border-width: 1px 3px 1px 1px"|N/A | ||
|align=center|[[File: | |align=center|[[File:KDL2 Spikey sprite.png]] | ||
|[[Spikey]] | |[[Spikey]] | ||
|[[Needle]] | |[[Needle]] | ||
| Line 85: | Line 84: | ||
!Copy Ability | !Copy Ability | ||
|- | |- | ||
|align=center|[[File: | |align=center|[[File:KDL2 Captain Stitch sprite.png]] | ||
|[[Captain Stitch]] | |[[Captain Stitch]] | ||
|[[Needle]] | |[[Needle]] | ||
| Line 95: | Line 94: | ||
==Gallery== | ==Gallery== | ||
<gallery> | <gallery> | ||
KDL2 Cloudy Park 4-1.png|Flying through the cloudy ruins | |||
KDL2 Cloudy Park 4-2.png|A tight palace hallway | |||
KDL2 Cloudy Park 4-3.png|Battle with Captain Stitch | |||
KDL2 Cloudy Park 4-5.png|Crossing an underwater diagonal tunnel | |||
KDL2 Cloudy Park 4-6.png|Working upward through barricades | |||
KDL2 Cloudy Park 4-7.png|Some snacks in the pockets to grab | |||
KDL2 Cloudy Park 4-8.png|The stage exit lies at the top. | |||
</gallery> | </gallery> | ||
{{clear}} | {{clear}} | ||
{{Navbox-KDL2}} | {{Navbox-KDL2}} | ||
Latest revision as of 19:26, 21 September 2022
| ||||||||||||||||
| ||||||||||||||||
|
| ||||||||||||||||

- This article is about the stage in Kirby's Dream Land 2. For the stage in Kirby's Dream Land 3, see Cloudy Park - Stage 4 (Kirby's Dream Land 3).
Cloudy Park - Stage 4 is the fourth stage of Cloudy Park in Kirby's Dream Land 2.
Overview[edit]
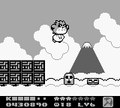
The stage begins atop a platform in a sea of clouds. This leads to a series of hallways where Kirby can use Star Blocks to attack Mumbies that appear. Then the path leads back out to the clouds, past more enemies, to reach the door to the the next area.
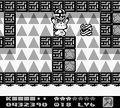
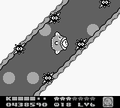
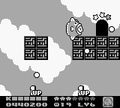
The door leads to a room where Kirby must contend with Captain Stitch. From there, Kirby can free an animal friend and move on to a tunnel of clouds in an auto-scrolling section. This tunnel is filled with Gordos, and has a Rocky guarding the door to the next area.
This area is another cloudy tunnel, this time filled with water. Like before, this is full of Gordos, but this time has a Sir Slippy guarding the door.
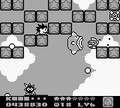
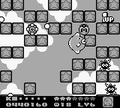
The door leads to an open area with wind sweeping upward, past star blocks and Gordos. Along the way, a large number of 1-Ups can be collected along the blocks, especially if Coo is still with Kirby. The stage exit can be found at the top to the right.
Enemies and Mid-Boss[edit]
|
Gallery[edit]
Flying through the cloudy ruins
A tight palace hallway

Battle with Captain Stitch
Crossing an underwater diagonal tunnel
Working upward through barricades
Some snacks in the pockets to grab
The stage exit lies at the top.


| |||||||||||||||||||||||