Western Outer Wall: Difference between revisions
No edit summary |
|||
| Line 1: | Line 1: | ||
{{Good}} | {{Good}} | ||
{{Infobox-KSAStage | {{Infobox-KSAStage | ||
|image=[[File:Western Outer Wall | |image=[[File:KSA Western Outer Wall entry.jpg|350px]] | ||
|caption='''Western Outer Wall''' on the world map. | |caption='''Western Outer Wall''' on the world map. | ||
|level=[[Fortress of Shadows - Jambastion]] | |level=[[Fortress of Shadows - Jambastion]] | ||
|switch={{Y}} ([[Sector B]]) | |switch={{Y}} ([[Sector B]]) | ||
|formation={{N}} | |formation={{N}} | ||
|midboss=[[Vividria]] | |midboss=[[Vividria]] | ||
|previousstage=[[Longview Corridor]] | |previousstage=[[Longview Corridor]] | ||
|nextstage=[[Inner Sanctum]] | |nextstage=[[Inner Sanctum]] | ||
}} | }} | ||
'''Western Outer Wall''' is the fourth stage of [[Fortress of Shadows - Jambastion]] in ''[[Kirby Star Allies]]''. This stage involves lots of open spaces, moving floors, and crushing hazards. Pressing the [[Big Switch]] in this stage unlocks [[Sector B]]. Completing this stage unlocks [[Inner Sanctum]]. | '''Western Outer Wall''' is the fourth stage of [[Fortress of Shadows - Jambastion]] in ''[[Kirby Star Allies]]''. This stage involves lots of open spaces, moving floors, and crushing hazards. Pressing the [[Big Switch]] in this stage unlocks [[Sector B]]. Completing this stage unlocks [[Inner Sanctum]]. | ||
| Line 26: | Line 24: | ||
===Rare Picture Piece Guide=== | ===Rare Picture Piece Guide=== | ||
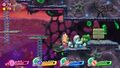
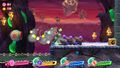
[[File:Western Outer Wall | [[File:KSA Western Outer Wall picture piece.jpg|thumb|right|250px|The piece is uncovered on the split path.]] | ||
During the split conveyor section, one of the switches when pressed causes this picture piece to appear. | During the split conveyor section, one of the switches when pressed causes this picture piece to appear. | ||
| Line 32: | Line 30: | ||
===Big Switch Guide=== | ===Big Switch Guide=== | ||
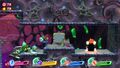
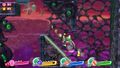
[[File:Western Outer Wall | [[File:KSA Western Outer Wall side area 02.jpg|thumb|right|250px|Kirby makes the leap.]] | ||
Along the hanging ladders, there are two round-trip doors to be accessed. The first involves a [[Mid-Boss]] fight with [[Vividria]]. From there, Kirby needs to use the [[Artist]] power to paint a canvas in front of this door to get a [[Key]]. This key opens the way to the second door, where Kirby will need to jump down using another Key to get to this switch. | Along the hanging ladders, there are two round-trip doors to be accessed. The first involves a [[Mid-Boss]] fight with [[Vividria]]. From there, Kirby needs to use the [[Artist]] power to paint a canvas in front of this door to get a [[Key]]. This key opens the way to the second door, where Kirby will need to jump down using another Key to get to this switch. | ||
| Line 80: | Line 78: | ||
==Gallery== | ==Gallery== | ||
<gallery> | <gallery> | ||
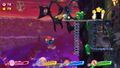
Western Outer Wall | KSA Western Outer Wall 01.jpg|The first steps up the shifting belts of platforms | ||
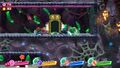
Western Outer Wall | KSA Western Outer Wall 02.jpg|Reaching the door at the top | ||
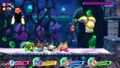
Western Outer Wall | KSA Western Outer Wall 03.jpg|Finding an alcove with a round-trip door and a canvas | ||
KSA Western Outer Wall 04.jpg|Returning from the alcove and obtaining a key from the canvas | |||
KSA Western Outer Wall 05.jpg|Opening the way to the split path | |||
KSA Western Outer Wall 06.jpg|Blasting through some crushing hazards | |||
KSA Western Outer Wall 07.jpg|The final launch toward the stage exit | |||
</gallery> | |||
===Side areas === | |||
<gallery> | |||
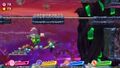
KSA Western Outer Wall side area 01.jpg|Battle with Vividria once again | |||
</gallery> | </gallery> | ||
Revision as of 21:48, 3 January 2021
| ||||||||||||||
| ||||||||||||||
|
| ||||||||||||||

Western Outer Wall is the fourth stage of Fortress of Shadows - Jambastion in Kirby Star Allies. This stage involves lots of open spaces, moving floors, and crushing hazards. Pressing the Big Switch in this stage unlocks Sector B. Completing this stage unlocks Inner Sanctum.
Overview
The stage begins at the base of several moving floors leading upward, with enemies and spikes on several of them.
From there, Kirby and his friends will need to scale some ladder hanging precariously over a bottomless pit. The door at the top requires two allies to open.
The next path is a split one, on two different conveyors. The path continues to scroll until eventually joining up at the end.
In the last area, Kirby and his allies will need to blast along cannon paths to reach the top, while avoiding getting crushed by the moving apparatus.
Rare Picture Piece Guide

During the split conveyor section, one of the switches when pressed causes this picture piece to appear.
Big Switch Guide

Along the hanging ladders, there are two round-trip doors to be accessed. The first involves a Mid-Boss fight with Vividria. From there, Kirby needs to use the Artist power to paint a canvas in front of this door to get a Key. This key opens the way to the second door, where Kirby will need to jump down using another Key to get to this switch.
Enemies, Bosses, and Abilities
| Regular Enemies | Bosses & Mid-Bosses | ||||
|---|---|---|---|---|---|
|
|
| ||||
| Abilities | Friend Actions | ||||
|
|
|
Gallery
The first steps up the shifting belts of platforms
Reaching the door at the top
Finding an alcove with a round-trip door and a canvas
Returning from the alcove and obtaining a key from the canvas
Opening the way to the split path
Blasting through some crushing hazards
The final launch toward the stage exit


Side areas
Battle with Vividria once again

Names in other languages
| Language | Name | Meaning |
|---|---|---|
| German | Westlicher Wall | Western Wall |