Course 3 - Hole 4: Difference between revisions
mNo edit summary |
mNo edit summary |
||
| Line 11: | Line 11: | ||
== Summary == | == Summary == | ||
This hole consists of a long narrow pathway, with symmetrical changes in elevation along its length before reaching a short wall on the furthest left side. In the basin on the left is a [[Squishy]] surrounded by two spinning [[Turntable]]s which can be | This hole consists of a long narrow pathway, with symmetrical changes in elevation along its length before reaching a short wall on the furthest left side. In the basin on the left is a [[Squishy]] surrounded by two spinning [[Turntable]]s which can be stopped using a switch all the way on the right of the board, next to two [[Kabu]]. [[Kirby]] starts to the left of this switch in front of a small hill lined with a [[Conveyor Belt]] flanked by two [[Kick Panel]]s, where [[Kracko]] waits at the top. Down the slope to the left from there - prior to a brief rise leading to Squishy's location - a [[Gaspar]] floats high above the floor. A couple conveyor belts also line the sides of the board at this point. Furthest left, close to a short wall marking the end of the board, two [[Gordo]]s lay in wait, though Kirby should have no reason to go near them. | ||
=== Extra Game === | === Extra Game === | ||
| Line 105: | Line 105: | ||
|[[Turntable]] | |[[Turntable]] | ||
|- | |- | ||
|{{center|[[File:KDC Turntable | |{{center|[[File:KDC Turntable Stop Switch sprite.png]]}} | ||
|[[Turntable]] | |[[Turntable]] Stop Switch | ||
|} | |} | ||
Revision as of 17:50, 18 January 2021
| ||||||||||
| ||||||||||
|
| ||||||||||
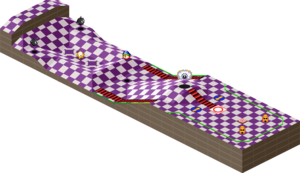
Course 3 - Hole 4 is the fourth hole of Course 3 in Kirby's Dream Course. It is a long and straight path which involves lots of slopes, along with Conveyor Belts and Turntables.
Summary
This hole consists of a long narrow pathway, with symmetrical changes in elevation along its length before reaching a short wall on the furthest left side. In the basin on the left is a Squishy surrounded by two spinning Turntables which can be stopped using a switch all the way on the right of the board, next to two Kabu. Kirby starts to the left of this switch in front of a small hill lined with a Conveyor Belt flanked by two Kick Panels, where Kracko waits at the top. Down the slope to the left from there - prior to a brief rise leading to Squishy's location - a Gaspar floats high above the floor. A couple conveyor belts also line the sides of the board at this point. Furthest left, close to a short wall marking the end of the board, two Gordos lay in wait, though Kirby should have no reason to go near them.
Extra Game
In the Extra Game, the Kabu are replaced with Squishys, and Kracko is replaced with Wheelie. Gaspar has been removed, the Squishy in the left basin is replaced with Rocky, and a Kabu is placed up the slope further left. Aside from that, the board is the same, and so is the strategy for the most part.
Enemies
Obstacles
| Sprite | Obstacle |
|---|---|
| Bumper | |
| Conveyor Belt | |
| Kick Panel | |
| Turntable | |
| Turntable Stop Switch |
