Course 6 - Hole 7: Difference between revisions
No edit summary |
m (→Gallery) |
||
| Line 85: | Line 85: | ||
<gallery> | <gallery> | ||
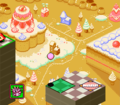
KDC Course 6 Hole 7 screenshot 01.png|Making the bounce | KDC Course 6 Hole 7 screenshot 01.png|Making the bounce | ||
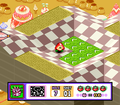
KDC Course 6 Hole 7 screenshot 02.png|Scrolling to the Waddle Dee who will | KDC Course 6 Hole 7 screenshot 02.png|Scrolling to the Waddle Dee who will shortly be the cup | ||
</gallery> | </gallery> | ||
Revision as of 22:46, 24 January 2021
| ||||||||||
| ||||||||||
|
| ||||||||||


Course 6 - Hole 7 is the seventh hole of Course 6 in Kirby's Dream Course. It features three isolated platforms that must be jumped between.
Summary
Hole 7 features a board split into three separate platforms. The two on the right are very small, serving as little more than stepping stones to the main area on the left. Kirby starts on the rightmost platform, with very little wiggle room. He will need to bounce over to the platform directly to the left, which is much lower in elevation. On that platform is a Trampoline and a Warp Panel. Either can be used, but the Warp Panel may cause an issue if Kirby overshoots, as it leads to the far left end of the left platform and may cause Kirby to bounce OB. The leftmost platform is fairly large, but heavily sloped and covered in lawns and sand bunkers. Two Waddle Dees can be found here.
Extra Game
In the Extra Game, the two Waddle Dees are replaced with two Starmen and a UFO. The rest of the board is the same.
Enemies
Obstacles
| Sprite | Obstacle |
|---|---|
| Bumper | |
| Bunker | |
| Lawn | |
| Trampoline | |
| Warp Panel |
Gallery
Making the bounce
Scrolling to the Waddle Dee who will shortly be the cup

