From WiKirby, your independent source of Kirby knowledge.

|
It has been requested that image(s) be uploaded and added to this article. Remove this notice once the image(s) have been uploaded and applied.
screenshots
|
| Course 2 - Hole 3
|
|
| Details
|
| Course
|
Course 2
|
| Copy Abilities
|
None
|
|
|
|
|
|
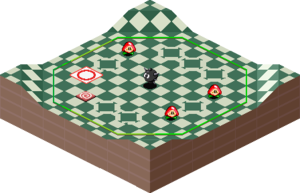
Course 2 - Hole 3 is the third hole of Course 2 in Kirby's Dream Course. It takes place in a small flat area and introduces Turntables.
Summary
The hole features a small square board with an area completely bordered by bumpers and featuring completely flat topography therein. Kirby starts on the left-hand side within this area, and three Waddle Dees can be seen circling around a Gordo in the middle, along with seven Turntables and a switch that can deactivate them.
In the Extra Game, Kirby starts in the middle of the board, replacing the Gordo that was there previously. His original starting point is now occupied by a fourth Waddle Dee. Aside from that, the board is the same.
Enemies
Obstacles
Template:Navbox-KDCrs
